MDN Web Docs has been documenting the web platform for over twelve years and is now a cross-platform effort with contributions and an Advisory Board with members from Google, Microsoft and Samsung as well as those representing Firefox. Something that is fundamental to MDN is that it is a huge community effort, with the web community helping to create and maintain the documentation. In this article, I’m going to give you some pointers as to the places where you can help contribute to MDN and exactly how to do so.
If you haven’t contributed to an open source project before, MDN is a brilliant place to start. Skills needed range from copyediting, translating from English to other languages, HTML and CSS skills for creating Interactive Examples, or an interest in browser compatibility for updating Browser Compatibility data. What you don’t need to do is to write a whole lot of code to contribute. It’s very straightforward, and an excellent way to give back to the community if you have ever found these docs useful.
Contributing To The Documentation Pages
The first place you might want to contribute is to the MDN docs themselves. MDN is a wiki, so you can log in and start to help by correcting or adding to any of the documentation for CSS, HTML, JavaScript or any of the other parts of the web platform covered by MDN.
To start editing, you need to log in using GitHub. As is usual with a wiki, any editors of a page are listed, and this section will use your GitHub username. If you look at any of the pages on MDN contributors are listed at the bottom of the page, the below image shows the current contributors to the page on CSS Grid Layout.

What Might You Edit?
Things that you might consider as an editor are fixing obvious typos and grammatical errors. If you are a good proofreader and copyeditor, then you may well be able to improve the readability of the docs by fixing any spelling or other errors that you spot.
You might also spot a technical error, or somewhere the specs have changed and where an update or clarification would be useful. With the huge range of web platform features covered by MDN and the rate of change, it is very easy for things to get out of date, if you spot something - fix it!
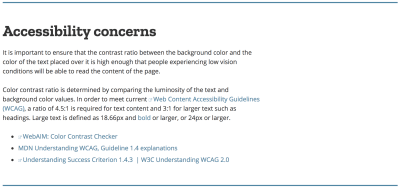
You may be able to use some specific knowledge you have to add additional information. For example, Eric Bailey has been adding Accessibility Concerns sections to many pages. This is a brilliant effort to highlight the things we should be thinking about when using a certain thing.

Another place you could add to a page is in adding “See also” links. These could be links to other parts of MDN, or to external resources. When adding external resources, these should be highly relevant to the property, element or technique being described by that document. A good candidate would be a tutorial which demonstrates how to use that feature, something which would give a reader searching for information a valuable next step.
How To Edit A Document?
Once you are logged in you will see a link to Edit on pages in MDN, clicking this will take you into a WYSIWYG editor for editing content. Your first few edits are likely to be small changes, in which case you should be able to follow your nose and edit the text. If you are making extensive edits, then it would be worth taking a look at the style guide first. There is also a guide to using the WYSIWYG Editor.
After making your edit, you can Preview and then Publish. Before publishing it is a good idea to explain what you added and why using the Revision Comment field.

Language Translations
Those of us with English as a first language are incredibly fortunate when it comes to information on the web, being able to get pretty much all of the information that we could ever want in our own language. If you are able to translate English language pages into other languages, then you can help to translate MDN Web Docs, making all of this information available to more people.

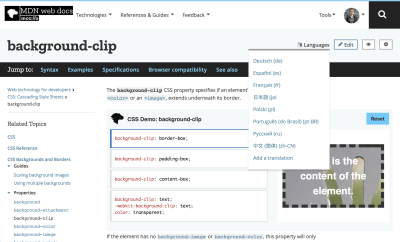
If you click on the language icon on any page, you can see which languages that information has been translated into, and you can add your own translations following the information on the page Translating MDN Pages.
Interactive Examples
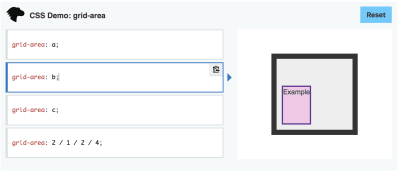
The Interactive Examples on MDN, are the examples that you will see at the top of many pages of MDN, such as this one for the grid-area property.

These examples allow visitors to MDN to try out various values for CSS properties or try out a JavaScript function, right there on MDN without needing to head into a development environment to do so. The project to add these examples has been in progress for around a year, you can read about the project and progress to date in the post Bringing Interactive Examples to MDN.
The content for these Interactive Examples is held in the Interactive Examples GitHub repository. For example, if you wanted to locate the example for grid-area, you would find it in that repo under live-examples/css-examples/grid. Under that folder, you will find two files for grid-area, an HTML and a CSS file.
<section id="example-choice-list" class="example-choice-list large" data-property="grid-area">
    <div class="example-choice" initial-choice="true">
        <pre><code class="language-css">grid-area: a;</code></pre>
        <button type="button" class="copy hidden" aria-hidden="true">
        <span class="visually-hidden">Copy to Clipboard</span>
        </button>
    </div>

    <div class="example-choice">
        <pre><code class="language-css">grid-area: b;</code></pre>
        <button type="button" class="copy hidden" aria-hidden="true">
        <span class="visually-hidden">Copy to Clipboard</span>
        </button>
    </div>

    <div class="example-choice">
        <pre><code class="language-css">grid-area: c;</code></pre>
        <button type="button" class="copy hidden" aria-hidden="true">
        <span class="visually-hidden">Copy to Clipboard</span>
        </button>
    </div>

    <div class="example-choice">
        <pre><code class="language-css">grid-area: 2 / 1 / 2 / 4;</code></pre>
        <button type="button" class="copy hidden" aria-hidden="true">
        <span class="visually-hidden">Copy to Clipboard</span>
        </button>
    </div>
</section>

<div id="output" class="output large hidden">
    <section id="default-example" class="default-example">
        <div class="example-container">
            <div id="example-element" class="transition-all">Example</div>
        </div>
    </section>
</div>
.example-container {
    background-color: #eee;
    border: .75em solid;
    padding: .75em;
    display: grid;
    grid-template-columns: 1fr 1fr 1fr;
    grid-template-rows: repeat(3, minmax(40px, auto));
    grid-template-areas:
    "a a a"
    "b c c"
    "b c c";
    grid-gap: 10px;
    width: 200px;
    }

    .example-container > div {
    background-color: rgba(0, 0, 255, 0.2);
    border: 3px solid blue;
    }

    example-element {
    background-color: rgba(255, 0, 200, 0.2);
    border: 3px solid rebeccapurple;
    }
An Interactive Example is just a small demo, which uses some standard classes and IDs in order that the framework can pick up the example and make it interactive, where the values can be changed by a visitor to the page who wants to quickly see how it works. To add or edit an Interactive Example, first fork the Interactive Examples repo, clone it to your machine and follow the instructions on the Contributing page to install the required packages from npm and be able to build and test examples locally.
Then create a branch and edit or create your new example. Once you are happy with it, send a Pull Request to the Interactive Examples repo to ask for your example to be reviewed. In order to keep the examples consistent, reviews are fairly nitpicky but should point out the changes you need to make in a clear way, so you can update your example and have it approved, merged and added to an MDN page.

With pretty much all of CSS now covered (in addition to the JavaScript examples), MDN is now looking for help to build the HTML examples. There are instructions as to how to get started in a post on the MDN Discourse Forum. Check out that post as it gives links to a Google doc that you can use to indicate that you are working on a particular example, as well as some other useful information.
The Interactive Examples are incredibly useful for people exploring the web platform, so adding to the project is an excellent way to contribute. Contributing to CSS or HTML examples requires knowledge of CSS and HTML, plus the ability to think up a clear demonstration. This last point is often the hardest part, I’ve created a lot of CSS Interactive Examples and spent more time thinking up the best example for each property than I do actually writing the code.
Browser Compat Data
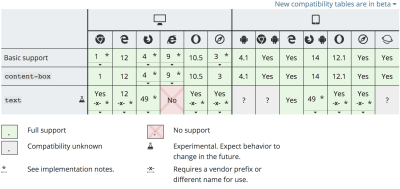
Fairly recently the browser compatibility data listed on MDN Pages has begun to be updated through the Browser Compatibility Project. This project is developing browser compat data in JSON format, which can display the compatibility tables on MDN but also be useful data for other purposes.


The Browser Compatibility Data is on GitHub, and if you find a page that has incorrect information or is still using the old tables, you can submit a Pull Request. The repository contains contribution information, however, the simplest way to start is to edit an existing example. I recently updated the information for the CSS shape-outside property. The property already had some data in the new format, but it was incomplete and incorrect.
To edit this data, I first forked the Browser Compat Data so that I had my own fork. I then cloned that to my machine and created a new branch to make my changes in.
Once I had my new branch, I found the JSON file for shape-outside and was able to make my edits. I already had a good idea about browser support for the property; I also used the live example on the shape-outside MDN page to test to see support when I wasn’t sure. Therefore making the edits was a case of working through the file, checking the version numbers listed for support of the property and updating those which were incorrect.
As the file is in JSON format is pretty straightforward to edit in any text editor. The .editorconfig file explains the simple formatting rules for these documents. There are also some helpful tips in this checklist.
Once you have made your edits, you can commit your changes, push your branch to your fork and then make a Pull Request to the Browser Compat Data repository. It’s likely that, as with the live examples, the reviewer will have some changes for you to make. In my PR for the Shapes data I had a few errors in how I had flagged the data and needed to make some changes to links. These were simple to make, and then my PR was merged.
Get Started
You can get started simply by picking something to add to and starting work on it in many cases. If you have any questions or need some help with any of this, then the MDN Discourse forum is a good place to post. MDN is the place I go to look up information, the place I send new developers and experienced developers alike, and its strength is the fact that we can all work to make it better.
If you have never made a Pull Request on a project before, it is a very friendly place to make that first PR and, as I hope I have shown, there are ways to contribute that don’t require writing any code at all. A very valuable skill for any documentation project is that of writing, editing and translating as these skills can help to make technical documentation easier to read and accessible to more people around the world.
 (il)
(il)


