Everyone has an idea for a mobile app, from your mom to the guy you met in line at the grocery store. You might even be one of those people, if you are reading this tutorial. Building your own app really gives you the ability to create anything you can imagine. For some people, the idea is the easy part; when it comes to making it a reality, they have no clue where to start.
In this tutorial, we are going to look at one page of an existing app and learn how to get the design into Xcode. The design for this app was done using an app called Sketch. Sketch allows you to design anything from websites to mobile apps. It is my preference for designing mobile apps.
When you are building an app, do not jump directly into Xcode. You’ll want to work on the app’s look and feel before doing any code. This will enable you to figure out exactly what your app will do before you start coding. Fixing a design is easier than fixing code. Once you are done with the design, you will then match it in Xcode. Here are a few other options that you might want to look at if you are interested in designing an app:
- Gravit: free
- Affinity Designer: $49
- Sketch: $99 (free trial)
- X: 0
- Y: 607
- Width: 375
- Height: 60
- X: 0
- Y: 0
- Width: 375
- Height: 60
- X: 8
- Y: 8
- Width: 359
- Height: 44
- Type: System
- Title: Change
Buttonto “ADD TO CART” in the text field above “Font.” - Font: Click the font icon, then “Custom,” and choose Avenir Next Condensed, Bold 24.0
- Text color: White
- Background:
addtocart-bg - Left: 0
- Right: 0
- Bottom: 0
- Height: 60 (make sure box is checked)
- X: 0
- Y: 0
- Width: 375
- Height: 607
- Cell 1: 540
- Cell 2: 290
- Cells 3 and 4: leave as the default
- Cell 5: 235
- X: 15
- Y: 308
- Width: 345
- Height: 28
- Text: plain
- Under text: change “Label” to “CONVERSE CHUCK TAYLOR ALL STAR HIGH TOP”
- Color: light gray
- Font: Click font icon, then “Custom,” and choose Avenir Next Condensed, Medium 20.0
- X: 15
- Y: 337
- Width: 54
- Height: 28
- Text: plain
- Under text: change “Label” to
$55 - Color: black
- Font: Avenir Next Condensed, Bold 20.0
- X: 0
- Y: 0
- Width: 375
- Height: 300
- Image:
red-chucks - X: 15
- Y: 474
- Width: 77
- Height: 50
- Image:
red-chuck-thumbs - X: 100
- Y: 474
- Width: 77
- Height: 50
- Image:
pink-chuck-thumbs - X: 185
- Y: 474
- Width: 77
- Height: 50
- Image:
yellow-chuck-thumbs - X: 270
- Y: 474
- Width: 77
- Height: 50
- Image:
blue-chuck-thumbs - X: 15
- Y: 374
- Width: 40
- Height: 40
- X: 0
- Y: 0
- Width: 40
- Height: 40
- Image:
outstock-bg - X: 0
- Y: 0
- Width: 40
- Height: 40
- Text: plain
- Under text: change “Label” to
8 - Color: light gray
- Font: System 17.0
- Alignment: center (icon)
- X: 0
- Y: 0
- Width: 40
- Height: 40
- Image:
slash - Axis: horizontal
- Alignment: fill
- Distribution: equal spacing
- Spacing: 10
- Axis: vertical
- Alignment: leading
- Distribution: equal spacing
- Spacing: 7
- Top: 9
- Right: 15
- Left: 15
- Height: 87
- Constrain to Margins: unchecked
- Right: 0
- Left: 0
- Height: 40
- Constrain to Margins: unchecked
- X: 18
- Y: 7
- Width: 109
- Height: 21
- Text: plain
- Under text: change “Label” to “DESCRIPTION”
- Font: Avenir Next Condensed, Demi Bold 14
- X: 13
- Y: 22
- Width: 362
- Height: 261
- Text: plain
- For the text, enter the following:
- Font: Avenir Next Condensed, Ultra Light 17
- Top: 7
- Left: 18
- Width: 109
- Height: 21
- Top: 22
- Right: 0
- Bottom: 6.5
- Left: 13
- Constrain to Margins: unchecked
- X: 18
- Y: 10
- Width: 109
- Height: 21
- Text: plain
- Font: Avenir Next Condensed, Demi Bold 14
- Axis: horizontal
- Distribution: equal spacing
- Spacing: 10
- X: 18
- Y: 0
- X: 0
- Y: 0
- Width: 375
- Height: 172
- X: 0
- Y: 33
- Width: 375
- Height: 172
- X: 18
- Y: 3
- Width: 116
- Height: 21
- Text: plain
- Under text: change “Label” to “YOU MIGHT ALSO LIKE”
- Font: Avenir Next Condensed, Demi Bold 14
- Top: 3
- Left: 18
- Width: 116
- Height: 21
- Top: 0
- Right: 0
- Left: 0
- Height: 172 (should be checked)
- Horizontally in container: 0 (should be checked)
- Top: 0
- Right: 0
- Left: 18
- Bottom: 0
- Top: 0
- Right: 0
- Left: 0
- Bottom: 0
- Top: 0
- Right: -8
- Left: 0
- Height: 172 (should be checked)
Moving From Photoshop And Illustrator To Sketch
Unlike Photoshop, Sketch was made for UI design right from the start; UI wasn’t an afterthought. If you’re a UI designer and are still using mostly Photoshop or Illustrator, it may be time to consider using Sketch instead. Read a related article →
Exploring The Design
One of the first things I like to do when I see an app is to review the design and see if I can figure out how they built it. Let’s first look at the design of this page:
As you can see, this is a product detail page, which might be similar to others you have seen in e-commerce apps. What I most like about this product detail page, for learning purposes, is that it contains a lot of different user interface (UI) components. Designing a UI like this enables you to explore Xcode in a meaningful way and to tackle many of the most common components you would encounter when designing an app. The following diagram breaks down the different UI components of our design page:
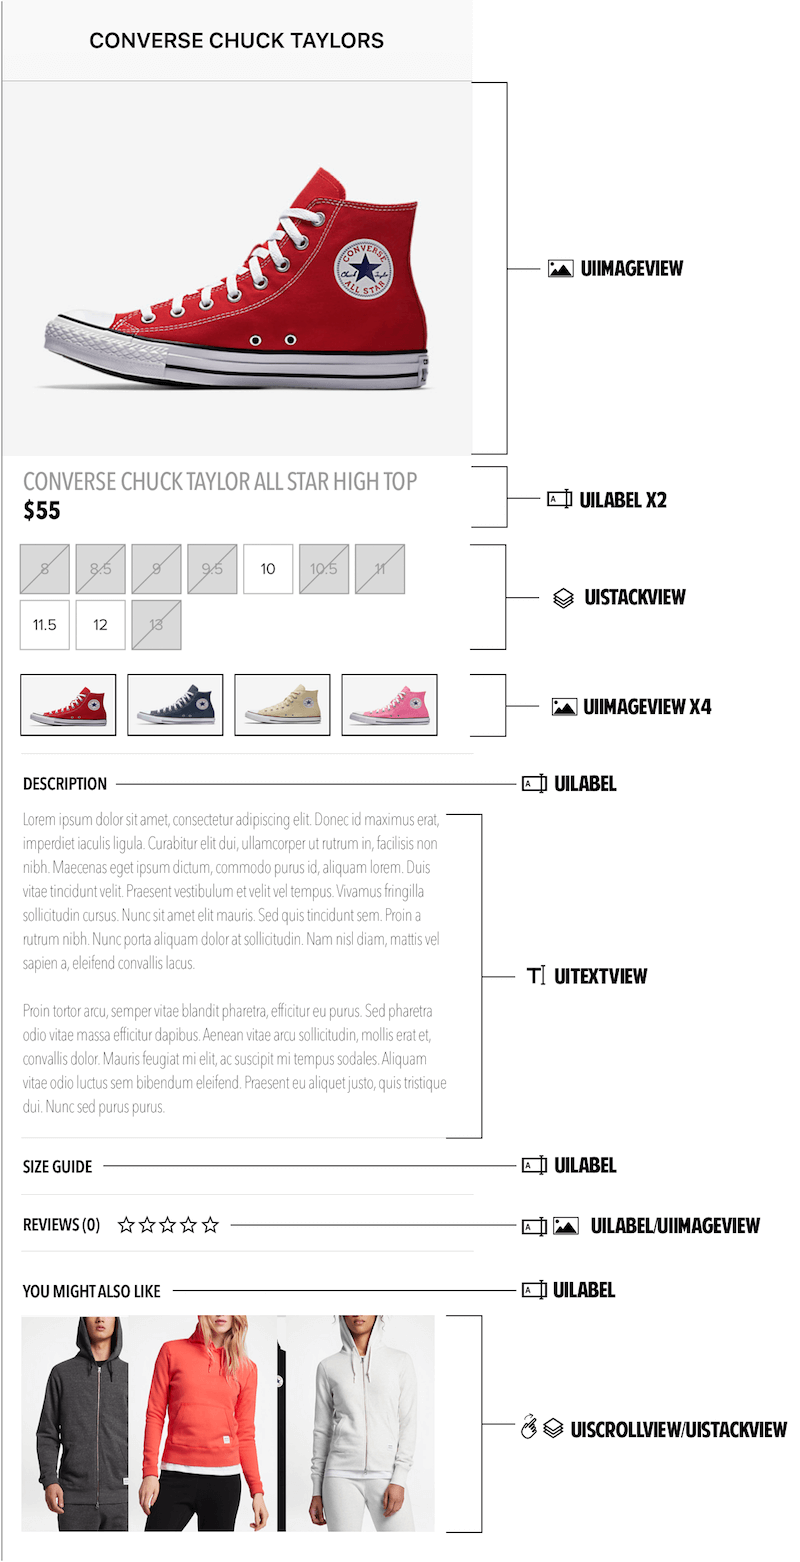
Let’s better understand each of these elements.
UIImageView
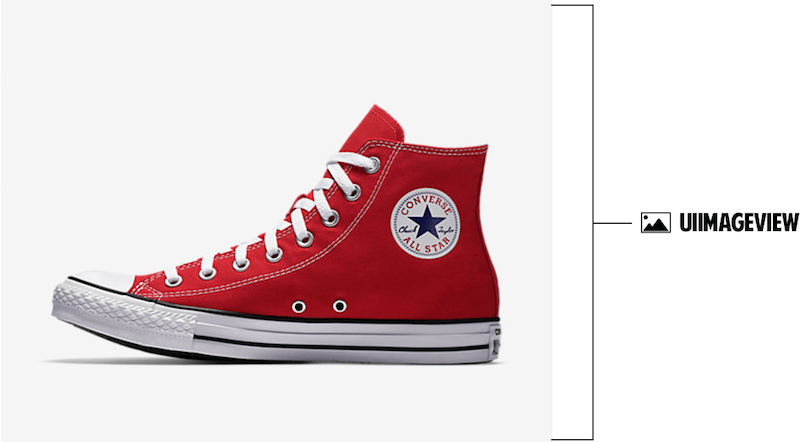
A UIImageView is a component that allows you to show images.
UILabel

A UILabel is typically used to display text on a single line, although you can set it up to display multiple lines of text. This component is not interactive.
UIStackView

A UIStackView allows you to stack components vertically and horizontally. For example, if you wanted to display three buttons spaced 10 pixels apart, you could use a UIStackView to make it easier.
UITextView
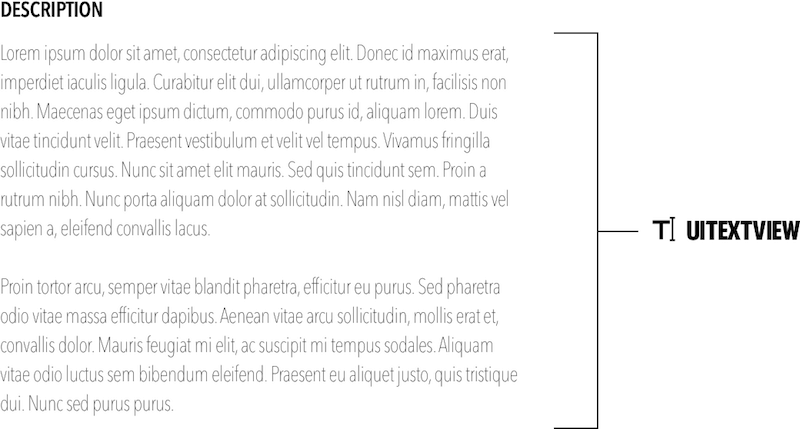
A UITextView is typically used to display multiple lines of text. Users can interact with this component by editing the text. If we simply wanted to display text, with no ability to edit, we would normally use a UILabel. However, for this tutorial, I want to introduce you to both the UILabel and UITextView components.
UIScrollView
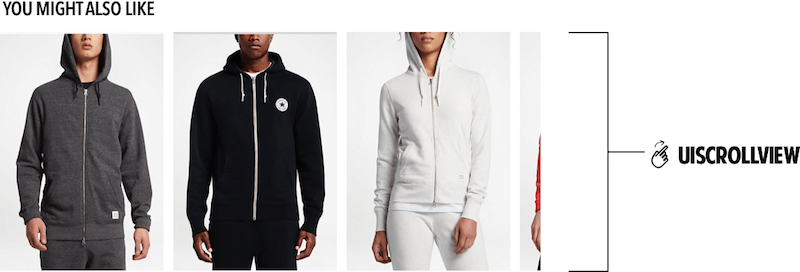
A UIScrollView allows you to add multiple components that scroll either horizontally or vertically.
Designing In Xcode
Before we begin designing our app page in Xcode, I want to introduce you to two important aspects of Xcode, storyboards and table views. Let’s start with storyboards.
What Are Storyboards, And Why Do We Use Them?
A storyboard is a tool in Xcode that enables us to set up our visual elements. These elements, our UI components, can be dragged and dropped into place without the need for code. If you are a visual person, you will most likely feel very comfortable with storyboards.
In addition to not having to code, I love storyboarding instead of coding all of the elements because it makes it easy for another person to understand what is going on in the project and to step in if need be. Storyboarding also makes it easier for you to step away from a project for a period of time and then come back to it. If everything is in the storyboard, it will be relatively easy to figure out what you did and where you left off, as well as to make any visual changes you desire. Plenty of people prefer coding to storyboarding, but in this tutorial I am going to show you the benefits of storyboards.
To get familiar with storyboarding, let’s review the five basic areas of Xcode.
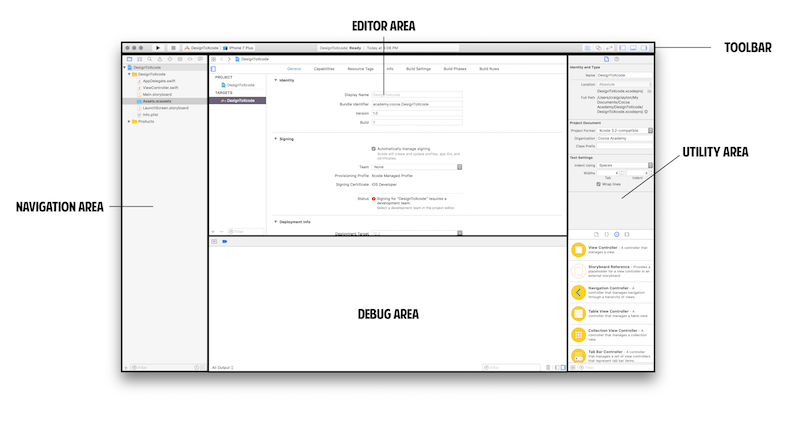
Navigation Area
The navigation area shows all of your files (such as Main.storyboard, where you design your visual elements) and Assets.xcassets (the blue folder), which holds your app’s icon and images.
Editor Area
The editor area is where you will work. Both storyboard and Swift files open in this area.
Toolbar
On the left side of the toolbar, you will find controls to launch your app using a simulator. On the far right of the toolbar, you will find icons that allow you to toggle different panels to be either shown or hidden.
Utility Area
When inside of a storyboard file, you will use the utility area to make changes to UI components. This area will change depending on the screen with which you are currently interacting.
Debug Area
The debug area is very useful when you are coding. It shows issues with your code that you need to address. In this tutorial, we will not be using this area because we will not be coding, focusing instead on storyboarding.
Now that you are familiar with storyboards, let’s discuss table views.
What Is A Table View?
As you can see above, our page is one in which the user scrolls down to view more information. One of the great features of iOS is that you can use a table view to scroll long pages without having to code anything. A table view is a way to list data in one column that can be vertically scrolled. A table view can have sections, and each section can have a header. There are two types of table views: dynamic and static.
Dynamic table views use code, and they typically have variable numbers of rows and/or sections based on some data. Dynamic table views are great for mailing and contact lists, which can change over time.
Static table views do not use code and instead are set up using storyboards in Xcode. They are not dynamic, and they have a finite number of rows or sections based on certain data. Static table views are good to use for things such as forms and detail pages that will not change.
For the product detail page in this tutorial, we will use static table views, which give us the flexibility to have complex layouts without having to write a lot of code. This solution will not work for every situation, but it is a good place to start.
Setting Up the Basic Structure
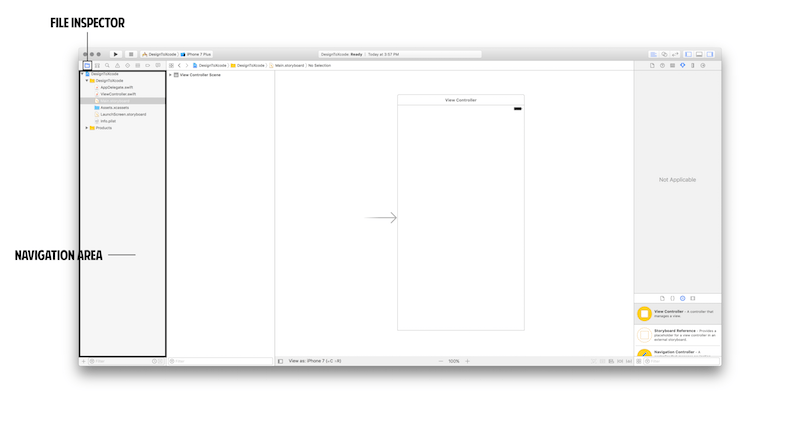
Let’s set up the bare bones of our basic structure; then, we can start entering the details of our page. I have already created a starter project for you, where you will find all of the assets needed to complete this tutorial. Download the files, and then open the file named DesignToXcode.xcodeproj in the file inspector in the navigation area:
Next, select the Main.storyboard file. You should see the following:
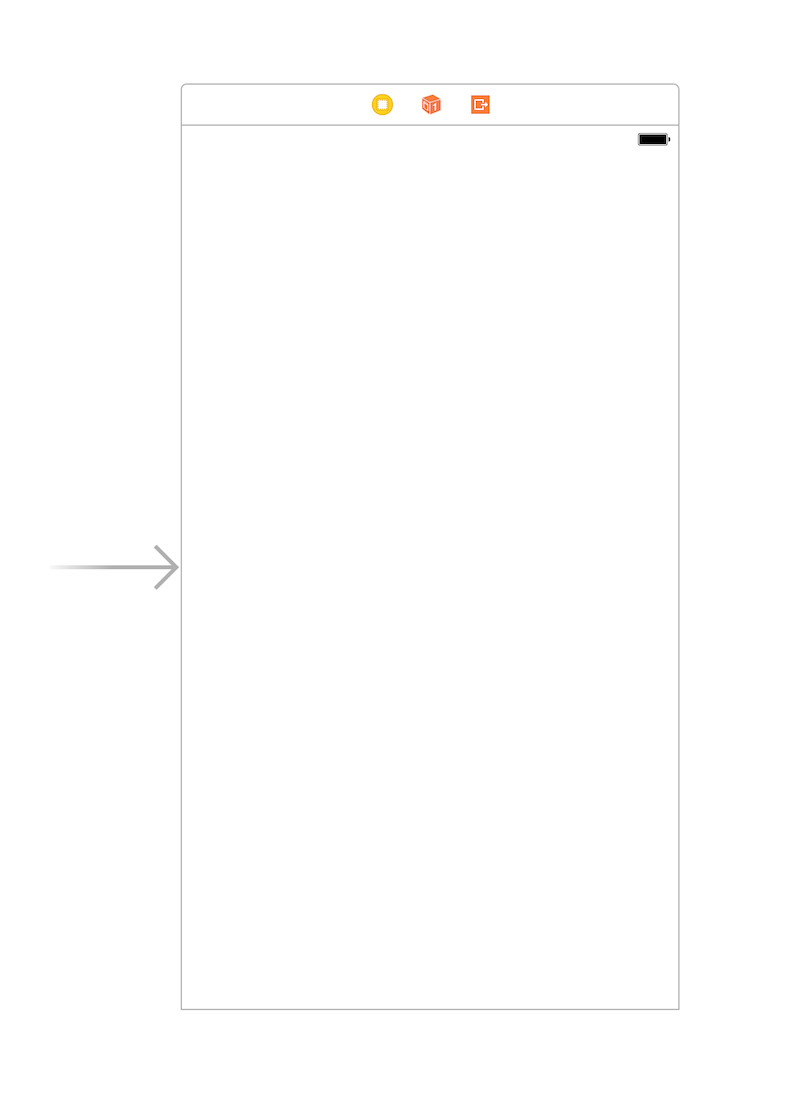
As the image above shows, our storyboard contains a single view controller on the scene. Nothing else has been created, because we will create the rest together. This view controller is where we will add the UI components that we discussed.
Looking at our page design, we need to add a navigation bar at the top, which will automatically add a label and two placeholders for buttons. We will eventually update the label title to CONVERSE CHUCK TAYLORS and leave the button placeholders alone.
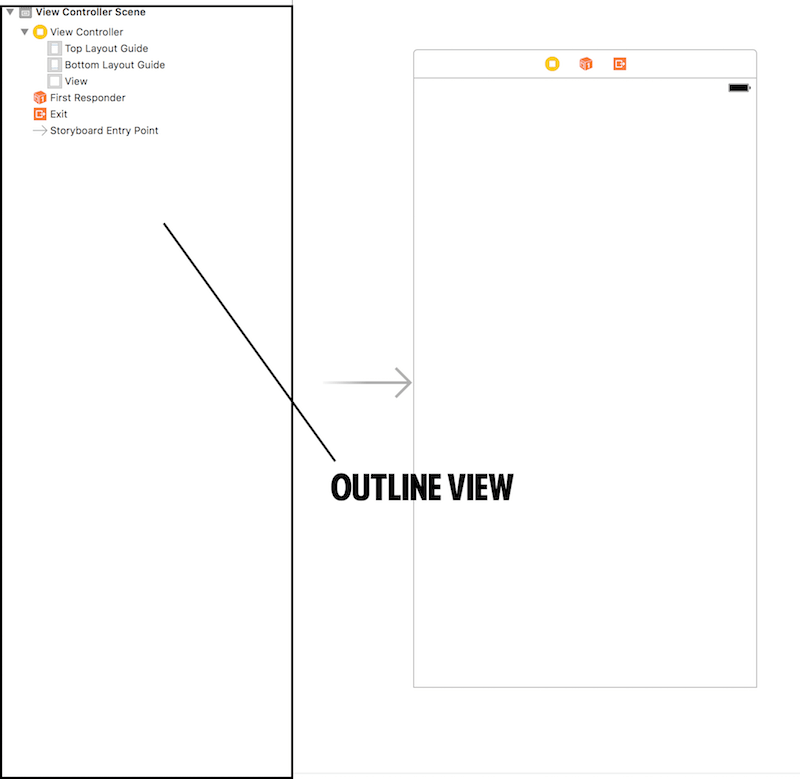
To add the navigation bar, we first have to add a navigation controller. So, select the view controller by choosing “View Controller” under “View Controller Scene” in the outline view or by clicking on the leftmost icon of the view controller in the scene. The outline view is located as shown in the following image:
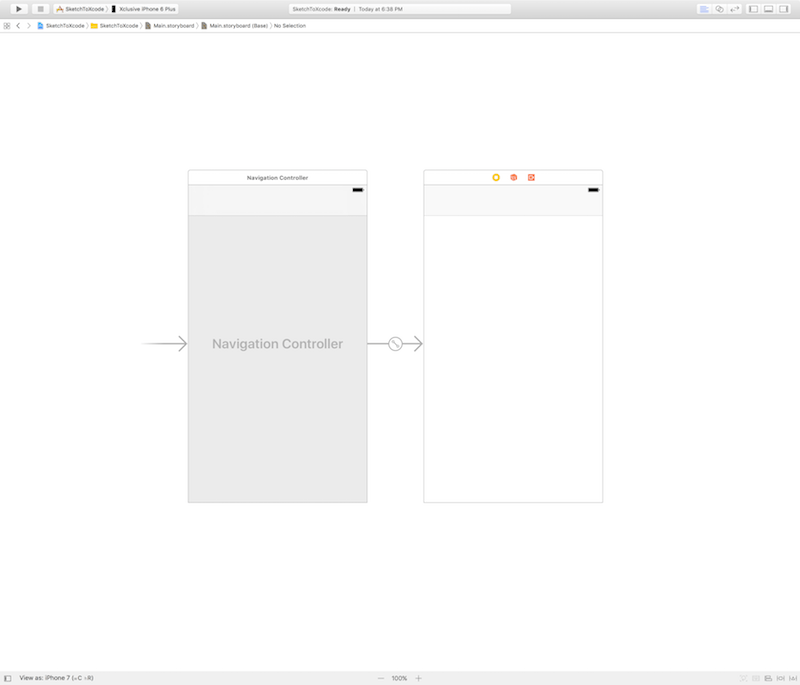
Then, in your Apple toolbar, go to “Editor” → “Embed In” → “Navigation Controller.” You should now have the following in your scene:
Next, let’s update the title in our view controller to read CONVERSE CHUCK TAYLORS. Click on “Navigation Item” under the view controller. In the utility area, select the “Attributes Inspector:”
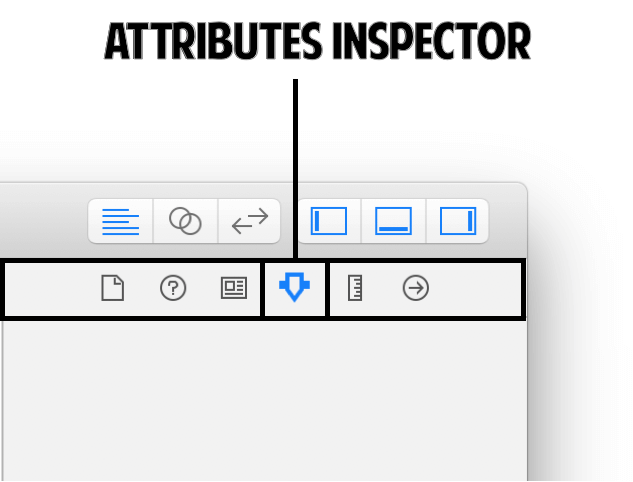
Type CONVERSE CHUCK TAYLORS in the title area. You will see the new title in the view controller in the scene.
Adding “Add to Cart” Button
Next, we need to address one of the major features of this product page. Looking at the design, you will notice that the “Add to Cart” button is pinned to the bottom and that the content scrolls underneath the button. We can create this design feature in a few different ways, but I find using a container view to be easiest. A container view is just a container that sits in our controller and allows us to use another view controller of our choice. For our design, the container view will consist of our static table view. Because a static table view cannot be dragged into a view controller with other elements, the container view will provide a separate container within which to set up the table view. In addition, the container view allows us to pin the “Add to Cart” button to the bottom, as the content is being scrolled.
The two main elements of the “Add to Cart” button are an image (the background of the button) and a button. Whenever I can, when items are grouped together, I put them into a UIView, which I treat as a container.
Let’s start setting up our “Add to Cart” button by adding the container. In the utility area, open the “Object” library, and then type view in the filter bar:
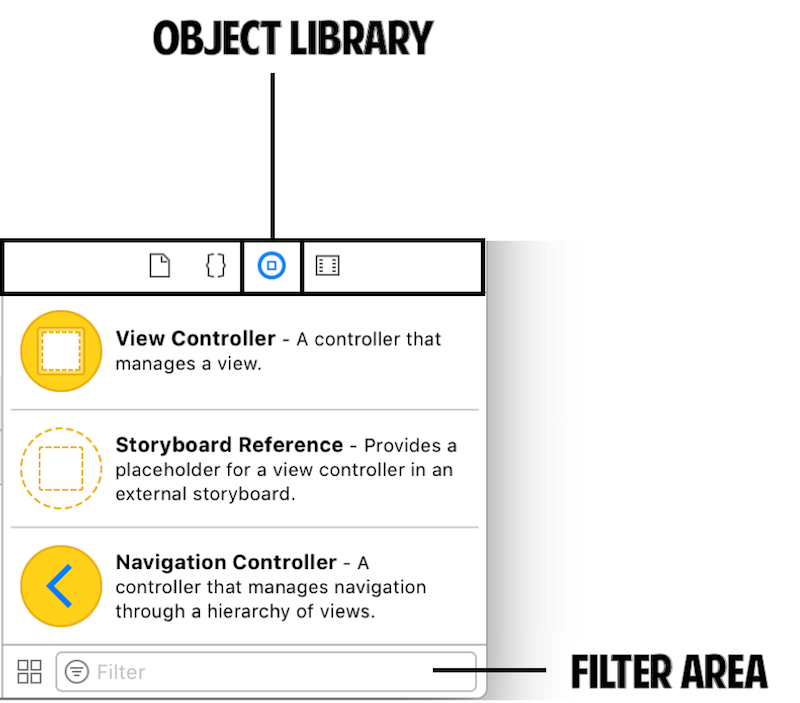
Drag the view into our view controller, and then click on the size inspector in the utility area:
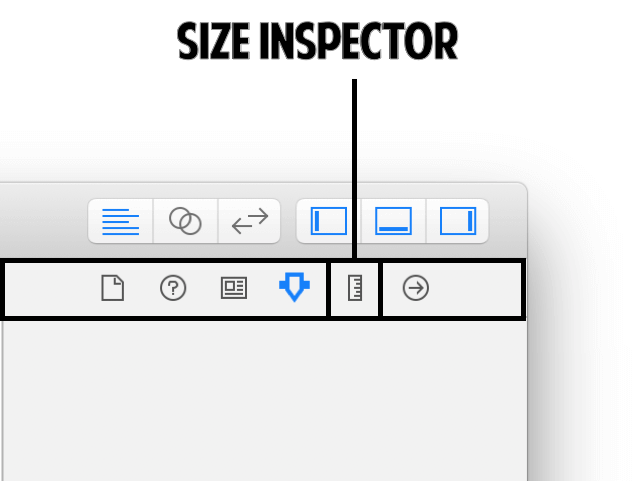
Set the following values in the size inspector:
Now that our container is in place, we need to add our image.
In the object library, type image in the filter area. Drag an image view into the view we just added. In the size inspector, add the following values:
In the attributes inspector, set “Image” to btn-bg.
Finally, let’s add our button. Type button in the filter area, and drag the button into the same view. In the size inspector, add the following values:
In the attributes inspector, add the following values:
Now that we have set up the button, our storyboard should look like the following:
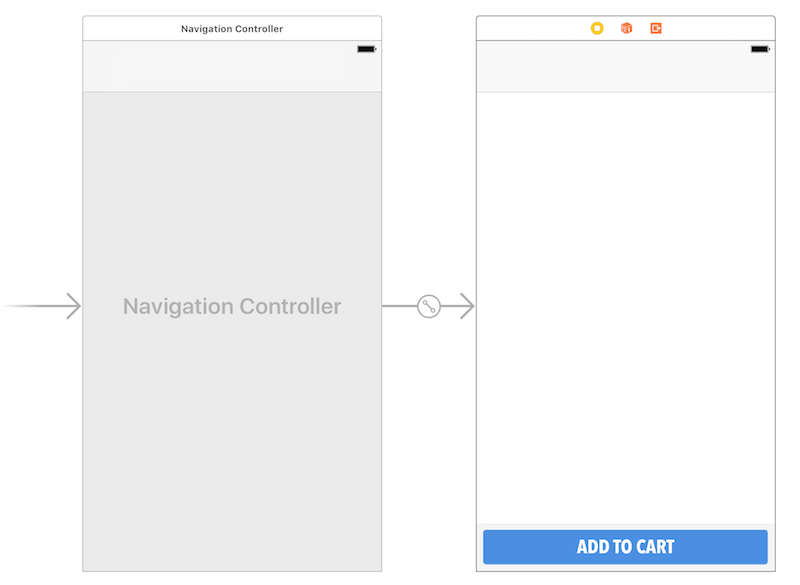
We now need to add some auto layout for our elements. Auto layout is a tool used to constrain components to the view. For example, you would use auto layout if you wanted a label to be pinned 10 pixels from the top of the view. You also would use auto layout to make sure that the label is vertically centered inside of your view. For our purposes, we will use auto layout to pin our “Add to Cart” button to the bottom of our view so that our content scrolls under it.
Let’s get started on applying auto layout to our “Add to Cart” button. First, select the view we recently added (i.e. our container), and click on the pin icon:
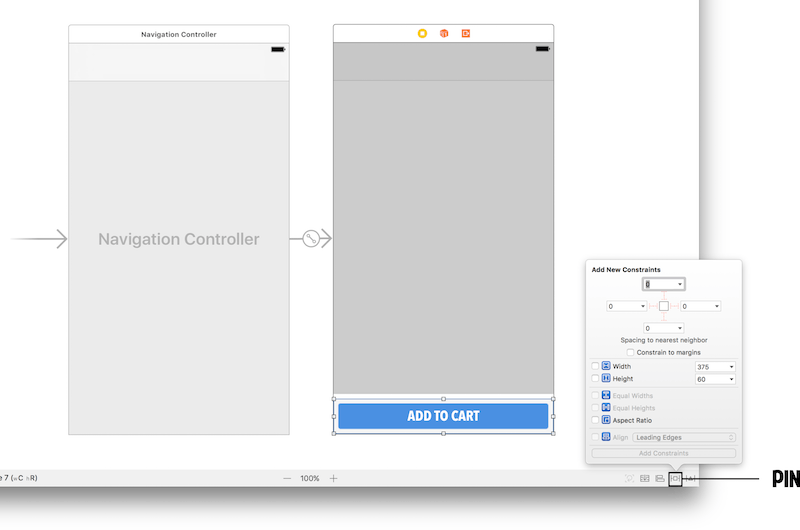
With the pin icon selected, enter the following values:
You can enter the left, right and bottom values just by clicking on the red barbells if their values are already at 0. After entering those values, click “Add 4 Constraints”:
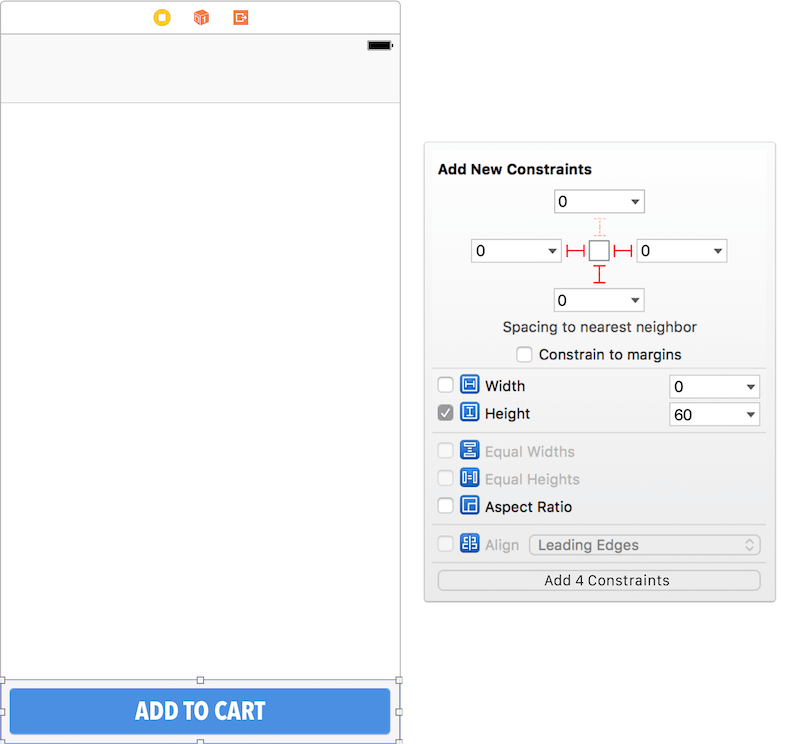
Now, our elements will always be pinned to the bottom of the device, with a height of 60, regardless of how tall our device is.
Next, we want to ensure that, no matter the size of the view, the background will fill the entire area. Therefore, select the image we are using for the background, click the pin icon, and then enter 0 for the top, left, right and bottom constraints. After entering those values, click “Add 4 Constraints”:
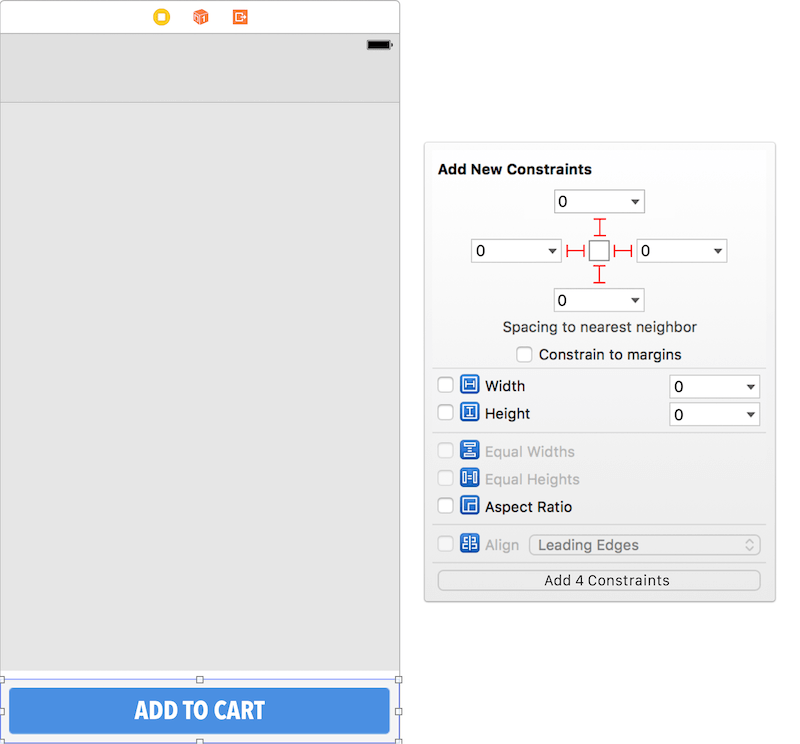
We also need to apply auto layout to our button. Select the button, click the pin icon, and then enter 8 for the left, right, top and bottom constraints. After entering those values, click “Add 4 Constraints”:

The constraints we just added will make sure that our button is always 8 pixels from the left, right, top and bottom of the view.
Let’s see how our application of auto layout works across different devices. Rather than building and running our project for each device, we can preview how our “Add to Cart” button looks across devices quite quickly. In the top right of your Xcode screen (above the utility area), select the “Assistant Editor” button, which will split the screen:

Then, in the menu at the top of the new screen, select “Preview(1)”:
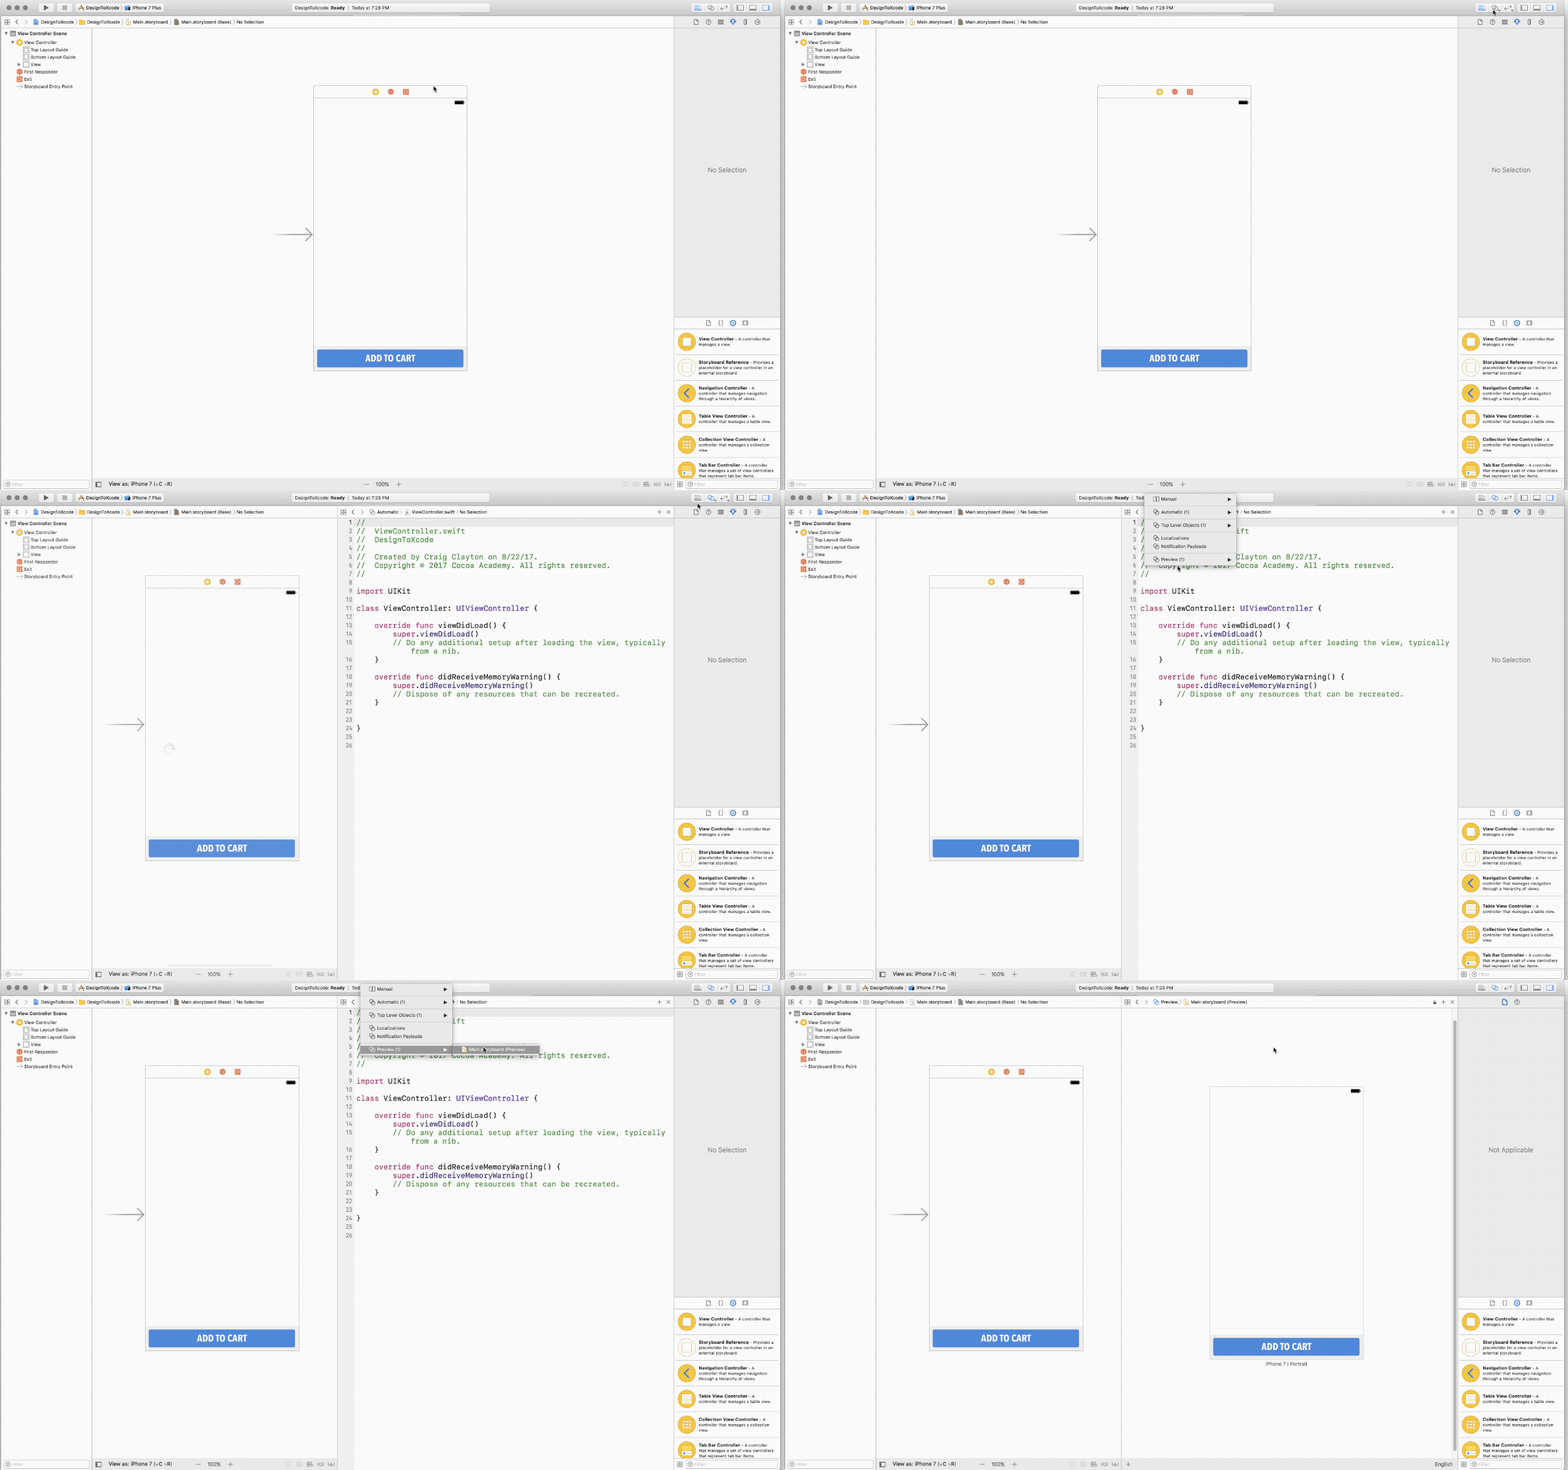
Once you select “Preview,” if you scroll to the bottom of the assistant editor screen, you will see the “Add to Cart” button pinned to the bottom of the iPhone 7 screen. Next, select and delete the iPhone 7 screen image in order to have an empty screen. Then, in the bottom-left corner, click the “+” button:
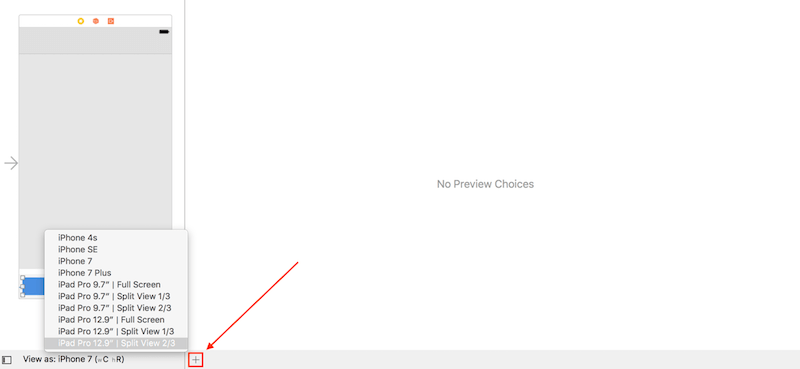
In the menu that appears, select the “iPhone SE.” Then, open this menu again and add the “iPhone 7 Plus” as well as the “iPad Pro 9.7″ | Full Screen.” When you are done, you will see the following:
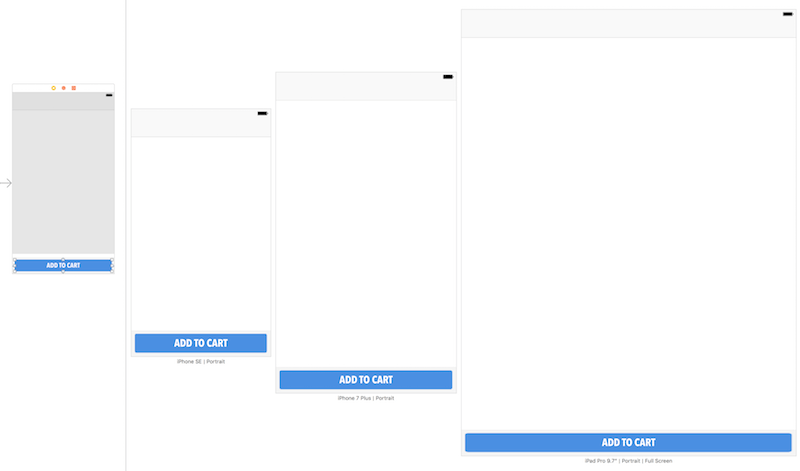
Notice that auto layout works exactly as we expected. Our “Add to Cart” button has expanded to the full width of the screen and is pinned to the bottom. Feel free to look at other devices and orientations. When you are done, exit the assistant editor and return to the standard editor.
Adding a Table View
Let’s now add a table view to our design. In the object library, type container in the filter area. Drag a container view into the view, and in the size inspector add the following values:
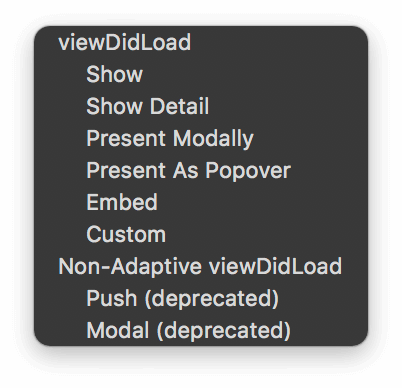
When we added our container view, you would have noticed that it created a view controller. Because we need a static table view, we will delete the view controller that was just created for us and replace it with a table view controller. Therefore, select the view controller that was created for us and hit “Delete.” Then, in the object library, type table view in the filter area. Drag a table view controller onto the scene. Then, from the container view that we just created, hold the Control button and drag to the table view controller. Select “Embed” on the screen that pops up:
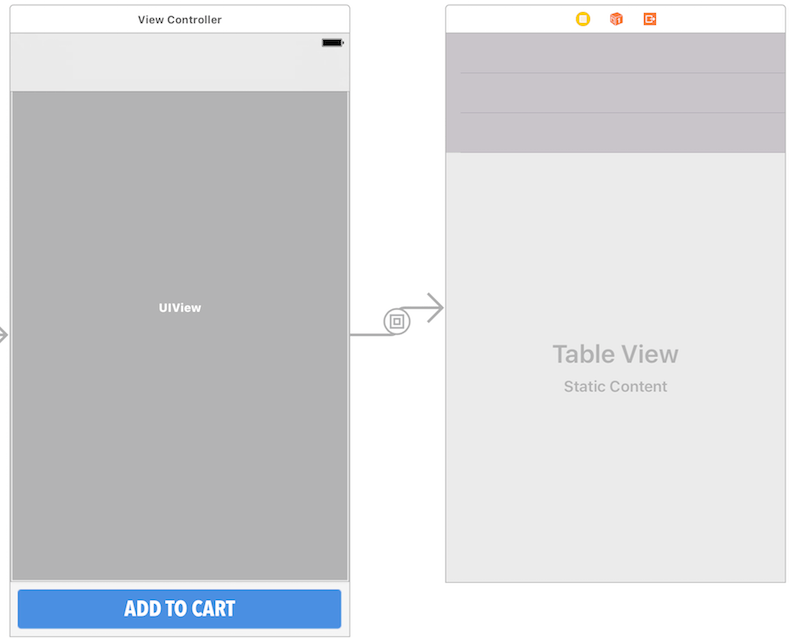
You have now connected the container view to the table view controller. Next, select the “Table View” in the table view controller, and in the attributes inspector change the “Content” from “Dynamic Prototypes” to “Static Cells.” Three new cells should now be at the top of your table view controller:
However, we need a total of five cells for our product detail page. Let’s see these five cells delineated in our design:
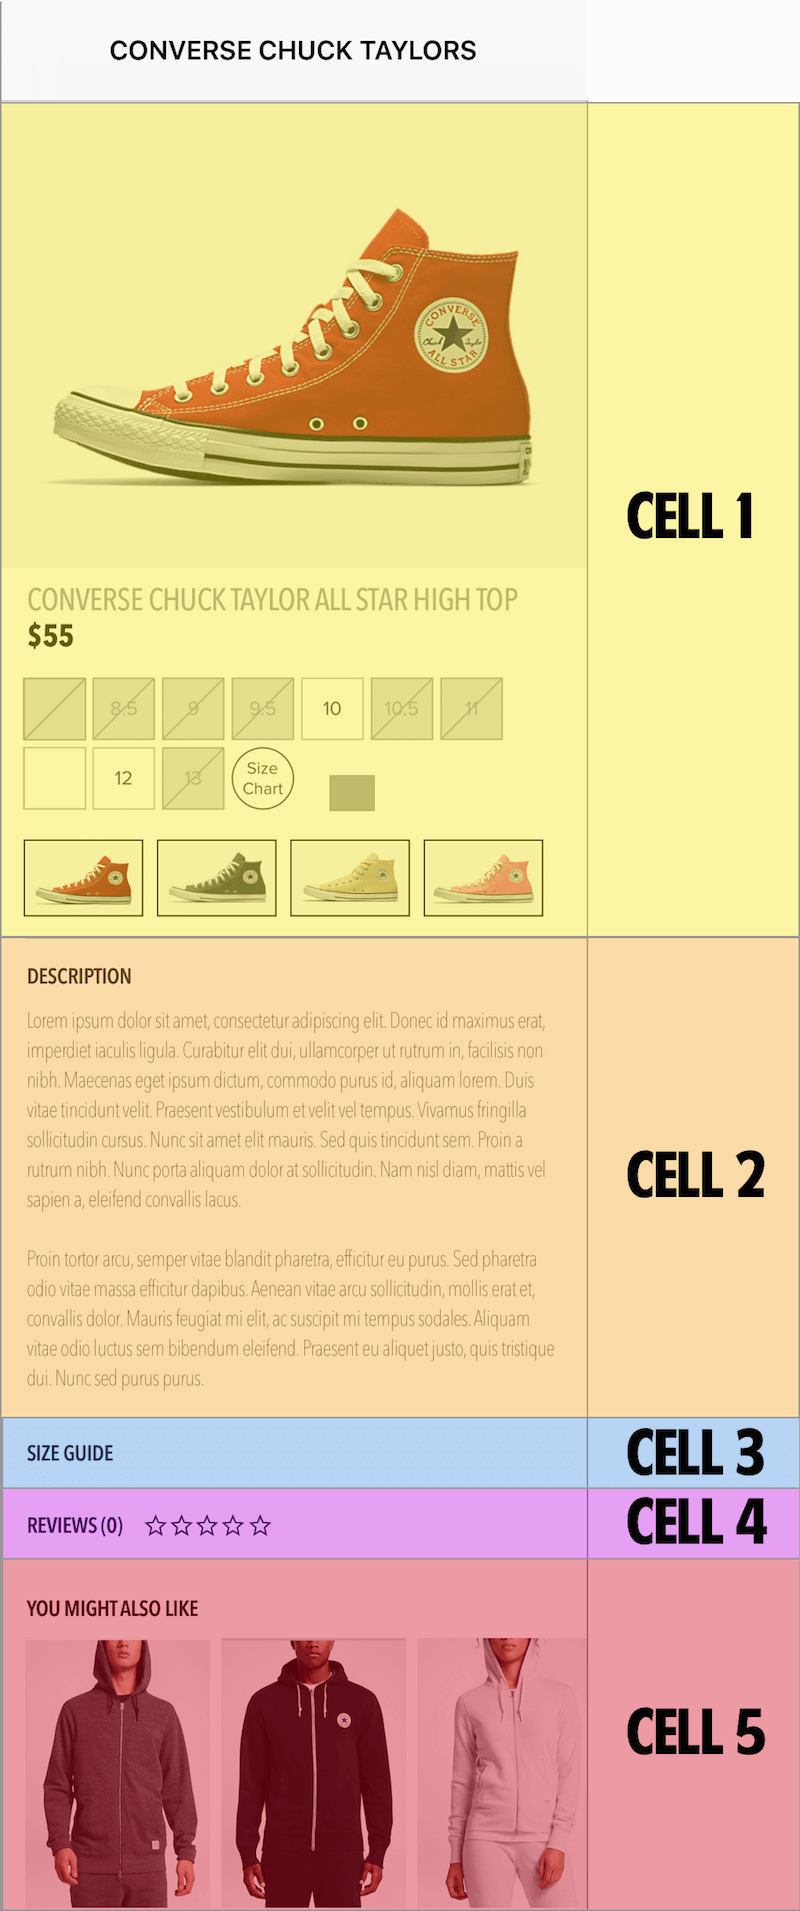
As you can see, each of the five cells has different elements that we will need to add in order to create this product page. In order to get the desired layout and functionality, we need to update a few things.
First, in the outline view, select “Table View Section.” Then, in the attributes inspector, update “Rows” to 5. Select each cell, and in the size inspector update each cell row’s height to the following values:
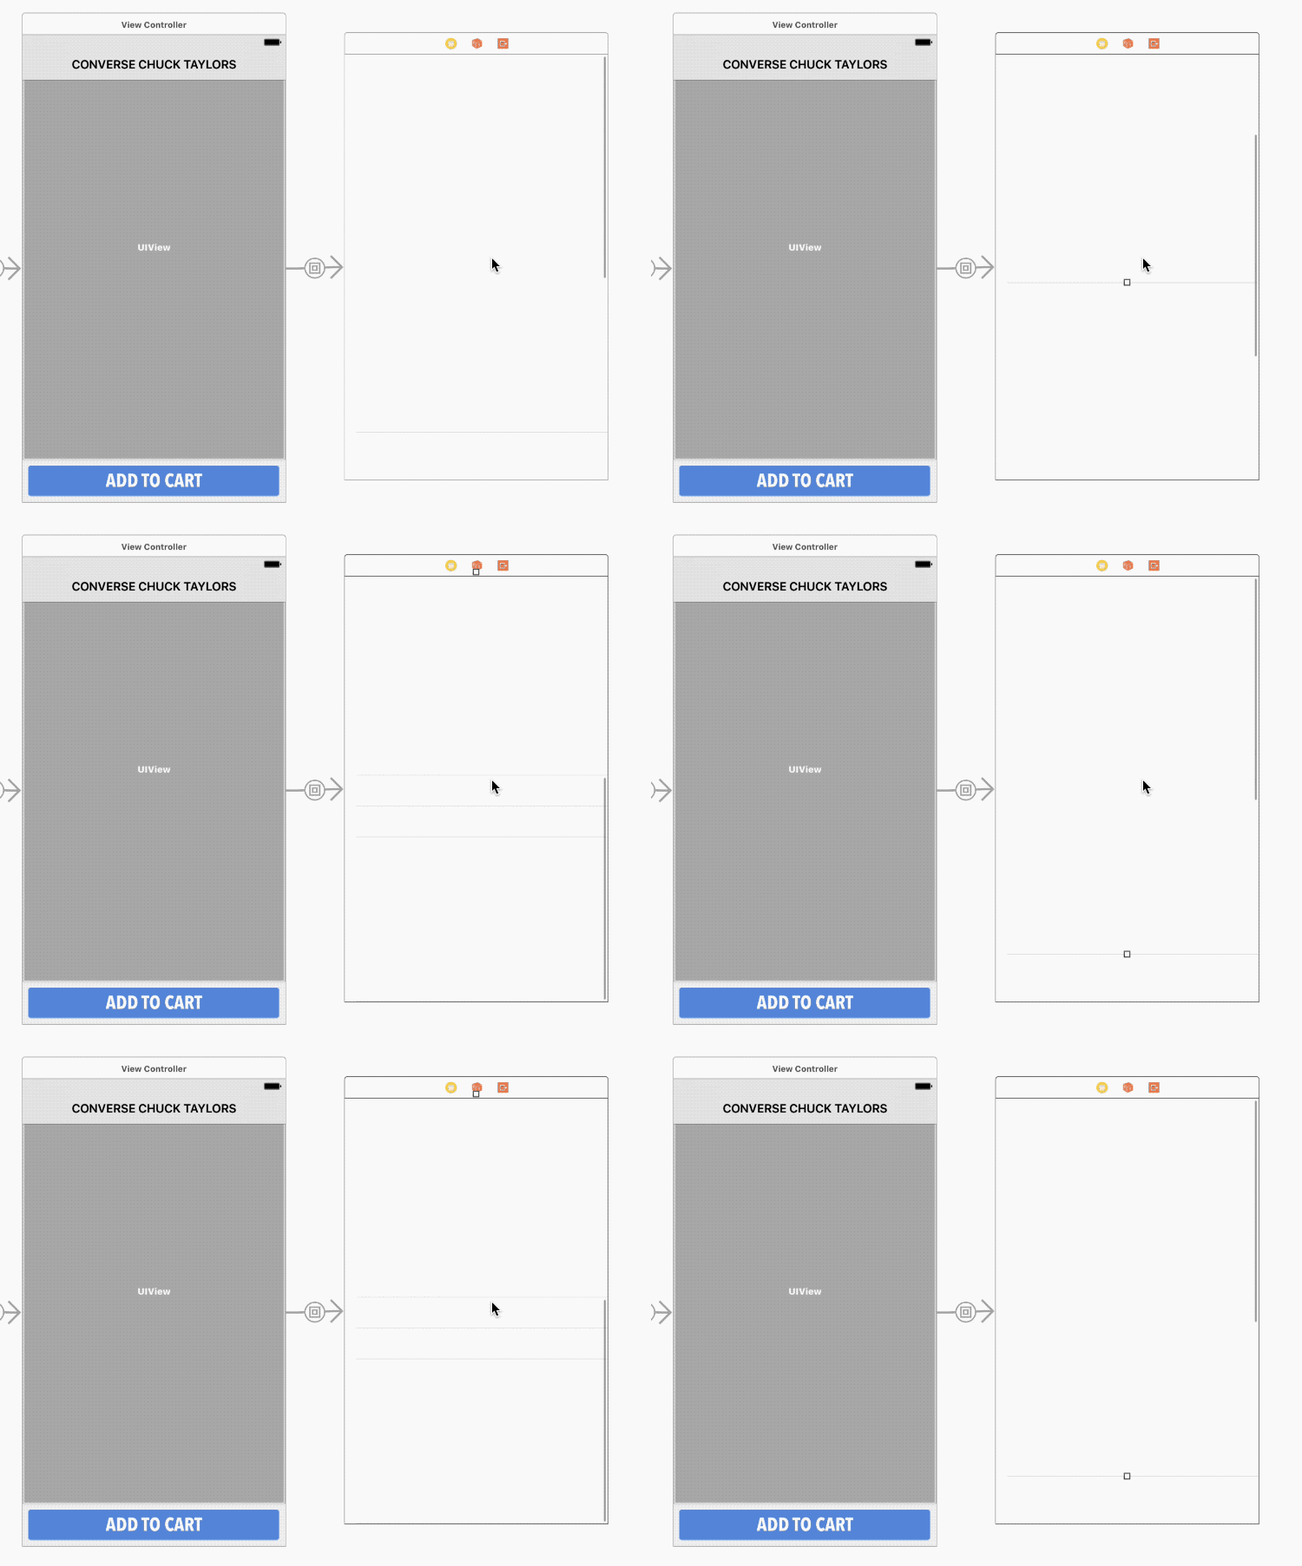
When you are done, hover your mouse over the table view in the scene, and then swipe up and down to scroll through the table view:
Select each table view cell, and in the attributes inspector update “Selection” from “Default” to “None.” Table views, by default, allow the user to select an item such as a cell. Because we do not need the behavior of cell selection, we have now removed this default.
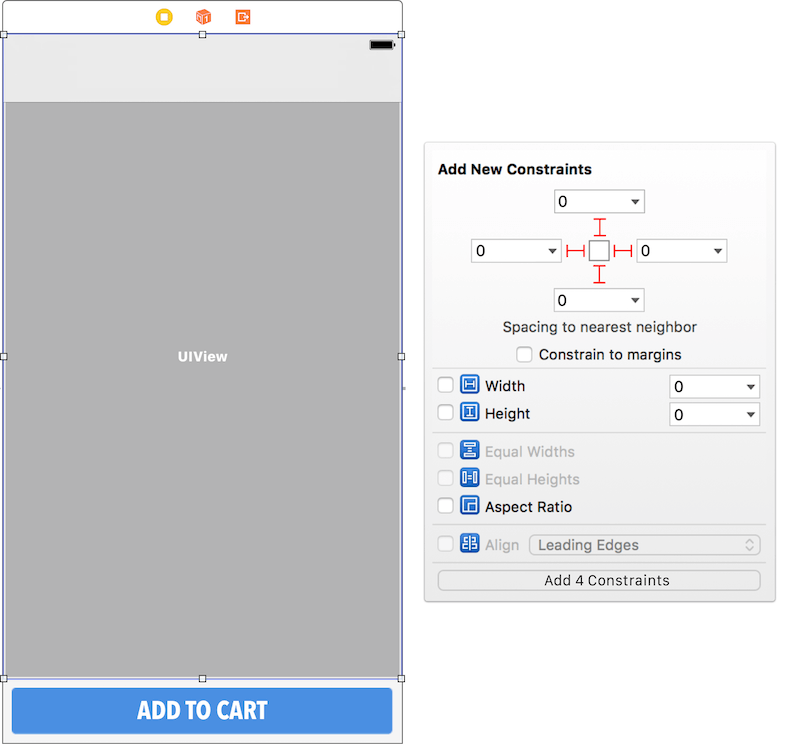
Finally, we need to add auto layout to the container view that we added. Select the container view, click the pin icon, and then enter 0 for the top, left, right and bottom constraints. After entering those values, click “Add 4 Constraints”:
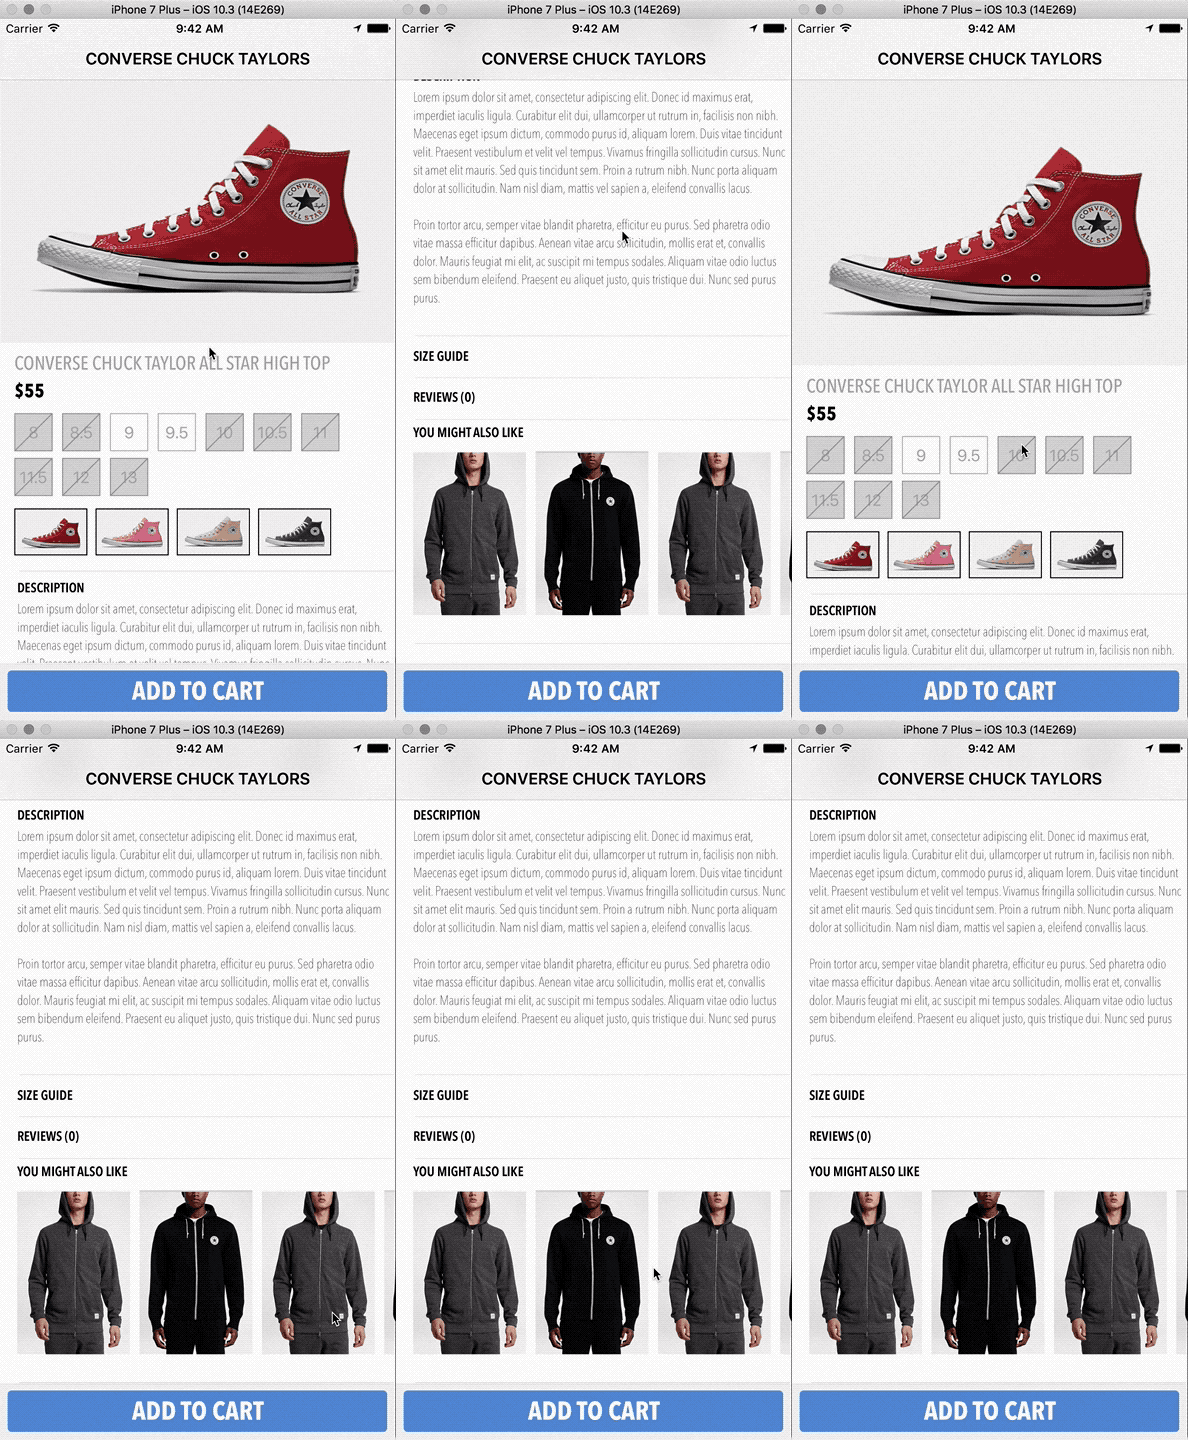
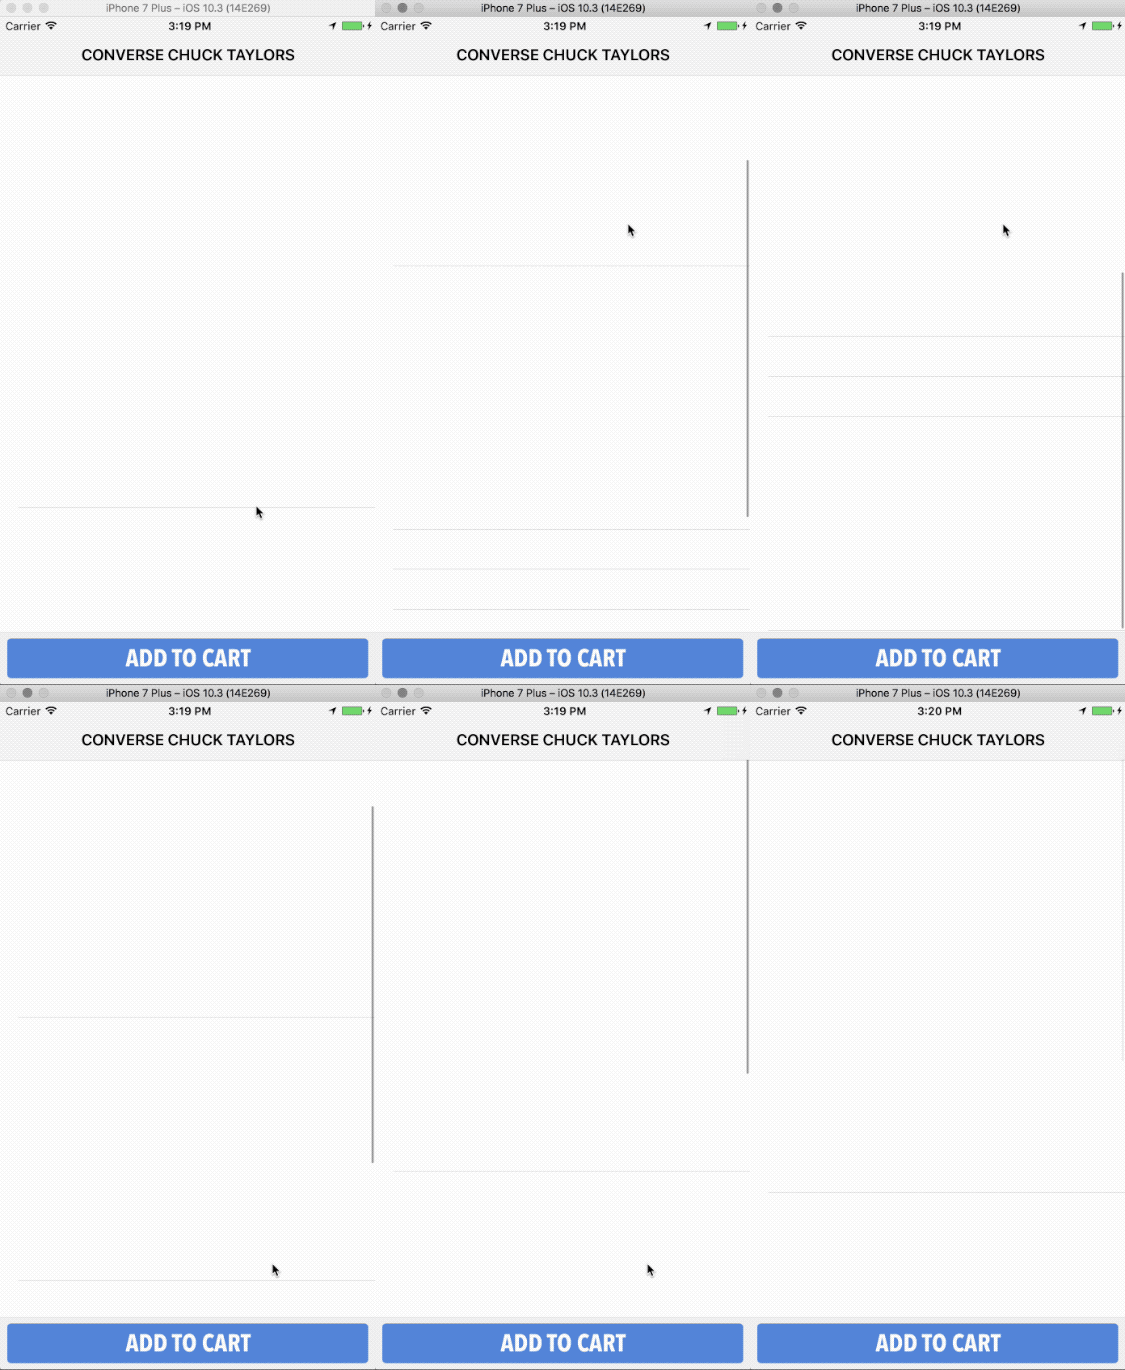
Let’s build and run the project by hitting the play button (or press Command + R). You should see our static table view, as well as have the behavior we want, which is the table view scrolling under our “Add to Cart” button:
Now that our basic structure is established, it is time to start building our product page to make it look like the design we reviewed at the beginning of this tutorial.
Updating Our Cells
We will work with one cell at a time in order to add all of the elements we need and position them in the cell, and then we’ll add auto layout to ensure that the elements will work with any device’s screen.
Cell One
In our first cell, we need two labels to display the product’s name and price. In addition, we need five images, four as product thumbnails and one for the product’s large image.
To begin, type label in the filter area of the object library, and drag two UILabels into the table view cell. Then, type image in the filter area, and drag five UIImageViews into the table view cell. We need to update each of these element’s size and position to the following.
UILabel 1
Size inspector:
Attributes inspector:
UILabel 2
Size inspector:
Attributes inspector:
UIImage 1
Size inspector:
Attributes inspector:
UIImage 2
Size inspector:
Attributes inspector:
UIImage 3
Size inspector:
Attributes inspector:
UIImage 4
Size inspector:
Attributes inspector:
UIImage 5
Size inspector:
Attributes inspector:
After adding all of these elements and updating all of their attributes, you should see the following in your storyboard scene:

The only remaining components we need to add to cell one are the shoe sizes. If we break this down, for when the shoe is out of stock, we need three elements: (1) the background, (2) the label and (3) the slash image. If the shoe is in stock, we need just the background and the label. Earlier, I mentioned that whenever elements are grouped together, I prefer to put them in a container. The shoe size elements are an instance of this.
Let’s begin setting this up by dragging a UIView, which will act as our container, into our first table view cell. In the object library, type image in the filter area and update the following values in the size inspector:
Next, in the object library, type image in the filter area and drag a UIImageView into the container we just created, and then update the image with the following values:
Size inspector:
Attributes inspector:
Now, in the object library, type label in the filter area and drag a UILabel into the same container, and update the following values for that label.
Size inspector:
Attributes inspector:
Finally, in the object library, type label in the filter area and drag another UIImageView into the same container, and then update the image’s following values:
Size inspector:
Attributes inspector:
At this point, your storyboard should look like this:
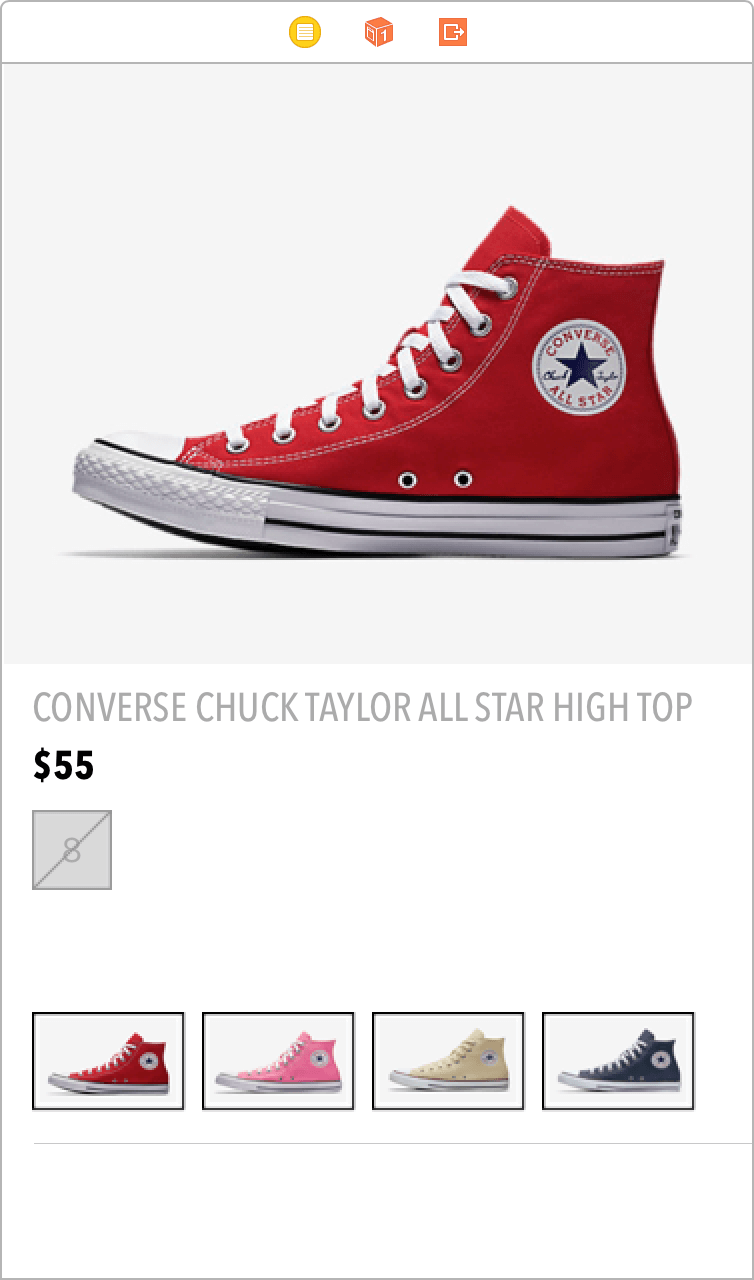
Now, we need to duplicate this element to create all of the different shoe sizes.
For the first row of shoe sizes, in the outline view, select the container that we just created and hit Command + C to copy, and then hit Command + V to paste. Continue to hit Command + V until you have seven of these containers.
We need to ensure that all seven of these views stay the same size, in both height and width, when in a StackView, which, as the name suggests, allows us to stack both horizontally and vertically.
First, select all of these views in the outline view (hold Shift, and then click the first and last one to select all):

Click the pin icon, check the boxes for both height and width, and, lastly, click “Add 14 Constraints.”
While the seven views still are selected, click the StackView icon, located two icons to the left of the pin icon:

Our containers are now all in a StackView. However, they are stacked right next to each other. To fix this, in the outline view, select the StackView that we just created, and in the attributes inspector update the following values:
We need to add another row. With the StackView still selected, hit Command + C to copy, and then Command + V to paste. Once you paste the new StackView, move it to right under the first one. They do not need to line up perfectly.
Next, select both of the StackViews and then the StackView icon. Similar to when we selected the StackView icon, the StackViews are now stacked; however, they are on top of each other, rather than next to each other. Select the main StackView, and in the attributes inspector update the following values:
Then, click the pin icon and enter the following values:
Click “Add 4 Constraints.”
Select one of the other two StackViews in the outline view, click the pin icon, and enter the following values:
Click “Add 3 Constraints.” Repeat this step for the remaining StackView. When you are done, you will see the following:
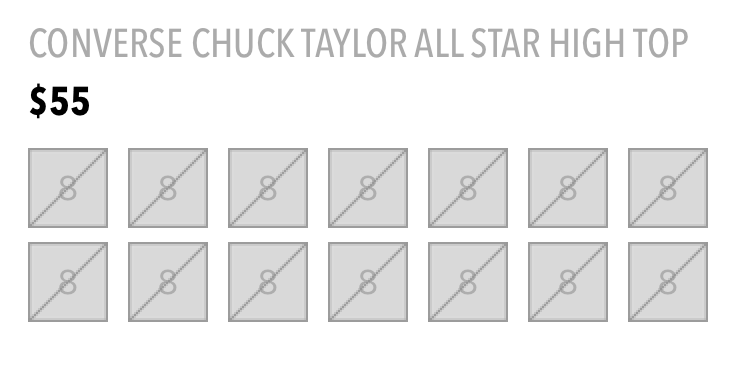
Finally, select the last four boxes of the bottom StackView, and hit “Delete.” When you complete this step, the boxes will fill the space evenly.
Our next step for setting up cell one is to change the “8” in each of the boxes to the shoe sizes that are in our example page. In addition, we need to adjust two of the boxes to reflect the sizes that are in stock, 9 and 9.5, without a slash through the boxes.
To change the 8 to another shoe size, select the label under the view for a particular box, and in the attributes inspector change the 8 to a new shoe size. Repeat this for each of the sizes in our design.
Lastly, to show that size 9 is available, select the view with “9” as the label, and in the attributes inspector change the outstock-bg image to instock-bg. Repeat for the view with “9.5” as the Label. Then, in the outline view, for each of these two sizes, select the slash image and click “Delete.” This will now show that you have two sizes in stock, 9 and 9.5:
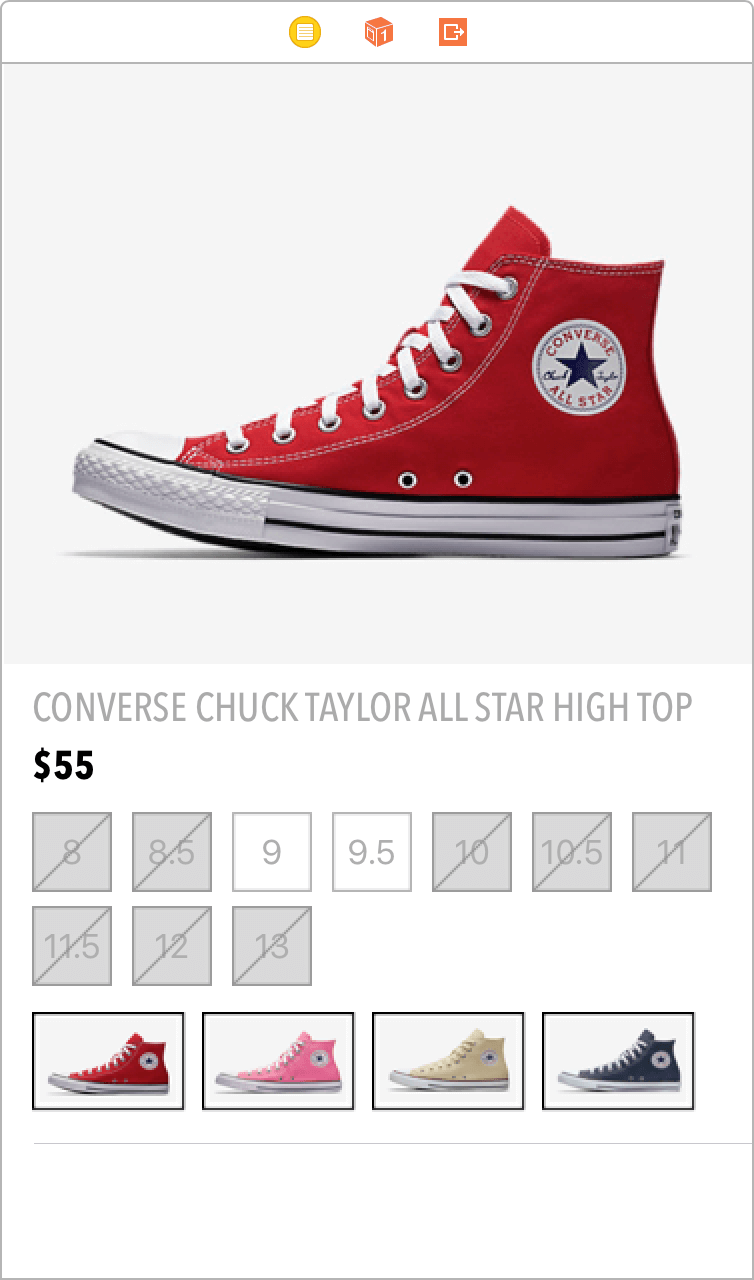
Cell one is now complete.
Cell Two
Let’s add our elements to cell two. Here, we have two components, a UILabel to display our header and a UITextView for a large body of text. Drag one of each into our second table view cell. With the label selected, update the following values.
Size inspector:
Attributes inspector:
Next, with the text view selected, update the following values:
Size inspector:
Attributes inspector:
Lorem ipsum dolor sit amet, consectetur adipiscing elit. Donec id maximus erat, imperdiet iaculis ligula. Curabitur elit dui, ullamcorper ut rutrum in, facilisis non nibh. Maecenas eget ipsum dictum, commodo purus id, aliquam lorem. Duis vitae tincidunt velit. Praesent vestibulum et velit vel tempus. Vivamus fringilla sollicitudin cursus. Nunc sit amet elit mauris. Sed quis tincidunt sem. Proin a rutrum nibh. Nunc porta aliquam dolor at sollicitudin. Nam nisl diam, mattis vel sapien a, eleifend convallis lacus.
Proin tortor arcu, semper vitae blandit pharetra, efficitur eu purus. Sed pharetra odio vitae massa efficitur dapibus. Aenean vitae arcu sollicitudin, mollis erat et, convallis dolor. Mauris feugiat mi elit, ac suscipit mi tempus sodales. Aliquam vitae odio luctus sem bibendum eleifend. Praesent eu aliquet justo, quis tristique dui. Nunc sed purus purus.
This text view is now set up to match our design. So, the height of 261 that I asked you to enter above is to completely show all of the text we entered. Feel free to experiment with this by changing the amount of text, which would then require a change in height as well.
In regards to UITextView versus UILabel, I honestly do not use UITextView much. My preference is to use UILabel, but in this tutorial I wanted to show you both. I do not have a reason for using the latter other than I just like it more. For this cell, we are adding dummy data to match our design. If you were trying to make the UITextView or UILabel dynamic in height, you would need to do some auto layout updates. For this tutorial, set the height manually and rest assured that the heights of both UILabel and UITextView will adjust to their content’s size using auto layout.
Lastly, let’s add some auto layout to our cell items. First, select the label, click the pin icon, and then enter the following values:
Then, click “Add 4 Constraints.”
Select the text view, click the pin icon, and enter the following values:
Click “Add 4 Constraints.” Cell two is now complete.
Cells Three and Four
Cells three and four are basically the same, except for their text. First, drag a UILabel into each of cell three and cell four. For each label, enter the following values.
Size inspector:
Attributes inspector:
Finally, for the text, for cells three and four, change “Label” to “SIZE GUIDE” and to “REVIEWS (0),” respectively.
Cell Five
Let’s update our last cell. As you can see from the design we reviewed at the beginning of this tutorial, cell five contains a UIScrollView in order for our “You may also like” section to scroll from left to right. ScrollViews can be created through code; however, consistent with the rest of this tutorial, we will build a working ScrollView with no code.
First, drag four UIImageViews into the cell, next to each other (even overlapping them in order to fit). In the size inspector for each image, change the width to 118 and the height to 172. Then, in the attributes inspector, change “Image” under the four image views to mn-hoodie1, mn-hoodie2, wm-hoodie1 and wm-hoodie2, in any order you like. When you are done, you should have something resembling the following:

Next, select all four images and select the pin icon. Set the width and height for all four images by clicking the boxes next to width and height and then on “Add 8 Constraints.” With the four images still selected, hit the StackView icon. In the attributes inspector, update the following values:
As you can see below, the images are now spaced equally, with 10 pixels in between:
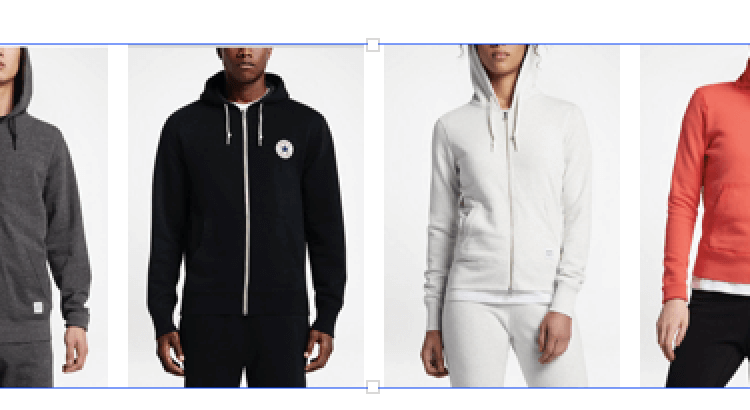
Next, we need to put the StackView inside of a view. Select the StackView that you just created, and in the Apple toolbar click on “Editor” → “Embed In” → “View.” We need to adjust the size of the newly created view by updating the width to 502 and the height to 172. We also need to adjust the position of where the StackView is located in this new view. Select the StackView and enter the following values in the size inspector:
Now, we need to get everything we just created into a ScrollView. Select the view in which the StackView resides, and then select “Editor” → “Embed In” → “Scroll View.” With the new ScrollView selected, enter the following values in the size inspector:
Lastly, in order to make our images scroll, we need to put the ScrollView in another view. Select the ScrollView, and then click “Editor” → “Embed In” → “View.” With this new view selected, enter the following values in the size inspector:
The last element we need to add is a UILabel. Drag a label into cell five, and enter the following values in the size inspector:
In the attributes inspector, enter these:
Let’s add auto layout to our elements in cell five. With the Label selected, click the pin icon, and enter the following values:
After entering the values, click “Add 4 Constraints.”
Then, for all of the other elements in cell five, to add auto layout, ensure that all of the disclosure arrows are open in the main view container that is holding the ScrollView, and ensure that you can see all the way to your images, as follows:
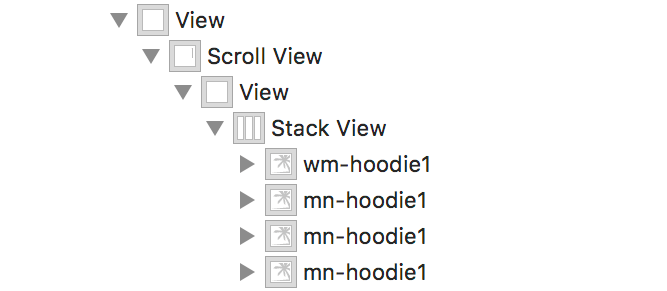
Now, select the StackView, click the pin icon, and enter the following values:
When you are done entering the values, click “Add 4 Constraints.”
Next, click on the align icon, which is just to the left of the pin icon, and enter the following values:
Then, click “Add 1 Constraint.”
Next, in the outline view, select the view that is holding the StackView. With that view selected, click the pin icon and enter the following values:
After entering the values, click “Add 4 Constraints.”
In the outline view, select the ScrollView, click the pin icon, and enter the following values:
Then, click “Add 4 Constraints.”
Finally, in the outline view, select the main container (the view holding the ScrollView), click the pin icon, and enter the following values:
When you are done, click “Add 4 Constraints.” You have now completed all of the auto layout for cell five.
Let’s build and run the project by hitting the play button (or press Command + R). You will now be able to see your ScrollView working without having had to code anything. If you run your project on multiple devices, you will also see that everything fits the way it is supposed to.
Where To Go From Here?
Now that you have completed this tutorial, my first suggestion would be to try repeating what you’ve done without referring to the steps in the tutorial. Once you are comfortable with storyboarding in Xcode, take some time to learn Swift 3. By knowing Swift, you will be able to add a product list as well as to show products on the detail page that we just created with dynamic data. If you still want to learn more, check out my book iOS 11 Programming for Beginners, which will be released later this year.
Summary
In this tutorial, you’ve learned how to bring a design into Xcode without any code. You’ve also learned how to look at a design and figure out what components it has. Then, you added all of the components of the design into storyboards and updated them to match the design. You’ve also learned how to add auto layout so that the design looks good on any device. Hopefully, this tutorial has introduced you to the ease and possibilities of storyboards. The more you work with storyboards, the more comfortable you will get.
As a full-time iOS engineer, I love doing the design side of an app because it helps me to become a better engineer. To me, it is always fun going into the App Store or looking at my favorite app and trying to figure out how they built it, including how they designed it. I really enjoy trying to recreate an app that catches my eye.
If you are a designer, I am sure you have seen plenty of designs that are not perfect. I am OK with my design not being perfect, and you should feel that way with your app’s design. You have to start somewhere, and with the help of other designers and developers, you will improve. Hopefully, this tutorial has opened your eyes to some things that you did not know or at least enabled you to hone your existing skills.


