(This is a sponsored post). In today’s article, we’ll create a JavaScript extension that works in all major modern browsers, using the very same code base. Indeed, the Chrome extension model based on HTML, CSS and JavaScript is now available almost everywhere, and there is even a Browser Extension Community Group working on a standard.
I’ll explain how you can install this extension that supports the web extension model (i.e. Edge, Chrome, Firefox, Opera, Brave and Vivaldi), and provide some simple tips on how to get a unique code base for all of them, but also how to debug in each browser.
Note: We won’t cover Safari in this article because it doesn’t support the same extension model as others.
Basics
I won’t cover the basics of extension development because plenty of good resources are already available from each vendor:
- Microsoft (also, see the great overview video “Building Extensions for Microsoft Edge”)
- Mozilla (also, see the wiki)
- Opera
- Brave
So, if you’ve never built an extension before or don’t know how it works, have a quick look at those resources. Don’t worry: Building one is simple and straightforward.
Our Extension
Let’s build a proof of concept — an extension that uses artificial intelligence (AI) and computer vision to help the blind analyze images on a web page.
We’ll see that, with a few lines of code, we can create some powerful features in the browser. In my case, I’m concerned with accessibility on the web and I’ve already spent some time thinking about how to make a breakout game accessible using web audio and SVG, for instance.
Still, I’ve been looking for something that would help blind people in a more general way. I was recently inspired while listening to a great talk by Chris Heilmann in Lisbon: “Pixels and Hidden Meaning in Pixels.”
Indeed, using today’s AI algorithms in the cloud, as well as text-to-speech technologies, exposed in the browser with the Web Speech API or using a remote cloud service, we can very easily build an extension that analyzes web page images with missing or improperly filled alt text properties.
My little proof of concept simply extracts images from a web page (the one in the active tab) and displays the thumbnails in a list. When you click on one of the images, the extension queries the Computer Vision API to get some descriptive text for the image and then uses either the Web Speech API or Bing Speech API to share it with the visitor.
The video below demonstrates it in Edge, Chrome, Firefox, Opera and Brave.
You’ll notice that, even when the Computer Vision API is analyzing some CGI images, it’s very accurate! I’m really impressed by the progress the industry has made on this in recent months.
I’m using these services:
- Computer Vision API, Microsoft Cognitive Services
This is free to use (with a quota). You'll need to generate a free key; replace theTODOsection in the code with your key to make this extension work on your machine. To get an idea of what this API can do, play around with it. - Bing Text to Speech API, Microsoft Cognitive Services
This is also free to use (with a quota, too). You'll need to generate a free key again. We'll also use a small library that I wrote recently to call this API from JavaScript. If you don't have a Bing key, the extension will always fall back to the Web Speech API, which is supported by all recent browsers.
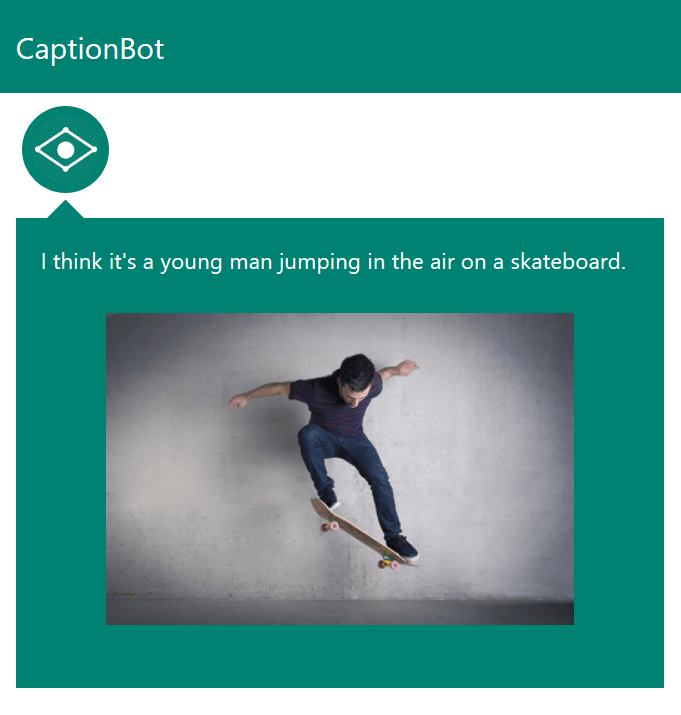
But feel free to try other similar services:
- Visual Recognition, IBM Watson
- Cloud Vision API, Google
You can find the code for this small browser extension on my GitHub page. Feel free to modify the code for other products you want to test.
Tip To Make Your Code Compatible With All Browsers
Most of the code and tutorials you’ll find use the namespace chrome.xxx for the Extension API (chrome.tabs, for instance).
But, as I’ve said, the Extension API model is currently being standardized to browser.xxx, and some browsers are defining their own namespaces in the meantime (for example, Edge is using msBrowser).
Fortunately, most of the API remains the same behind the browser. So, it’s very simple to create a little trick to support all browsers and namespace definitions, thanks to the beauty of JavaScript:
window.browser = (function () {
  return window.msBrowser ||
    window.browser ||
    window.chrome;
})();
And voilà!
Of course, you’ll also need to use the subset of the API supported by all browsers. For instance:
- Microsoft Edge has a list of support.
- Mozilla Firefox shares its current Chrome incompatibilities.
- Opera maintains its own list of extension APIs supported by its browser.
Extension Architecture
Let’s review together the architecture of this extension. If you’re new to browser extensions, this should help you to understand the flow.
Let’s start with the manifest file:
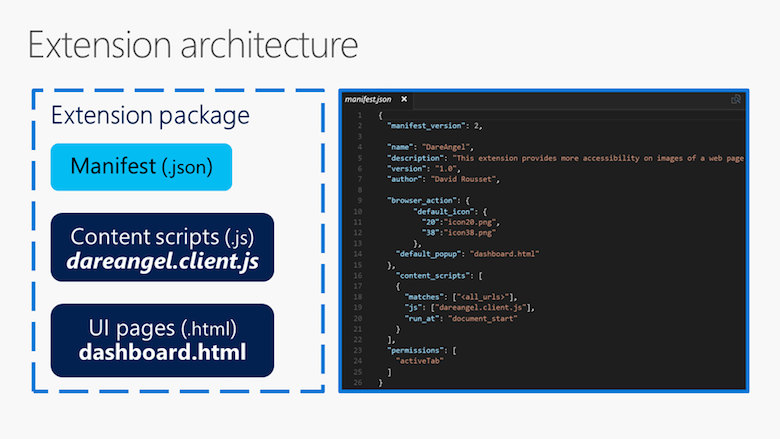
This manifest file and its associated JSON is the minimum you’ll need to load an extension in all browsers, if we’re not considering the code of the extension itself, of course. Please check the source in my GitHub account, and start from here to be sure that your extension is compatible with all browsers.
For instance, you must specify an author property to load it in Edge; otherwise, it will throw an error. You’ll also need to use the same structure for the icons. The default_title property is also important because it’s used by screen readers in some browsers.
Here are links to the documentation to help you build a manifest file that is compatible everywhere:
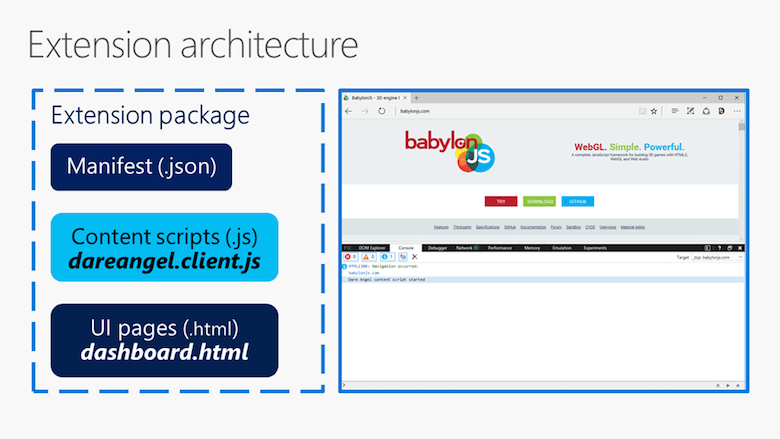
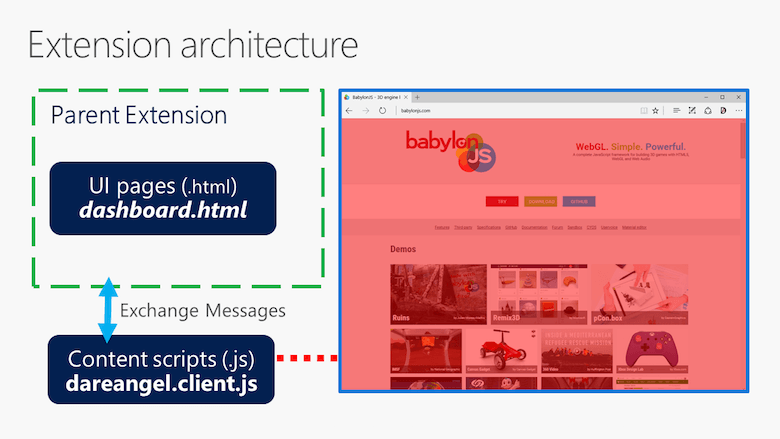
The sample extension used in this article is mainly based on the concept of the content script. This is a script living in the context of the page that we’d like to inspect. Because it has access to the DOM, it will help us to retrieve the images contained in the web page. If you’d like to know more about what a content script is, Opera, Mozilla and Google have documentation on it.
Our content script is simple:
console.log("Dare Angel content script started");

browser.runtime.onMessage.addListener(function (request, sender, sendResponse) {
    if (request.command == "requestImages") {
        var images = document.getElementsByTagName('img');
        var imagesList = [];
        for (var i = 0; i < images.length; i++) {
            if ((images[i].src.toLowerCase().endsWith(".jpg") || images[i].src.toLowerCase().endsWith(".png"))
                && (images[i].width > 64 && images[i].height > 64)) {
                imagesList.push({ url: images[i].src, alt: images[i].alt });
            }
        }
        sendResponse(JSON.stringify(imagesList));
    }
});
view raw
This first logs into the console to let you check that the extension has properly loaded. Check it via your browser’s developer tool, accessible from F12, Control + Shift + I or ⌘ + ⌥ + I.
It then waits for a message from the UI page with a requestImages command to get all of the images available in the current DOM, and then it returns a list of their URLs if they’re bigger than 64 × 64 pixels (to avoid all of the pixel-tracking junk and low-resolution images).
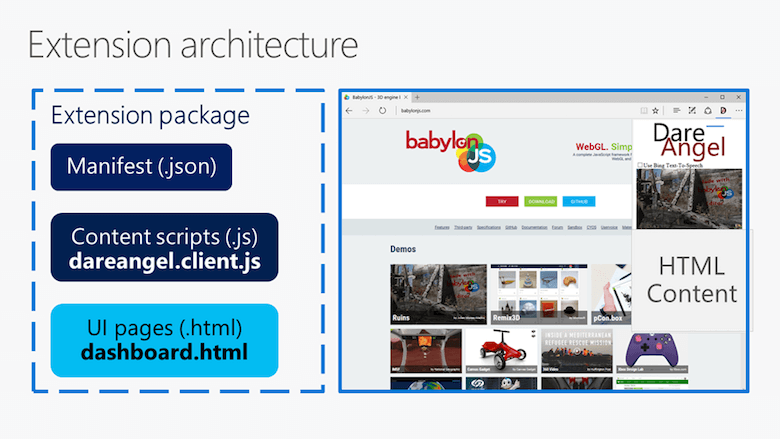
The popup UI page we’re using is very simple and will display the list of images returned by the content script inside a flexbox container. It loads the start.js script, which immediately creates an instance of dareangel.dashboard.js to send a message to the content script to get the URLs of the images in the currently visible tab.
Here’s the code that lives in the UI page, requesting the URLs to the content script:
browser.tabs.query({ active: true, currentWindow: true }, (tabs) => {
browser.tabs.sendMessage(tabs[0].id, { command: "requestImages" }, (response) => {
this._imagesList = JSON.parse(response);
this._imagesList.forEach((element) => {
var newImageHTMLElement = document.createElement("img");
newImageHTMLElement.src = element.url;
newImageHTMLElement.alt = element.alt;
newImageHTMLElement.tabIndex = this._tabIndex;
this._tabIndex++;
newImageHTMLElement.addEventListener("focus", (event) => {
if (COMPUTERVISIONKEY !== "") {
this.analyzeThisImage(event.target.src);
}
else {
var warningMsg = document.createElement("div");
warningMsg.innerHTML = "Please generate a Computer Vision key in the other tab.
";
this._targetDiv.insertBefore(warningMsg, this._targetDiv.firstChild);
browser.tabs.create({ active: false, url: "https://www.microsoft.com/cognitive-services/en-US/sign-up?ReturnUrl=/cognitive-services/en-us/subscriptions?productId=%2fproducts%2f54d873dd5eefd00dc474a0f4" });
}
});
this._targetDiv.appendChild(newImageHTMLElement);
});
});
});
We’re creating image elements. Each image will trigger an event if it has focus, querying the Computer Vision API for review.
This is done by this simple XHR call:
analyzeThisImage(url) {
    var xhr = new XMLHttpRequest();
    xhr.onreadystatechange = () => {
        if (xhr.readyState == 4 && xhr.status == 200) {
            var response = document.querySelector('#response');
            var reponse = JSON.parse(xhr.response);
            var resultToSpeak = `With a confidence of ${Math.round(reponse.description.captions[0].confidence * 100)}%, I think it's ${reponse.description.captions[0].text}`;
            console.log(resultToSpeak);
            if (!this._useBingTTS || BINGSPEECHKEY === "") {
                var synUtterance = new SpeechSynthesisUtterance();
                synUtterance.text = resultToSpeak;
                window.speechSynthesis.speak(synUtterance);
            }
            else {
                this._bingTTSclient.synthesize(resultToSpeak);
            }
        }
    };
    xhr.onerror = (evt) => {
        console.log(evt);
    };
    try {
        xhr.open('POST', 'https://api.projectoxford.ai/vision/v1.0/describe');
        xhr.setRequestHeader("Content-Type", "application/json");
        xhr.setRequestHeader("Ocp-Apim-Subscription-Key", COMPUTERVISIONKEY);
        var requestObject = { "url": url };
        xhr.send(JSON.stringify(requestObject));
    }
    catch (ex) {
        console.log(ex);
    }
}
view raw
The following articles will you help you to understand how this Computer Vision API works:
- “Analyzing an Image Version 1.0,” Microsoft Cognitive Services
- “Computer Vision API, v1.0,” Microsoft Cognitive Services
This shows you via an interactive console in a web page how to call the REST API with the proper JSON properties, and the JSON object you’ll get in return. It’s useful to understand how it works and how you will call it.
In our case, we’re using the describe feature of the API. You’ll also notice in the callback that we will try to use either the Web Speech API or the Bing Text-to-Speech service, based on your options.
Here, then, is the global workflow of this little extension:
Loading The Extension In Each Browser
Let’s review quickly how to install the extension in each browser.
Prerequisites
Download or clone my small extension from GitHub somewhere to your hard drive.
Also, modify dareangel.dashboard.js to add at least a Computer Vision API key. Otherwise, the extension will only be able to display the images extracted from the web page.
Microsoft Edge
First, you’ll need at least a Windows 10 Anniversary Update (OS Build 14393+) to have support for extensions in Edge.
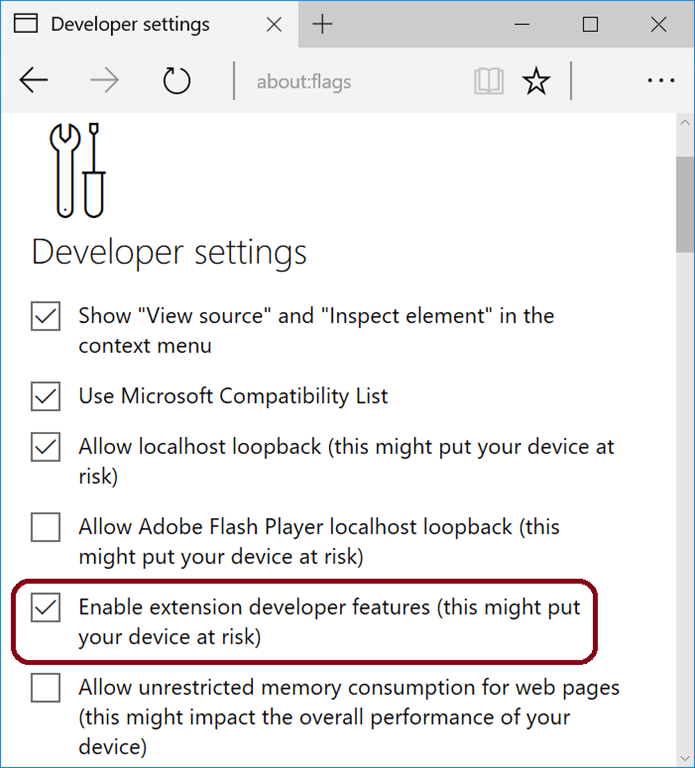
Then, open Edge and type about:flags in the address bar. Check the “Enable extension developer features.”
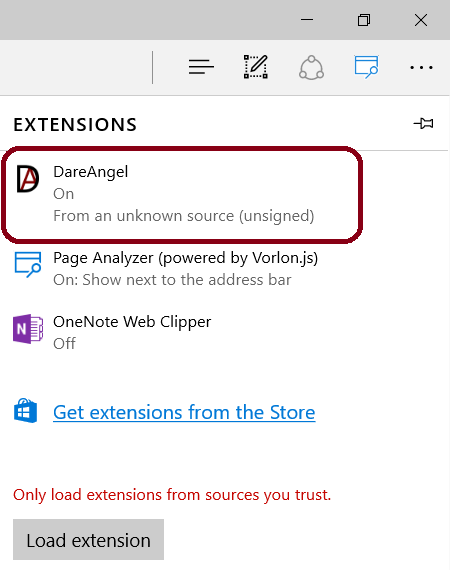
Click on “…” in the Edge’s navigation bar and then “Extensions” and then “Load extension,” and select the folder where you’ve cloned my GitHub repository. You’ll get this:
Click on this freshly loaded extension, and enable “Show button next to the address bar.”
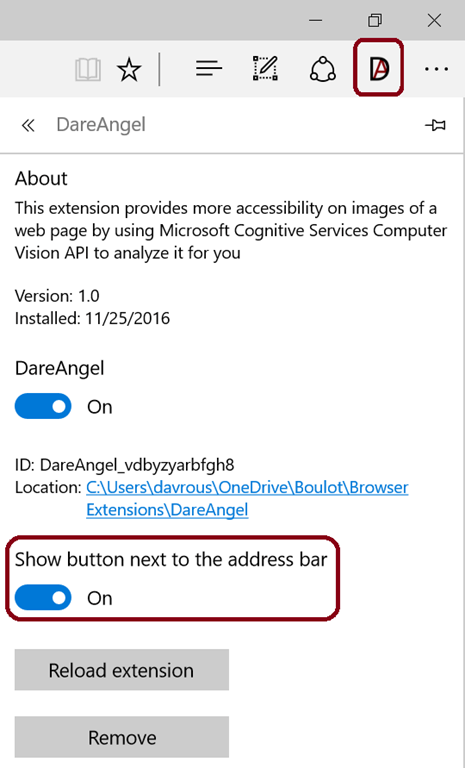
Note the “Reload extension” button, which is useful while you’re developing your extension. You won’t be forced to remove or reinstall it during the development process; just click the button to refresh the extension.
Navigate to BabylonJS, and click on the Dare Angel (DA) button to follow the same demo as shown in the video.
Google Chrome, Opera, Vivaldi
In Chrome, navigate to chrome://extensions. In Opera, navigate to opera://extensions. And in Vivaldi, navigate to vivaldi://extensions. Then, enable “Developer mode.”
Click on “Load unpacked extension,” and choose the folder where you’ve extracted my extension.
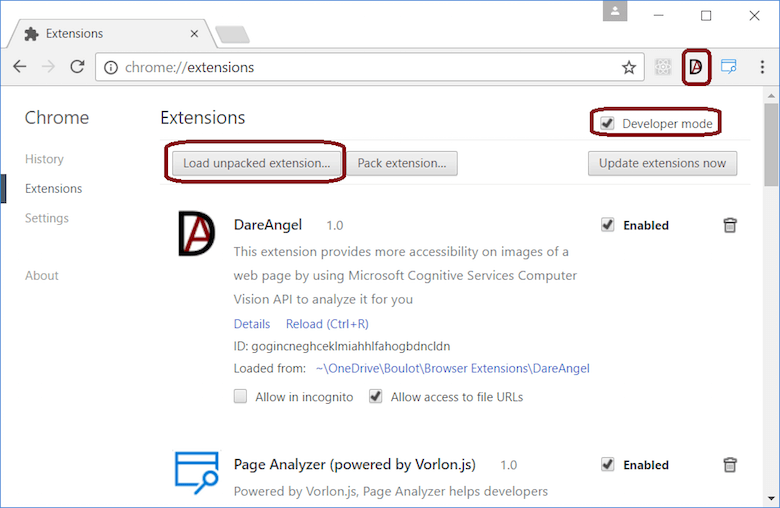
Navigate to BabylonJS, and open the extension to check that it works fine.
Mozilla Firefox
You’ve got two options here. The first is to temporarily load your extension, which is as easy as it is in Edge and Chrome.
Open Firefox, navigate to about:debugging and click “Load Temporary Add-on.” Then, navigate to the folder of the extension, and select the manifest.json file. That’s it! Now go to BabylonJS to test the extension.
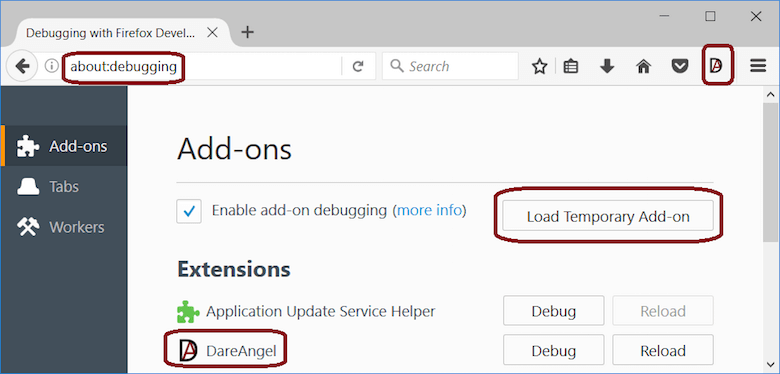
The only problem with this solution is that every time you close the browser, you’ll have to reload the extension. The second option would be to use the XPI packaging. You can learn more about this in “Extension Packaging” on the Mozilla Developer Network.
Brave
The public version of Brave doesn’t have a “developer mode” embedded in it to let you load an unsigned extension. You’ll need to build your own version of it by following the steps in “Loading Chrome Extensions in Brave.”
As explained in that article, once you’ve cloned Brave, you’ll need to open the extensions.js file in a text editor. Locate the lines below, and insert the registration code for your extension. In my case, I’ve just added the two last lines:
  // Manually install the braveExtension and torrentExtension
  extensionInfo.setState(config.braveExtensionId, extensionStates.REGISTERED)
  loadExtension(config.braveExtensionId, getExtensionsPath('brave'), generateBraveManifest(), 'component')

  extensionInfo.setState('DareAngel', extensionStates.REGISTERED)
  loadExtension('DareAngel', getExtensionsPath('DareAngel/'))
view raw
Copy the extension to the app/extensions folder. Open two command prompts in the browser-laptop folder. In the first one, launch npm run watch, and wait for webpack to finish building Brave’s Electron app. It should say, “webpack: bundle is now VALID.” Otherwise, you’ll run into some issues.
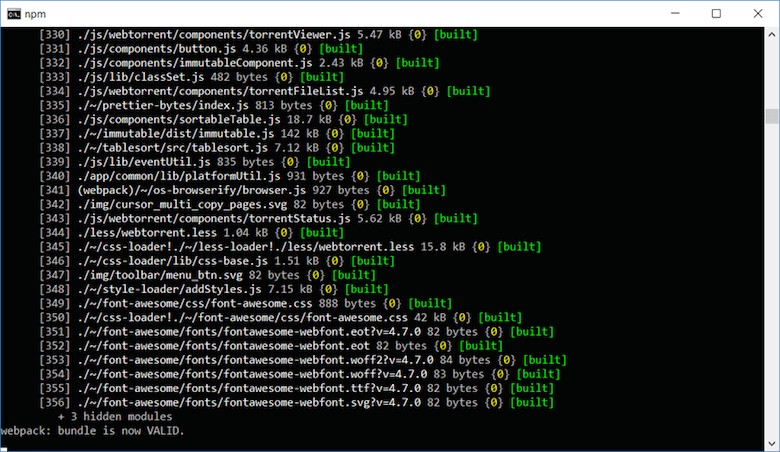
Then, in the second command prompt, launch npm start, which will launch our slightly custom version of Brave.
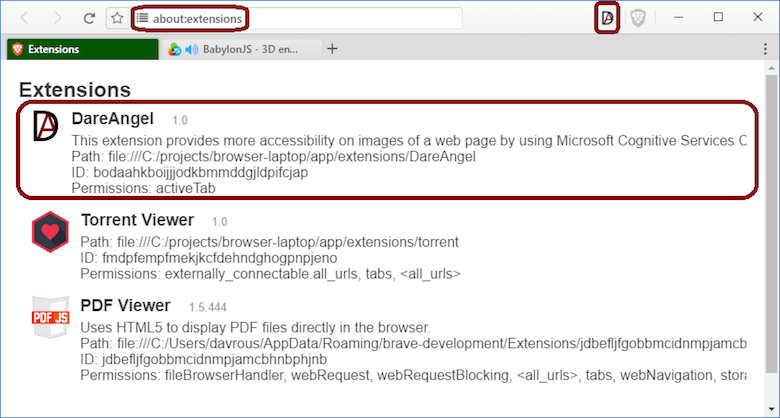
In Brave, navigate to about:extensions, and you should see the extension displayed and loaded in the address bar.
Debugging The Extension In Each Browser
Tip for all browsers: Using console.log(), simply log some data from the flow of your extension. Most of the time, using the browser’s developer tools, you’ll be able to click on the JavaScript file that has logged it to open it and debug it.
Microsoft Edge
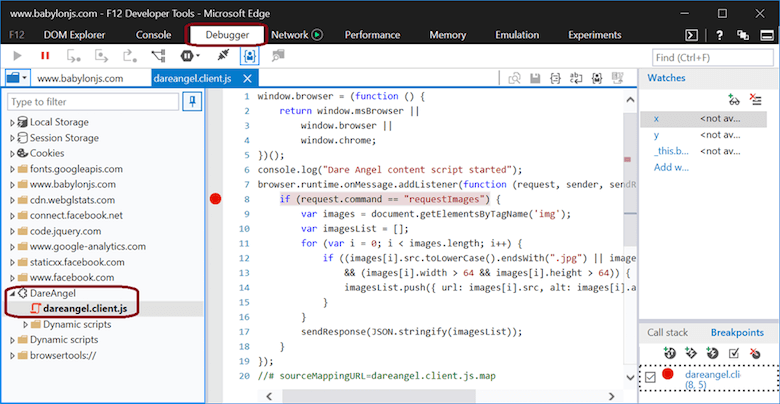
To debug the client script part, living in the context of the page, you just need to open F12. Then, click on the “Debugger” tab and find your extension’s folder.
Open the script file that you’d like to debug — dareangel.client.js, in my case — and debug your code as usual, setting up breakpoints, etc.
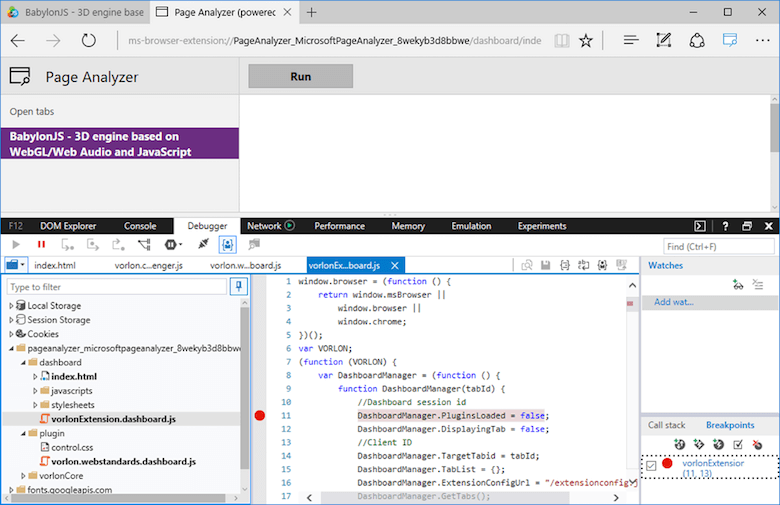
If your extension creates a separate tab to do its job (like the Page Analyzer, which our Vorlon.js team published in the store), simply press F12 on that tab to debug it.
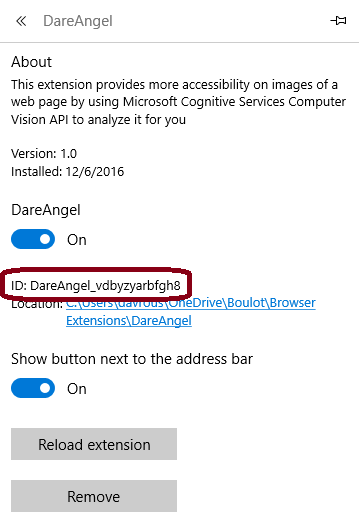
If you’d like to debug the popup page, you’ll first need to get the ID of your extension. To do that, simply go into the property of the extension and you’ll find an ID property:
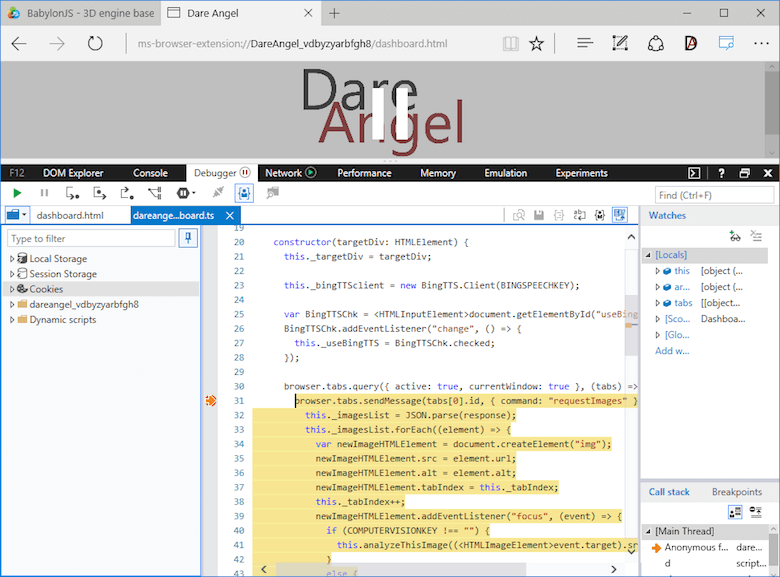
Then, you’ll need to type in the address bar something like ms-browser-extension://ID_of_your_extension/yourpage.html. In our case, it would be ms-browser-extension://DareAngel_vdbyzyarbfgh8/dashboard.html. Then, simply use F12 on this page:
Google Chrome, Opera, Vivaldi, Brave
Because Chrome and Opera rely on the same Blink code base, they share the same debugging process. Even though Brave and Vivaldi are forks of Chromium, they also share the same debugging process most of the time.
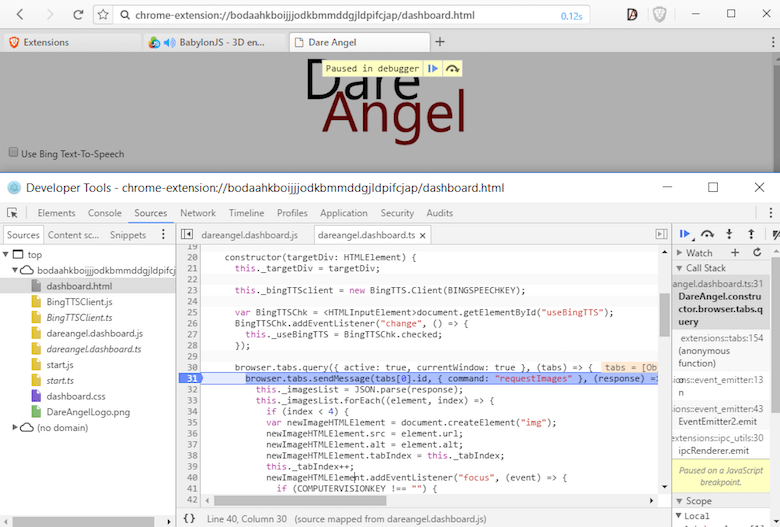
To debug the client script part, open the browser’s developer tools on the page that you’d like to debug (pressing F12, Control + Shift + I or ⌘ + ⌥ + I, depending on the browser or platform you’re using).
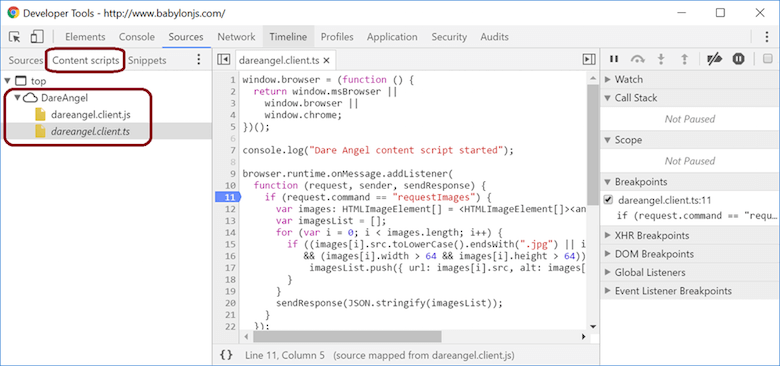
Then, click on the “Content scripts” tab and find your extension’s folder. Open the script file that you’d like to debug, and debug your code just as you would do with any JavaScript code.
The popup UI page we’re using is very simple and will display the list of images returned by the content script inside a flexbox container. It loads the start.js script, which immediately creates an instance of dareangel.dashboard.js to send a message to the content script to get the URLs of the images in the currently visible tab.
Here’s the code that lives in the UI page, requesting the URLs to the content script:
browser.tabs.query({ active: true, currentWindow: true }, (tabs) => {
browser.tabs.sendMessage(tabs[0].id, { command: "requestImages" }, (response) => {
this._imagesList = JSON.parse(response);
this._imagesList.forEach((element) => {
var newImageHTMLElement = document.createElement("img");
newImageHTMLElement.src = element.url;
newImageHTMLElement.alt = element.alt;
newImageHTMLElement.tabIndex = this._tabIndex;
this._tabIndex++;
newImageHTMLElement.addEventListener("focus", (event) => {
if (COMPUTERVISIONKEY !== "") {
this.analyzeThisImage(event.target.src);
}
else {
var warningMsg = document.createElement("div");
warningMsg.innerHTML = "Please generate a Computer Vision key in the other tab.
";
this._targetDiv.insertBefore(warningMsg, this._targetDiv.firstChild);
browser.tabs.create({ active: false, url: "https://www.microsoft.com/cognitive-services/en-US/sign-up?ReturnUrl=/cognitive-services/en-us/subscriptions?productId=%2fproducts%2f54d873dd5eefd00dc474a0f4" });
}
});
this._targetDiv.appendChild(newImageHTMLElement);
});
});
});
We’re creating image elements. Each image will trigger an event if it has focus, querying the Computer Vision API for review.
This is done by this simple XHR call:
analyzeThisImage(url) {
    var xhr = new XMLHttpRequest();
    xhr.onreadystatechange = () => {
        if (xhr.readyState == 4 && xhr.status == 200) {
            var response = document.querySelector('#response');
            var reponse = JSON.parse(xhr.response);
            var resultToSpeak = `With a confidence of ${Math.round(reponse.description.captions[0].confidence * 100)}%, I think it's ${reponse.description.captions[0].text}`;
            console.log(resultToSpeak);
            if (!this._useBingTTS || BINGSPEECHKEY === "") {
                var synUtterance = new SpeechSynthesisUtterance();
                synUtterance.text = resultToSpeak;
                window.speechSynthesis.speak(synUtterance);
            }
            else {
                this._bingTTSclient.synthesize(resultToSpeak);
            }
        }
    };
    xhr.onerror = (evt) => {
        console.log(evt);
    };
    try {
        xhr.open('POST', 'https://api.projectoxford.ai/vision/v1.0/describe');
        xhr.setRequestHeader("Content-Type", "application/json");
        xhr.setRequestHeader("Ocp-Apim-Subscription-Key", COMPUTERVISIONKEY);
        var requestObject = { "url": url };
        xhr.send(JSON.stringify(requestObject));
    }
    catch (ex) {
        console.log(ex);
    }
}
view raw
The following articles will you help you to understand how this Computer Vision API works:
- “Analyzing an Image Version 1.0,” Microsoft Cognitive Services
- “Computer Vision API, v1.0,” Microsoft Cognitive Services
This shows you via an interactive console in a web page how to call the REST API with the proper JSON properties, and the JSON object you’ll get in return. It’s useful to understand how it works and how you will call it.
In our case, we’re using the describe feature of the API. You’ll also notice in the callback that we will try to use either the Web Speech API or the Bing Text-to-Speech service, based on your options.
Here, then, is the global workflow of this little extension:

Loading The Extension In Each Browser
Let’s review quickly how to install the extension in each browser.
Prerequisites
Download or clone my small extension from GitHub somewhere to your hard drive.
Also, modify dareangel.dashboard.js to add at least a Computer Vision API key. Otherwise, the extension will only be able to display the images extracted from the web page.
Microsoft Edge
First, you’ll need at least a Windows 10 Anniversary Update (OS Build 14393+) to have support for extensions in Edge.
Then, open Edge and type about:flags in the address bar. Check the “Enable extension developer features.”

Click on “…” in the Edge’s navigation bar and then “Extensions” and then “Load extension,” and select the folder where you’ve cloned my GitHub repository. You’ll get this:

Click on this freshly loaded extension, and enable “Show button next to the address bar.”

Note the “Reload extension” button, which is useful while you’re developing your extension. You won’t be forced to remove or reinstall it during the development process; just click the button to refresh the extension.
Navigate to BabylonJS, and click on the Dare Angel (DA) button to follow the same demo as shown in the video.
Google Chrome, Opera, Vivaldi
In Chrome, navigate to chrome://extensions. In Opera, navigate to opera://extensions. And in Vivaldi, navigate to vivaldi://extensions. Then, enable “Developer mode.”
Click on “Load unpacked extension,” and choose the folder where you’ve extracted my extension.

Navigate to BabylonJS, and open the extension to check that it works fine.
Mozilla Firefox
You’ve got two options here. The first is to temporarily load your extension, which is as easy as it is in Edge and Chrome.
Open Firefox, navigate to about:debugging and click “Load Temporary Add-on.” Then, navigate to the folder of the extension, and select the manifest.json file. That’s it! Now go to BabylonJS to test the extension.

The only problem with this solution is that every time you close the browser, you’ll have to reload the extension. The second option would be to use the XPI packaging. You can learn more about this in “Extension Packaging” on the Mozilla Developer Network.
Brave
The public version of Brave doesn’t have a “developer mode” embedded in it to let you load an unsigned extension. You’ll need to build your own version of it by following the steps in “Loading Chrome Extensions in Brave.”
As explained in that article, once you’ve cloned Brave, you’ll need to open the extensions.js file in a text editor. Locate the lines below, and insert the registration code for your extension. In my case, I’ve just added the two last lines:
  // Manually install the braveExtension and torrentExtension
  extensionInfo.setState(config.braveExtensionId, extensionStates.REGISTERED)
  loadExtension(config.braveExtensionId, getExtensionsPath('brave'), generateBraveManifest(), 'component')

  extensionInfo.setState('DareAngel', extensionStates.REGISTERED)
  loadExtension('DareAngel', getExtensionsPath('DareAngel/'))
view raw
Copy the extension to the app/extensions folder. Open two command prompts in the browser-laptop folder. In the first one, launch npm run watch, and wait for webpack to finish building Brave’s Electron app. It should say, “webpack: bundle is now VALID.” Otherwise, you’ll run into some issues.

Then, in the second command prompt, launch npm start, which will launch our slightly custom version of Brave.
In Brave, navigate to about:extensions, and you should see the extension displayed and loaded in the address bar.

Debugging The Extension In Each Browser
Tip for all browsers: Using console.log(), simply log some data from the flow of your extension. Most of the time, using the browser’s developer tools, you’ll be able to click on the JavaScript file that has logged it to open it and debug it.
Microsoft Edge
To debug the client script part, living in the context of the page, you just need to open F12. Then, click on the “Debugger” tab and find your extension’s folder.
Open the script file that you’d like to debug — dareangel.client.js, in my case — and debug your code as usual, setting up breakpoints, etc.

If your extension creates a separate tab to do its job (like the Page Analyzer, which our Vorlon.js team published in the store), simply press F12 on that tab to debug it.

If you’d like to debug the popup page, you’ll first need to get the ID of your extension. To do that, simply go into the property of the extension and you’ll find an ID property:

Then, you’ll need to type in the address bar something like ms-browser-extension://ID_of_your_extension/yourpage.html. In our case, it would be ms-browser-extension://DareAngel_vdbyzyarbfgh8/dashboard.html. Then, simply use F12 on this page:

Google Chrome, Opera, Vivaldi, Brave
Because Chrome and Opera rely on the same Blink code base, they share the same debugging process. Even though Brave and Vivaldi are forks of Chromium, they also share the same debugging process most of the time.
To debug the client script part, open the browser’s developer tools on the page that you’d like to debug (pressing F12, Control + Shift + I or ⌘ + ⌥ + I, depending on the browser or platform you’re using).
Then, click on the “Content scripts” tab and find your extension’s folder. Open the script file that you’d like to debug, and debug your code just as you would do with any JavaScript code.

To debug a tab that your extension would create, it’s exactly the same as with Edge: Simply use the developer tools.
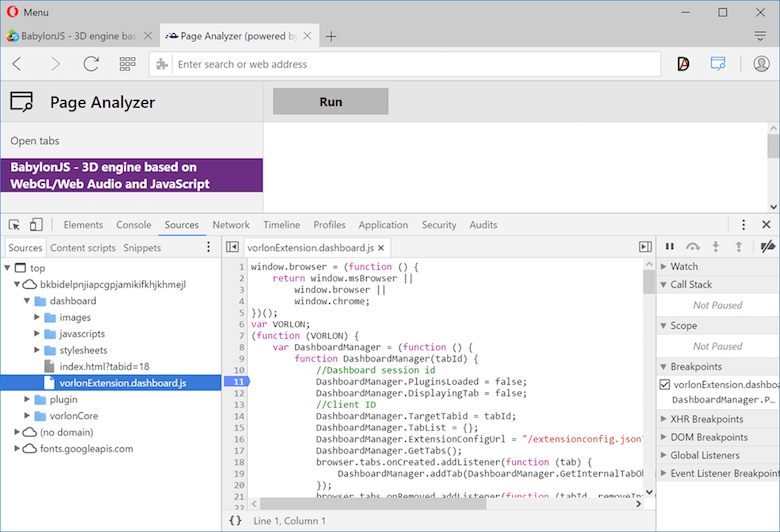
For Chrome and Opera, to debug the popup page, right-click on the button of your extension next to the address bar and choose “Inspect popup,” or open the HTML pane of the popup and right-click inside it to “Inspect.” Vivaldi only supports right-click and then “Inspect” inside the HTML pane once opened.
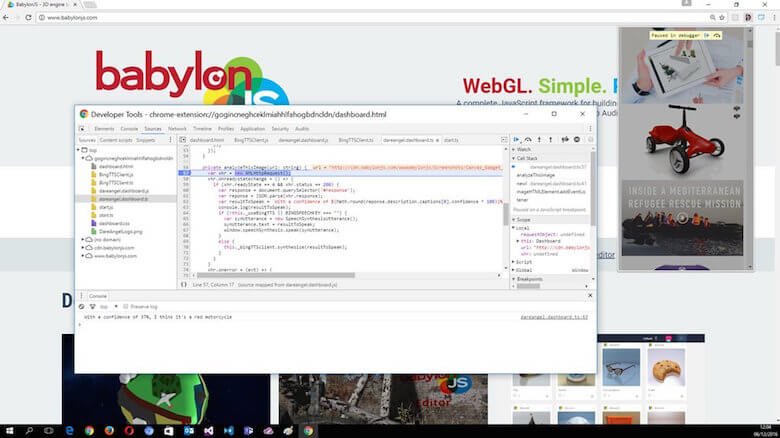
For Brave, it’s the same process as with Edge. You first need to find the GUID associated with your extension in about:extensions:
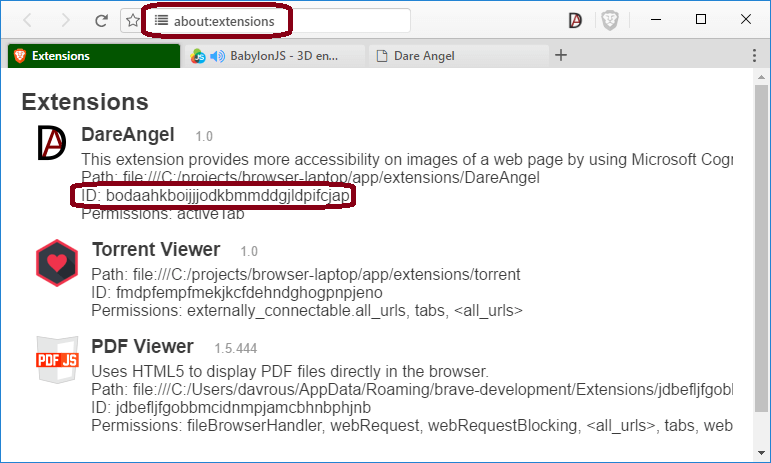
And then, in a separate tab, open the page you’d like to debug like — in my case, chrome-extension://bodaahkboijjjodkbmmddgjldpifcjap/dashboard.html — and open developer tools.
For the layout, you have a bit of help using Shift + F8, which will let you inspect the complete frame of Brave. And you’ll discover that Brave is an Electron app using React!
Note, for instance, the data-reactroot attribute.
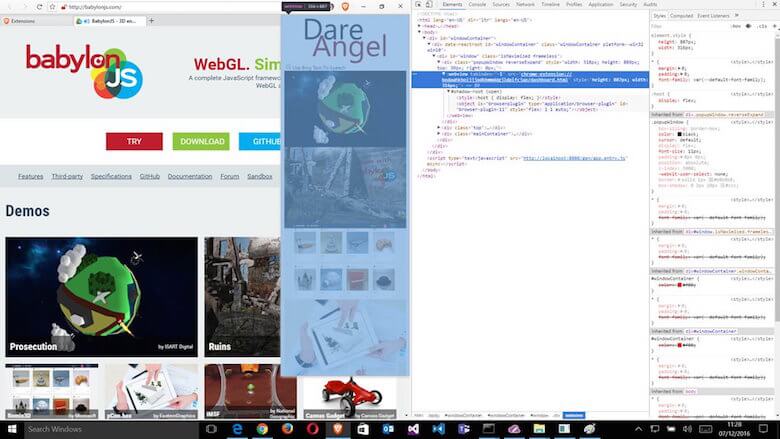
Note: I had to slightly modify the CSS of the extension for Brave because it currently displays popups with a transparent background by default, and I also had some issues with the height of my images collection. I’ve limited it to four elements in Brave.
Mozilla Firefox
Mozilla has really great documentation on debugging web extensions.
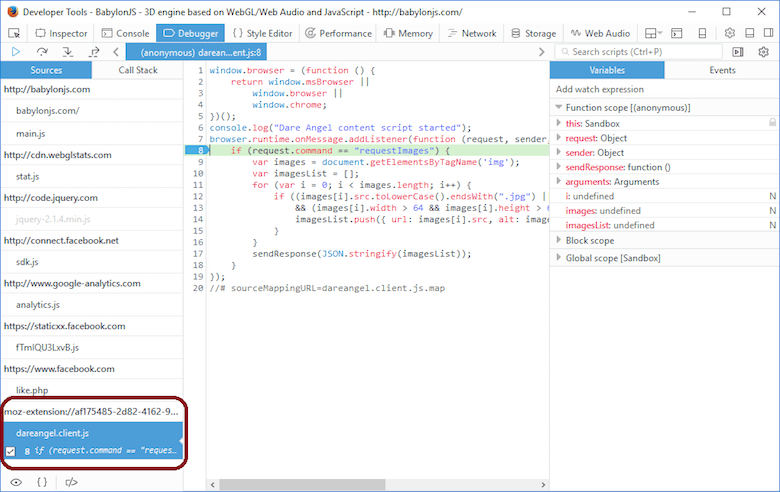
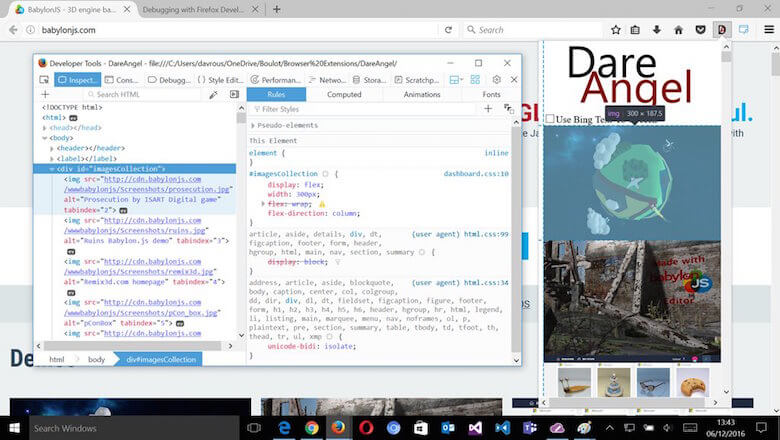
For the client script part, it’s the same as in Edge, Chrome, Opera and Brave. Simply open the developer tools in the tab you’d like to debug, and you’ll find a moz-extension://guid section with your code to debug:
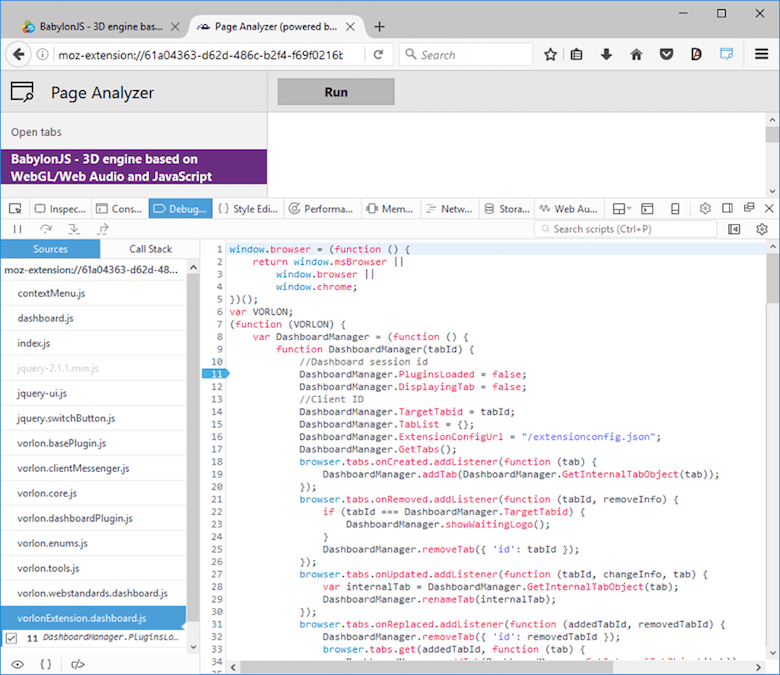
If you need to debug a tab that your extension would create (like Vorlon.js’ Page Analyzer extension), simply use the developer tools:
Finally, debugging a popup is a bit more complex but is well explained in the “Debugging Popups” section of the documentation.
Publishing Your Extension In Each Store
Each vendor has detailed documentation on the process to follow to publish your extension in its store. They all take similar approaches. You need to package the extension in a particular file format — most of the time, a ZIP-like container. Then, you have to submit it in a dedicated portal, choose a pricing model and wait for the review process to complete. If accepted, your extension will be downloadable in the browser itself by any user who visits the extensions store.
Here are the various processes:
- Google: “Publish in the Chrome Web Store”
- Mozilla: “Publishing your WebExtension”
- Opera: “Publishing Guidelines”
- Microsoft: “Packaging Microsoft Edge Extensions”
Please note that submitting a Microsoft Edge extension to the Windows Store is currently a restricted capability. Reach out to the Microsoft Edge team with your request to be a part of the Windows Store, and they’ll consider you for a future update.
I’ve tried to share as much of what I’ve learned from working on our Vorlon.js Page Analyzer extension and this little proof of concept.
Some developers remember the pain of working through various implementations to build their extension — whether it meant using different build directories, or working with slightly different extension APIs, or following totally different approaches, such as Firefox’s XUL extensions or Internet Explorer’s BHOs and ActiveX.
It’s awesome to see that, today, using our regular JavaScript, CSS and HTML skills, we can build great extensions using the very same code base and across all browsers!
Feel free to ping me on Twitter for any feedback.
 (ms, vf, rb, yk, al, il)


