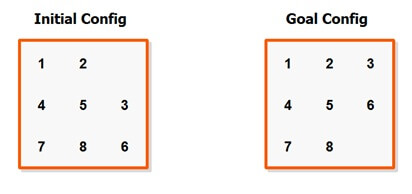
Sam Loyd (1841–1911), American chess player and puzzle maker, created the sliding tiles puzzle in the 1870s. The puzzle is represented by an m×n grid, where m is number of columns and n is number of rows, and each cell can be any imaginable value (number, letter, image, and so on.)
Further Reading on SmashingMag:
- A Beginner’s Guide To Progressive Web Apps
- How To Develop A Chat Bot With Node.js
- How Artificial Intelligence Is Changing Design
The purpose of the puzzle is to rearrange the initial configuration of the tiles to match another configuration known as the goal configuration. The rearrangement task is achieved by swapping the empty tile with some other tile in all possible directions (up, down, left, and right).
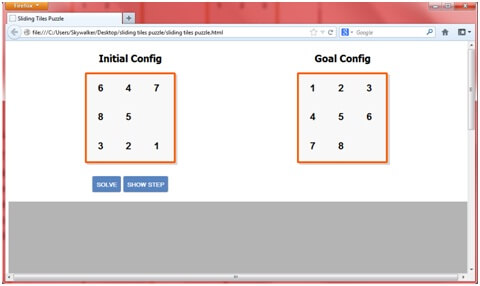
It is assumed that the empty tile cannot be moved out of the board: thus, if located in the first column, the empty tile cannot go left; and if located in the rightmost column, it cannot go right; the same applies for rows considering moves either up or down. The solution to the previous puzzle will be obtained in the following steps.
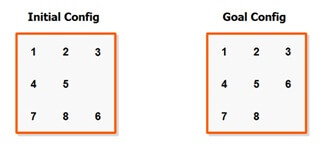
and finally
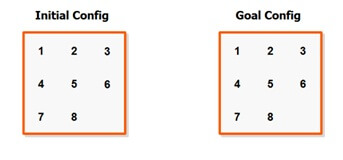
Verify how the initial and goal configurations are now the same; this means we have completed the puzzle.
This article will be divided into two parts. First, we’ll provide a brief description of how to create and develop a sliding tiles puzzle using HTML, CSS for the visual aspects, and JavaScript for moving (by means of animation) the tiles on the board. (We’ll need this to illustrate the latter part of this article.)
Second, we’ll develop an artificial intelligence by means of an A* search algorithm capable of finding a solution with the minimum number of moves to the goal configuration, thus providing an optimal solution. The various heuristics associated with the A* algorithm will help guide the search, and the cleverer the heuristic, the sooner the optimal solution will be found. Each of the heuristics described will be presented in order of cleverness; therefore, the last heuristic presented will be the most powerful.
Layout
We’ll start by creating the corresponding sliding_tiles_puzzle.html file which will hold the game; we’ll also create the following empty files:
- styles.css
- stpuzzle.js
Moreover, it will be necessary to add jquery.js as we will use it to make our life easier and get much more elegant, legible code.
The header should end up looking like this:
<head>
   <meta name="viewport" content="width=device-width, initial-scale=1.0">
   <meta http-equiv="Content-Type" content="text/html; charset=UTF-8" />
   <link href="css/styles.css" rel="stylesheet" media="screen" type="text/css">

   <title>Sliding Tiles Puzzle</title>
</head>
For efficiency, we’ll add links to every script at the bottom of the page. This is a common practice, since pages are rendered in a top to bottom manner and we regularly want the page to load as quickly as possible; we leave the functional scripts to be loaded at the end, after all visual elements have been properly loaded.
      <script type="text/javascript" src="js/jquery.js"></script>
      <script type="text/javascript" src="js/priority-queue.js"></script>
      <script type="text/javascript" src="js/hashtable.js"></script>
      <script type="text/javascript" src="js/hashset.js"></script>
      <script type="text/javascript" src="js/stpuzzle.js"></script>
   </body>
</html>
The priority-queue.js, hashtable.js and hashset.js will be used in the artificial intelligence component to provide efficiency to our rational agent; they respectively represent priority queues, hash tables and hash sets data structures.
Now we’ll start creating the layout of the page. At first, our layout will look like this.
<body>
   <div class="container">

   </div>
   <div id="panel">
   </div>
The container class, located in the styles.css file, appears as in the following block of styles.
/*
Developed by Arnaldo Perez Castano
arnaldo.skywalker@gmail.com
*/

.container {
   width:1024px;
   margin-left: auto;
   margin-right: auto;
   min-height:380px;
}
The panel is simply a log that we’l use for printing or showing the results associated with the artificial intelligence component. In this panel we’ll be printing the optimal solution obtained by the AI.
#panel {
   width:100%;
   background-color: rgb(180,180,180);
   min-height:1000px;
   color:white;
   font-weight: bold;
   padding:5px;
   font-family: Arial;
}
Since we want the global container to be at the center of the page, we set a fixed width, and properties margin-left and margin-right to auto – this will set it right in the middle. Now we add the grid-container div which, as the name suggests, is basically the div that will immediately contain the grid representing the board.
<div class="container">
   <div class="grid-container">
      <h2> Initial Config </h2>

   </div>
</div>
The grid-container class and the selectors involving it are illustrated in the following blocks.
.grid-container {
   float: left;
   width:210px;
   height:250px;
   text-align: center;
   width:50%;
}

.grid-container h2 {
   font-family: Tahoma;
}
We are floating left the grid container since we will put two of these in the same line: one for each configuration (initial and goal). Finally, we add the grid div.
<div class="grid-container">
   <h2> Initial Config </h2>
   <div class="grid start">
      <div class="row">
         <div class="cell" data-pos="0,0"><span>6</span></div>
         <div class="cell" data-pos="0,1"><span>4</span></div>
         <div class="cell" data-pos="0,2"><span>7</span></div>
      </div>
      <div class="row">
         <div class="cell" data-pos="1,0"><span>8</span></div>
         <div class="cell" data-pos="1,1"><span>5</span></div>
         <div class="cell" id="empty" data-pos="1,2"></div>
      </div>
      <div class="row">
         <div class="cell" data-pos="2,0"><span>3</span></div>
         <div class="cell" data-pos="2,1"><span>2</span></div>
         <div class="cell" data-pos="2,2"><span>1</span></div>
      </div>
   </div>
</div>
The sliding tiles puzzle grid consists of three rows, each with three cells; this basically makes up the entire grid. With the proposed layout we achieve a very intuitive manner of representing the grid. The grid contains three children; each child is a row (div element); a row contains three children; and each child represents a cell (also a div element).
For programming-related issues we add the data-pos attribute to each cell, to indicate the position of each cell on the board. The same goes for the start class. We need to differentiate the initial configuration from the goal configuration as the latter will not receive input from the user. The start class will help us accomplish that. The definition of the above classes is listed in the next lines.
.grid {
   background-color: rgb(248,248,248);
   border: solid 5px rgb(249, 90, 0);
   width:210px;
   height:210px;
   margin-left: auto;
   margin-right: auto;
   border-radius: 3px;
   box-shadow: 5px 5px #d8d8d8, 5px 5px #d8d8d8;
   overflow: auto;
}

.row {
   height:33.3%;
}

.cell {
   width:32.3%;
   height:100%;
   float: left;
   text-align: center;
   font-size:150%;
   font-family: Arial;
   font-weight: bold;
   position:relative;
}

.cell:hover {
   background-color: rgb(221,221,221);
}

.cell span {
   display: block;
   transform: translateY(70%);
}
The final result is a complete 3×3 grid with numbers 1 to 9.
To get the goal configuration into the page we just copy the grid div and all its contents and rename the start class to goal.
<div class="grid-container">
   <h2> Goal Config </h2>
   <div class="grid goal">
      <div class="row">
         <div class="cell"><span>1</span></div>
         <div class="cell"><span>2</span></div>
         <div class="cell"><span>3</span></div>
      </div>
      <div class="row">
         <div class="cell"><span>4</span></div>
         <div class="cell"><span>5</span></div>
         <div class="cell"><span>6</span></div>
      </div>
      <div class="row">
         <div class="cell"><span>7</span></div>
         <div class="cell"><span>8</span></div>
         <div class="cell"></div>
      </div>
   </div>
</div>
To conclude, we add Solve and Show Step buttons to the first grid container.
<button onclick="start()"> Solve </button>
<button onclick="showSolution()"> Show Step </button>
The first button will trigger the rational agent; in other words, the A* search algorithm. The second will visually show a step of the solution obtained by the first. Thus, by pressing the Show Step button n times where n is the length of the solution, we’ll know how to solve the puzzle in the minimum number of steps.
Now that we have some visual competence let us start building some functional competence. We need to make the game work – basically, that translates into allowing the empty tile to move throughout the board. To complete this piece of development we’ll be using JavaScript. The first lines of the stpuzzle.js file will look like this
/*
   Developed by Arnaldo Perez Castano
   arnaldo.skywalker@gmail.com
*/

var emptytilePosRow = 1;
var emptytilePosCol = 2;
var cellDisplacement = "69px";
The emptytilePosRow and emptytilePosCol will tell us where the empty tile is at all times. It will be updated with each move made.
The cellDisplacement variable will indicate the displacement value to apply to a cell when an animation is being made. Note how the cell class has the position attribute set to relative. We want to freely move the cells on the board using the top and right properties on animations. The cellDisplacement value will indicate the new values of the top and right properties, thus moving the cells.
The function taking care of moves on the board starts like this:
function moveTile()
{
   // Gets the position of the current element
   var pos = $(this).attr('data-pos');
   var posRow = parseInt(pos.split(',')[0]);
   var posCol = parseInt(pos.split(',')[1]);
Notice how we are already using jQuery to select all cells from the starting grid. Note also the use of the start class. We want to maintain the goal board as read-only, therefore we select all cells belonging to the start grid – and only to the start grid. Up next, we get the position of the cell being selected. Remember, the positions are stored as ‘x, y‘: we get the row and column indexes in the posRow and posCol variables.
The rest of the function is dedicated to executing the correct move.
// Move Up
   if (posRow + 1 == emptytilePosRow && posCol == emptytilePosCol)
   {
      $(this).animate({
      'top' : "+=" + cellDisplacement //moves up
      });

      $('#empty').animate({
      'top' : "-=" + cellDisplacement //moves down
      });

      emptytilePosRow-=1;
      $(this).attr('data-pos',(posRow+1) + "," + posCol);
   }

   // Move Down
   if (posRow - 1 == emptytilePosRow && posCol == emptytilePosCol)
   {
      $(this).animate({
      'top' : "-=" + cellDisplacement //moves down
      });

      $('#empty').animate({
      'top' : "+=" + cellDisplacement //moves up
      });

      emptytilePosRow+=1;
      $(this).attr('data-pos',(posRow-1) + "," + posCol);
   }

   // Move Left
   if (posRow == emptytilePosRow && posCol + 1 == emptytilePosCol)
   {
      $(this).animate({
      'right' : "-=" + cellDisplacement //moves right
      });

      $('#empty').animate({
      'right' : "+=" + cellDisplacement //moves left
      });

      emptytilePosCol -= 1;
      $(this).attr('data-pos',posRow + "," + (posCol+1));
   }

   // Move Right
   if (posRow == emptytilePosRow && posCol - 1 == emptytilePosCol)
   {
      $(this).animate({
      'right' : "+=" + cellDisplacement //moves left
      });

      $('#empty').animate({
      'right' : "-=" + cellDisplacement //moves right
      });

      emptytilePosCol += 1;
      $(this).attr('data-pos',posRow + "," + (posCol-1));
   }

   // Update empty position
   $('#empty').attr('data-pos',emptytilePosRow + "," + emptytilePosCol);
}
Each of the four if statements represents a different move for the empty tile. They share similarities as their main differences reside on the conditions, signs and updating of variables. The right move, for instance, begins by checking if the empty tile is to the left of the current cell by the condition: posRow == emptytilePosRow (the same as saying that they are in the same row) and posCol - 1 == emptytilePosCol (the same as saying that the empty tile is to the left of current cell).
If the condition is satisfied then, using JQuery’s animation, we change the value of the right property to displace the current cell to the left and make the illusion of having swapped the elements. The if statement ends by updating the emptytilePosCol variable (adding 1) as it was moved to the right, and updating the cell position which was moved to the left (subtracting 1 from its column position). At the end, we update the position of the empty tile.
Artificial Intelligence
The A* informed search (Hart et al, 1968) represents the rational non-living agent that we’ll be developing to solve the sliding tiles puzzle. A rational agent is an entity that, being part of some environment and subject to certain rules, is capable of perceiving in this environment and acting rationally to these perceptions. Rationality would be given by the appropriate decision making of the agent, considered appropriate if it’s aimed towards maximizing some desired outcome. The artificial intelligence is the agent itself.
Humans are rational (most of the time) living agents as they belong to an environment (the universe) and we are subject to certain environmental rules (we cannot live under extremely cold temperatures, for example); we obtain perceptions from the environment (we feel cold) and we react rationally (again, most of the time) to these perceptions (we wear coats).
In the context of the sliding tiles puzzle, the environment is represented by the board, the rules or constraints by the possible directions in which one can move the empty tile (up, down, left, right), and by the fact that you execute a valid movement when you swap the empty tile with any of its adjacent tiles. A perception corresponds to the current state of the configuration and the rational reaction to this perception corresponds to the executed move. If it’s rational, this move should be oriented toward getting a configuration that matches the goal configuration.
What Will The A* Search Do?
The A* search, as the name suggests, is a search algorithm, its purpose to intelligently search the space state (set of all board configurations) and find a path from the initial configuration to the goal configuration. The intelligence of the search is given by how many states it visits: the fewer the number of states visited, the more intelligent it is and the sooner it will provide a solution. To navigate through the space state, we model the problem as a graph. In this manner, we consider that state B is a child of state A if B is obtained by moving the empty tile in some valid direction in A. In this sense, a node on the graph can have at most four children, one for each possible direction.
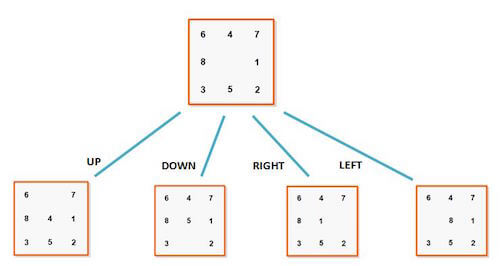
The A* search is informed as it uses environment knowledge to select the next step to continue the search. This knowledge is represented by a numeric value associated with every state (s) and known as f(s), hence in general:
f(s) = g(s) + h(s)
where g(s) is the cost of reaching state s from the initial state, and h(s) is the estimated cost of reaching the goal state from the current state or configuration. This relation is depicted in the following figure.

To guide the search through the immense space state we use heuristics. A heuristic is the way by which we adhere our empirical and specific environment knowledge to the rational agent, in this case the A* search. The information provided by the heuristic is supposed to help find a feasible, short path to the goal configuration.
Since we are modeling the problem as a graph, the basic skeleton of the A* search corresponds to that of a breadth-first search (BFS), a classical graph search algorithm. The difference between the A* search and the BFS is that nodes or states in the A* search are associated with some value f(s), and the node selected for the next iteration is the one with the minimum f(s). In BFS, all nodes have the same value (1) so it is not really important which one comes first, just that they are selected in the order in which they were added to the queue (FIFO: first in, first out).
When developing a heuristic it’s important to make sure it holds the admissibility criteria. A heuristic is considered admissible if it doesn’t overestimate the minimum cost of reaching the goal configuration from the current configuration. If admissible, the A* search algorithm will always find an optimal solution.
As previously mentioned we are coding the artificial intelligence in JavaScript. Some may think this an unwise approach but we’ll prove that JavaScript can offer all we need to obtain an efficient rational agent. We’ll start by creating the Node object shown in the following code.
function Node(value, state, emptyRow, emptyCol, depth) {
   this.value = value
   this.state = state
   this.emptyCol = emptyCol
   this.emptyRow = emptyRow
   this.depth = depth
   this.strRepresentation = ""
   this.path = ""

   // String representation of the state in CSV format
   for (var i = 0; i < state.length; i++)
   {
      // We assume the state is a square
      if (state[i].length != state.length) {
         alert('Number of rows differs from number of columns')
         return false
      }

      for (var j = 0; j < state[i].length; j++)
        this.strRepresentation += state[i][j] + ",";
   }
   this.size = this.state.length
}
A description of every variable is listed next.
value: represents the f(s) value.state: represents the state of the board as a two-dimensional array.emptyCol: indicates the column in which the empty tile is located.emptyRow: indicates the row in which the empty tile is located.depth: indicates the number of moves executed from the initial configuration up to the configuration of this node, the g(s) value.strRepresentation: string representation of the board in CSV format. For the goal configuration the string representation would be “1,2,3,4,5,6,7,8,0,”. The sliding tiles puzzle is a cyclic puzzle: from one configuration s and after a sequence of moves we could get back to s, hence we’ll store the representation of every expanded node to avoid these cycles. For this purpose we are using the HashSet.path: stores every move in a string (“DLRU”), thus this string represents the sequence of moves made from the initial configuration up to the current node.size: the size of the board. Notice that we are assuming the board has dimensions n, m where n=m.
Now that we’ve presented the Node object let’s illustrate the execution of the A* algorithm through an example. For this example we’ll consider the misplaced tiles heuristic, probably the simplest, most common heuristic for this puzzle. The misplaced tiles heuristic returns the number of tiles that are misplaced; that is, in an incorrect position when compared to the goal configuration. It’s admissible as the number returned does not overestimate the minimum number of moves required to get to the goal state. You have to move every misplaced tile once at least to be able to take them to their goal position; hence, it is admissible.
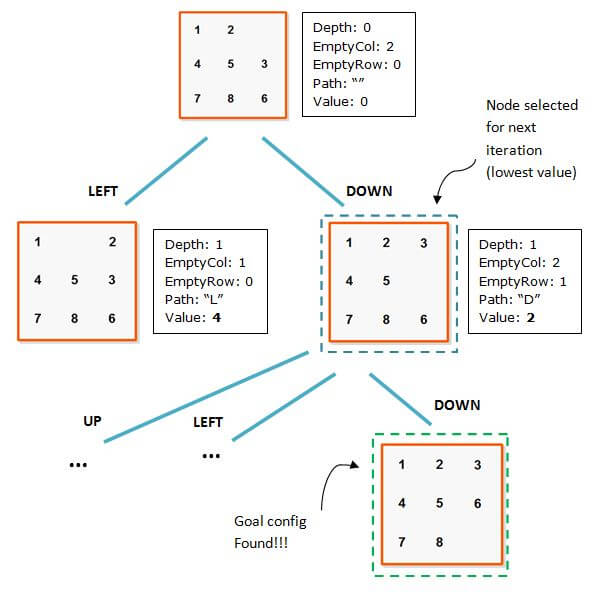
To implement the A* algorithm we’ll create an AStar object with the following schema:
function AStar(initial, goal, empty) {
   this.initial = initial
   this.goal = goal
   this.empty = empty
   this.queue = new PriorityQueue({ comparator: function(a, b) {
        if (a.value > b.value)
            return 1
        if (a.value < b.value)
            return -1
        return 0
    }});
    this.queue.queue(initial);
    this.visited = new HashSet();
}
Notice how we are already using the data structures contained in the script files we added at the beginning. For the priority queue, we defined a comparison function that we’ll need to sort the elements or nodes in ascending order. The visited HashSet will store the strRepresentation of our visited configurations. This way we avoid cycles.
To enhance the AStar object, we’ll use prototypes to add methods and properties. A prototype is a method or property that becomes part of every new object created after the method or property has been related to the object at hand. For instance, the execute function will be available for every AStar object declared after this piece of code.
AStar.prototype.execute = function ()
{
   // Add current state to visited list
   this.visited.add(this.initial.strRepresentation)

   while (this.queue.length > 0)
   {
      var current = this.queue.dequeue()

      if (current.strRepresentation == this.goal.strRepresentation)
        return current

      this.expandNode(current)
   }
}
The execute skeleton resembles that of the BFS skeleton:
- There’s a loop that will end when the priority queue is empty.
- The current variable will hold the node contained in the queue with minimum value.
- If this node’s state matches the goal state then we would have completed the task.
- Otherwise we expand the current node. The expansion translates into moving the empty tile in all possible directions, hence generating new nodes that will be queued into the queue.
The statements block from the expansion method is presented in the following code:
AStar.prototype.expandNode = function (node)
{
   var temp = ''
   var newState = ''
   var col = node.emptyCol
   var row = node.emptyRow
   var newNode = ''

   // Up
   if (row > 0)
   {
      newState = node.state.clone();
      temp = newState[row - 1][col]
      newState[row - 1][col] = this.empty
      newState[row][col] = temp
      newNode = new Node(0, newState, row - 1, col,  node.depth + 1)

      if (!this.visited.contains(newNode.strRepresentation))
      {
      newNode.value = newNode.depth + this.heuristic(newNode)
      newNode.path = node.path + "U"
      this.queue.queue(newNode)
      this.visited.add(newNode.strRepresentation)
      }
   }

   // Down
  if (row < node.size - 1)
  {
      newState = node.state.clone();
      temp = newState[row + 1][col]
      newState[row + 1][col] = this.empty
      newState[row][col] = temp
      newNode = new Node(0, newState, row + 1, col, node.depth + 1)

      if (!this.visited.contains(newNode.strRepresentation))
      {
         newNode.value = newNode.depth + this.heuristic(newNode)
     newNode.path = node.path + "D"
         this.queue.queue(newNode)
         this.visited.add(newNode.strRepresentation)
      }
   }

   // Left
   if (col > 0)
   {
       newState = node.state.clone();
       temp = newState[row][col - 1]
       newState[row][col - 1] = this.empty
       newState[row][col] = temp
       newNode = new Node(0, newState, row, col - 1, node.depth + 1)

       if (!this.visited.contains(newNode.strRepresentation))
       {
         newNode.value = newNode.depth + this.heuristic(newNode)
     newNode.path = node.path + "L"
         this.queue.queue(newNode)
         this.visited.add(newNode.strRepresentation)
       }
   }

   // Right
   if (col < node.size - 1)
   {
      newState = node.state.clone();
      temp = newState[row][col + 1]
      newState[row][col + 1] = this.empty
      newState[row][col] = temp
      newNode = new Node(0, newState, row, col + 1, node.depth + 1)

      if (!this.visited.contains(newNode.strRepresentation))
      {
         newNode.value = newNode.depth + this.heuristic(newNode)
         newNode.path = node.path + "R"
         this.queue.queue(newNode)
         this.visited.add(newNode.strRepresentation)
      }
   }
}
All of the if statements are very similar; each is devoted to one of the possible moves. First we check a condition to see if the move at hand happens to be possible. The right move, for example, will be possible only if the empty tile column is less than the size of the board. If the move is possible, we create a newState by cloning the current state (cloning becomes necessary as arrays are reference types). We swap the empty tile with the corresponding element, we create a newNode, and finally queue it if – and only if – the node’s state is not in the visited HashSet. We also calculate the value of the node as explained earlier (f = g + h) and we add the corresponding direction to the path variable.
Array.prototype.clone = function()
{
   return JSON.parse(JSON.stringify(this))
}
Last but not least the heuristic function
AStar.prototype.heuristic = function (node)
{
   return this.manhattanDistance(node);
}
From this point on we’ll start presenting and comparing results provided by the A* when accompanied by different heuristics. We’ll see how the heuristic turns out to be an essential component during the search and how its cleverness can drastically reduce the time complexity of the algorithm.
Misplaced Tiles
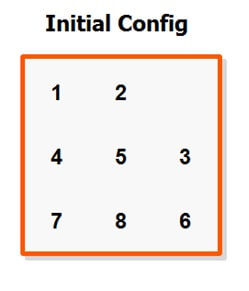
Before we dive into the interesting field of heuristics, let’s point out an important note when calculating any heuristic: we never take into account the empty tile. If we do, then we could be overestimating the real cost of the shortest path to the goal state, thereby making the heuristic non-admissible. To illustrate this note, consider the following node:
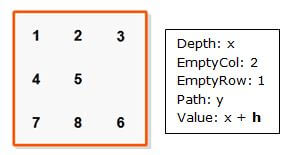
If we take into account the empty tile, then h=2, an overestimation of the shortest path to the goal configuration, which could be obtained just by moving the empty tile down. Thus the length of the shortest path to the goal configuration is 1 and we are overestimating.
To test our heuristics we’ll be using one of the worst configurations for this puzzle – it requires 31 moves to be completed.
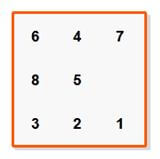
The A* algorithm will be executed when the Solve button is pressed. The onclick event associated with this button will trigger the start function whose body is up next.
function start() {
   var init = new Node(0, [[6,4,7],[8,5,0],[3,2,1]], 1, 2, 0)
   var goal = new Node(0, [[1,2,3],[4,5,6],[7,8,0]], 2, 2, 0)

   var astar = new AStar(init, goal, 0)
   // To measure time taken by the algorithm
   var startTime = new Date()
   // Execute AStar
   var result = astar.execute()
   // To measure time taken by the algorithm
   var endTime = new Date()
   alert('Completed in: ' + (endTime - startTime) + ' milliseconds')

   var panel = document.getElementById('panel')
   panel.innerHTML = 'Solution: ' + result.path + ' Total steps: ' + result.path.length + '
'
   solution = result.path
}
Note that we are going to measure the time taken by the algorithm in milliseconds. This is how we’ll compare the various heuristics developed. The code of the misplaced tiles heuristic is very simple.
AStar.prototype.misplacedTiles = function (node)
{
   var result = 0;

   for (var i = 0; i < node.state.length; i++)
   {
      for (var j = 0; j < node.state[i].length; j++)
      if (node.state[i][j] != this.goal.state[i][j] && node.state[i][j] != this.empty)
      result++;
   }

   return result;
}
The result is the following
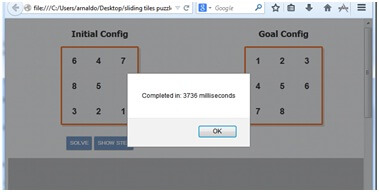
The algorithm takes around four seconds to find a solution: not bad, but with more sophisticated, intelligent heuristics we can do better.
Manhattan Distance
The Manhattan distance or block distance is defined as the sum of the absolute difference of their corresponding coordinates; that is:
MD = |x1−x2| + |y1−y2|
considering points A=(x1, y1) and B=(x2, y2).
It is admissible since for each tile it returns the minimum number of steps that will be required to move that tile into its goal position.
AStar.prototype.manhattanDistance = function (node)
{
   var result = 0;

   for (var i = 0; i < node.state.length; i++)
   {
      for (var j = 0; j < node.state[i].length; j++)
      {
         var elem = node.state[i][j]
         var found = false
         for (var h = 0; h < this.goal.state.length; h++)
         {
            for (var k = 0; k < this.goal.state[h].length; k++)
            {
               if (this.goal.state[h][k] == elem)
               {
                  result += Math.abs(h - i) + Math.abs(j - k)
                  found = true
                  break
               }
            }
            if (found) break
         }
      }
   }
   return result
}
The result after applying this heuristic is the following:
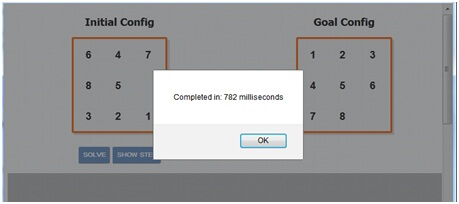
Now we have obtained a significant reduction in the time, down to less than one second. The Manhattan distance heuristic provides more accurate information on how far we are from the goal configuration, thus we complete the puzzle sooner.
MD + Linear Conflict
Even though the Manhattan distance heuristic greatly improves the time complexity of the algorithm, there are some necessary moves that are being missed. The linear conflict heuristic provides information on these necessary moves. Two tiles tj and tk are said to be in a linear conflict if: tj and tk are in the same line; the goal positions of tj and tk are both in that line; tj is to the right of tk; and the goal position of tj is to the left of the goal position of tk.

In the left board, tiles 3 and 1 are located in their corresponding row but in an incorrect order. To get them to their goal positions we must move one of them down and then up again; these moves are not considered in the Manhattan distance heuristic. Important note: a tile cannot appear related to more than one conflict as solving a conflict may involve the resolution of other conflicts in the same row or column. Therefore, if tile 1 is related to tile 3 in a conflict then it cannot be related to a conflict with tile 2 as this may become an overestimation of the shortest path to a goal state and could make our heuristic non-admissible. The methods implementing this heuristic are presented in the next code.
AStar.prototype.linearConflicts = function (node)
{
   var result = 0
   var state = node.state

   // Row Conflicts
   for (var i = 0; i < state.length; i++)
      result += this.findConflicts(state, i, 1)

   // Column Conflicts
   for (var i = 0; i < state[0].length; i++)
      result += this.findConflicts(state, i, 0)

   return result
}

AStar.prototype.findConflicts = function (state, i, dimension)
{
   var result = 0;
   var tilesRelated = new Array();

   // Loop foreach pair of elements in the row/column
   for (var h = 0; h < state.length - 1 && !tilesRelated.contains(h); h++)
   {
      for (var k = h + 1; k < state.length && !tilesRelated.contains(h); k++)
      {
         var moves = dimension == 1
            ? this.inConflict(i, state[i][h], state[i][k], h, k, dimension)
            : this.inConflict(i, state[h][i], state[k][i], h, k, dimension);

         if (moves == 0) continue;
         result += 2
         tilesRelated.push([h, k ])
         break
      }
   }

   return result;
}

AStar.prototype.inConflict = function (index, a, b, indexA, indexB, dimension)
{
   var indexGoalA = -1
   var indexGoalB = -1

   for (var c = 0; c = 0 && indexGoalB >= 0) &&
           ((indexA  indexGoalB) ||
          (indexA > indexB && indexGoalA < indexGoalB))
                     ? 2
                     : 0;
}
Since the linear conflicts heuristic calculates moves that do not intersect with the moves associated with the Manhattan distance, we can join them together to get more accurate information.
AStar.prototype.heuristic = function (node)
{
   return this.manhattanDistance(node) + this.manhattanDistance(node);
}
The result after having added the linear conflicts heuristic is the following:
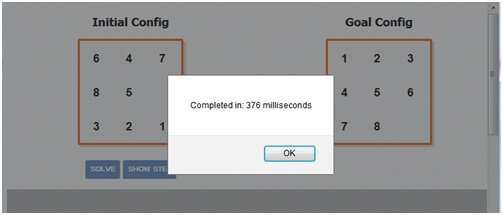
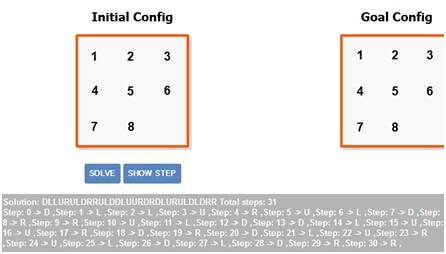
By adding the linear conflicts heuristic we have obtained a significant improvement. If we want to know the solution we can see it printed on the gray panel below.

By pressing the Show Step button we can see a step of the solution. After pressing this button 31 times we’ll see the sequence of moves that solve the puzzle.
In this article we have described an artificial intelligence by means of an A* search algorithm for the sliding tiles puzzle. We have examined the result offered by different heuristics and we have been able to find an efficient agent for the problem at hand. Now you can compete with friends and create artificial intelligences for this and many other puzzles and games. Enter the amazing world of rational agents, supervised learning and unsupervised learning. Start developing algorithms that can solve daily life problems by simulating the thinking of the human mind. The purpose of artificial intelligence should be that: providing a contribution to society and making our life easier and more sophisticated.
 (rb, ml, og)


