It’s not exactly a new subject, but lately I’ve had reason to revisit the skill of content modeling in my team’s work. Our experience has reached a point where the limitations of how we practice are starting to become clear. Our most common issue is that people tend to tie themselves and their mental models to a chosen platform and its conventions.
Instead of teaching people how to model content, we end up teaching them how to model content in Drupal, or how to model content in WordPress. But I’d prefer that we approach it from a focus on the best interests of users, regardless of which platform said content will end up in.
Further Reading on SmashingMag:
- Build A Blog With Jekyll And GitHub Pages
- Why Static Website Generators Are The Next Big Thing
- Static Website Generators Reviewed: Jekyll, Middleman, Roots, Hugo
- Automating Style Guide-Driven Development
This line of thought brought me back to an idea I’ve become a bit obsessed with, which is that when we have to create an artifact to communicate certain ideas to a client, the process almost always goes better when that artifact is as close as possible to an actual website instead of a picture of a website or a PDF full of diagrams.
Thus the question I ended up asking myself: was there a tool I could use to help people quickly model content in a platform-agnostic manner and simultaneously build an artifact that was ideal for communicating intent to a client or team?
A High-Level Theory Of Content Modeling
Let’s divert a bit before we get into Jekyll. I believe you can remove all the conventions and platform-specific language from the content modeling discussion and define it as a three part system:
- The core idea is that of an object: some unit of content that holds together across a site. For example, a blog post or a person would be an object on a site.
- Objects have attributes that define them. A blog post could have a title, a body of content, an author. A person could have a name, a photo, a bio.
- Objects have relationships that determine where they end up on a site, and layouts have logic that defines which attributes of an object are used and where. Our example blog post object is connected to a person object because its author is a person. We output the author’s name and a link to their profile on the post page, and we output their full bio on their profile page.
I wanted to create a system that respected the high-level ideas I’ve outlined, but allowed the team the freedom to create attributes and relationships as they saw fit without worrying about ideas specific to certain platforms. Instead, they could focus on defining content based on what’s best for users. And it turns out that Jekyll has the features to make this possible.
Enter Jekyll
Jekyll is a static blogging framework. And before you head for the comment section, yes, I am aware that it is correct to regard it as a platform in its own right. However, it has a few advantages over something like Drupal or WordPress.
Jekyll takes simplicity seriously. It doesn’t have a database, instead relying on flat files and some Liquid templating tags that generate plain old HTML. Liquid is limited, simple and extremely human-readable. I’ve found that I can show somebody a template constructed with some Liquid tags and as long as they have a bit of experience with front-end code, they understand what the template is doing.
What’s nice about this is that we don’t have to show somebody how to get a database running, how to hook their templates up to it, how to configure the admin area of their CMS to work with their templates, and so on. Instead, we can install Jekyll and teach how to start a server. If the user is on a Mac there is an excellent chance that this is a two minute process that just works the first time we try it.
Jekyll also doesn’t force a lot of conventions down the user’s throat. You have the freedom to create your preferred file structure and asset pipeline, establish your own relationships between files, and write markup in the way you like best. What few conventions it possesses are easily reconfigured to suit your style.
Using Collections To Create And Contain Objects
While it’s still considered an experimental feature, Jekyll has something called collections that will allow us to create the system I’m describing.
Basically, you create a folder and name it after the type of object you’re creating. Then you add files to that folder, and each file represents an object in that collection. Once you have objects, you can create attributes for them using YAML at the beginning of every file. YAML is a syntax that allows you to define key/value pairs that easily store information.
What’s nice about this system is how incredibly simple it is. Everything is human-readable and functions in a manner that’s easy for a new user to learn. Rather than creating a lot of documentation on how somebody should create content and relationships in the final system, you can just create it. Designers can see what the objects and their attributes are so they can plan their design system. Front-end developers have a functioning website to architect their markup and CSS with.
Because they aren’t forced to use a specific system or convention, they can just use the one they prefer or the conventions of the final platform for the project. And back-end developers can easily determine the intention of the designer when transferring over templates and logic into whatever CMS they decide to use because it’s already written out for them.
Let’s Build A Simple Site With Objects And Relationships
If we’re going to take this idea for a spin we’ll need to set up a simple Jekyll site and then build our objects and relationships. If you want to see the final product you can grab it from this GitHub repo. (Note: You’ll have to use the terminal for some of this, but it’s pretty basic usage, I promise.)
Installing Jekyll
If you’re on a Mac this is pretty easy. Ruby is already installed, you just need to install Jekyll. Open up the terminal and type:
gem install jekyllThis will install the Jekyll Ruby gem and its dependencies. Once it’s done running, that’s it: you’ve got Jekyll.
Setting Up Your Site
Now we need to get a Jekyll scaffold started. I store all of my web projects in a folder on my Mac called Sites, in the home folder. So first I need to navigate to it with:
cd ~/SitesThen I can generate a folder with the proper files and structure with this command:
jekyll new my-new-siteYou can replace “my-new-site” with whatever you want to call your project. What you’ll get is a folder with that name, and all the right files inside it.
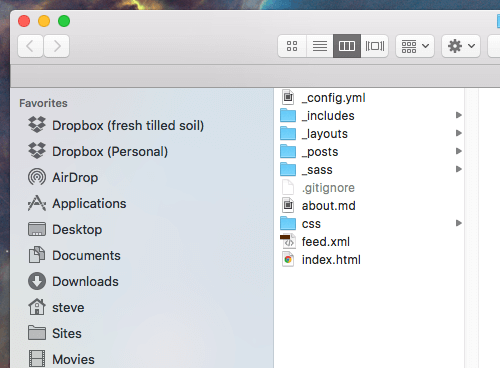
Pop open the Finder and navigate to your new folder to see what’s inside. You should see something like this:

Since we don’t need everything Jekyll offers we’re going to delete a few files and folders first. Let’s toss /_includes, /_posts, /_sass, about.md and feed.xml.
Configuration
Now we’ll set up our site-wide configurations. Open up _config.yml. There’s a bunch of introductory stuff in there. I’ll just delete that and replace it with my preferred configurations. Here’s the new configuration for this project:
permalink: pretty

collections:
  projects
  people
I’ve made it so that my URLs will look like /path/to/file/ instead of /path/to/file.html which is just a personal preference. I’ve also established two collections: projects and people. Any new collection has to be added to the configuration file.
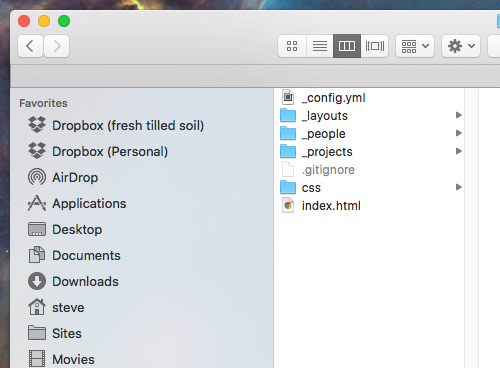
Now I can make folders for these collections in my project:

The folder names have to start with the _ (underscore) character so that Jekyll knows what to do with them.
Making Some Objects
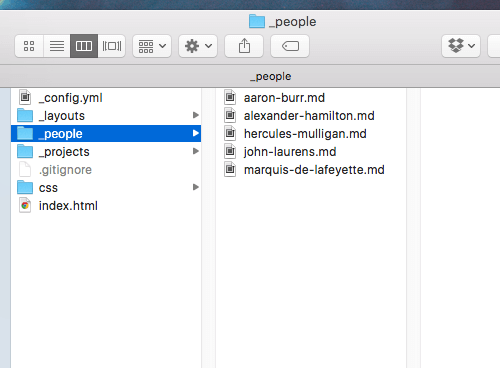
The first objects we’ll make will be our people. We’re going to use Markdown to create these files so they’ll be nice and clean but still generate proper, semantic HTML. You can see I’ve made some files for figures from American history (this may or may not be related to the fact that I’ve been listening to Hamilton non-stop for a month now):

The attributes we’ll put in our file for a person will be:
---
object-id:
first-name:
last-name:
job:
listing-priority:
wikipedia-url:
---
We’ll use the object-id to refer specifically to any one of these objects later. We’ll split first and last name so we can select which combination to use in various places (if your system calls for this) and we’ll use job to define what they do. (I’m avoiding ‘title’ because that’s already a variable that pages in Jekyll have by default.) I’ve also included an attribute for listing priority which will allow me to sort each person according to whim, but you can also sort by some built-in methods such as alphabetical or numerical. Finally, we have a field for a link to the person’s Wikipedia page.
All of this is contained between three hyphens at the top and bottom to define it as YAML front-matter. The content of each bio will go after the YAML and can be an arbitrary amount and structure of HTML (but we’ll use Markdown formatting to keep everything nice and clean).
A completely populated person object looks like this (the content is truncated for clarity):
---
object-id: alexander-hamilton
first-name: Alexander
last-name: Hamilton
job: 1st United States Secretary of the Treasury
listing-priority: 1
wikipedia-url: https://en.wikipedia.org/wiki/Alexander_Hamilton
---
Alexander Hamilton (January 11, 1755 or 1757 – July 12, 1804) was...
And here’s a project object (the content is truncated for clarity):
---
object-id: united-states-coast-guard
title: United States Coast Guard
featured: true
featured-priority: 2
listing-priority: 1
architect-id: alexander-hamilton
wikipedia-url: https://en.wikipedia.org/wiki/United_States_Coast_Guard
---
The United States Coast Guard (USCG) is...
This one has a few differences. I’ve set a featured attribute. If a project is featured then it gets listed on the home page. All projects will get listed on the projects page. We also have our preferred sort order set for each placement. And we’ve included a reference to the id of the person who created the project, so we can refer directly to them later.
Generating Pages From Our Objects
By altering my _config.yml file I can create pages for each of these objects.
permalink: pretty

collections:
  projects:
    output: true
  people:
    output: true
Setting output: true on each collection causes a page to be generated for each object inside it. But because our objects have no content in their files, they currently don’t output any data, which means we’ll just get empty pages. Let’s build a layout template to do that for us.
This file will go in the _layouts folder. But first, we have a default.html file in there to deal with. This will hold any markup that’s consistent across all of our HTML files.
<!DOCTYPE html>
<html>
    <head>
        <meta charset="utf-8">
        <meta http-equiv="X-UA-Compatible" content="IE=edge,chrome=1">
        <title>{{ page.title }}</title>
        <meta name="viewport" content="width=device-width, initial-scale=1.0">
        <link rel="stylesheet" href="/css/styles.css" />
    </head>
    <body>
        <header role="banner">
            ...
        </header>

        <div role="main">
            <div class="container">
                {{ content }}
            </div>
        </div>

        <footer role="contentinfo">
            ...
        </footer>
    </body>
</html>
You’ll notice a Liquid tag that looks like this: {{ content }}. Every file that gets rendered into a page by Jekyll needs a template specified for it. Once you specify its template, the content from that file gets rendered into the location of the {{ content }} tag in the layout template. Now we don’t have to repeat stuff that will be on every page.
Next, we’ll build a unique layout template for our person objects. That will look like this:
---
layout: default
---
<header class="intro person-header">
    <h1>{{ page.first-name }} {{ page.last-name }}</h1>
    <h2>{{ page.job }}</h2>
</header>

<div class="person-body">
    {{ page.content }}
    <a href="{{ page.wikipedia-url }}">Read more about {{ page.first-name }} {{ page.last-name }} on Wikipedia</a>
</div>
This file specifies that its code gets inserted into the default layout template, and then its markup gets populated from data in the person object files.
The last step is to make sure each person object specifies that it uses the person.html layout file. Normally, we’d just insert that into the YAML in our person files like so:
---
object-id:
first-name:
last-name:
job:
listing-priority:
wikipedia-url:
layout: person
---
But I prefer to make the data in my object files only contain attributes relevant to the content model. Fortunately, I can alter my _config.yml file to handle this for me:
exclude:
  - README.md

permalink: pretty

collections:
  projects:
    output: true
  people:
    output: true

defaults:
  - scope:
      type: projects
    values:
      layout: project
  - scope:
      type: people
    values:
      layout: person
Now my site knows that any object in the project collection should use the project layout template, and any object in the people collection should use the person layout. This helps me keep my content objects nice and clean.
Displaying Objects On A Listing Page
Whether we choose to output pages for our objects or not, we can list them out and sort by different parameters. Here’s how we’d list all of our projects on a page:
---
layout: default
title: Projects
---
<header class="intro">
    <h1>{{ page.title }}</h1>
</header>

<div class="case-studies-body">
    <ul class="listing">
        {% assign projects = site.projects | sort: 'listing-priority' %}
        {% for project in projects %}
        <li>
            <h2><a href="{{ project.url }}">{{ project.title }}</a></h2>
            {{ project.content }}
        </li>
        {% endfor %}
    </ul>
</div>
What we’ve done is create a <ul> to put our list inside. Then, we’ve created a variable on the page called projects, and assigned all of our project objects to it, and sorted them by the listing-priority variable we created in each one. Finally, for every project in our projects variable we output a <li> that includes data from the attributes in each file. This gives us a highly controllable list of our project objects with links to their unique pages.
On the home page, instead of displaying all projects we’ll show only our featured ones:
<ul class="listing">
    {% assign projects = site.projects | where: "featured", "true" | sort: 'featured-priority' %}
    {% for project in projects %}
    <li>
        <h3>{{ project.title }}</h3>
        <a href="{{ project.url }}">Learn about {{ project.title }}</a>
    </li>
    {% endfor %}
</ul>
Any project object that has the featured attribute set to true will render onto this page, and they’ll be sorted by the special priority ordering we’ve set for featured projects.
These are pretty simple examples of how to output and sort objects, but they demonstrate the different capabilities we can create for organizing content.
Linking To A Specific Object
The last feature we’re going to build is linking to a specific object. This is something you might want to do if you’re linking an author to a blog post or something similar. In our case, we’re going to attach a person to the project they are commonly associated with. If you remember, our project object has an architect-id attribute and our people each have an object-id attribute. We can attach the correct person to a specific project using these attributes.
Here is our project layout template:
---
layout: default
---
{% assign architect = site.people | where: "object-id", page.architect-id  | first %}

<header class="intro project-header">
    <h1>{{ page.title }}</h1>
    <p>Architected by: <a href="{{ architect.url }}">{{ architect.first-name }} {{ architect.last-name }}</a></p>
</header>
<div class="project-body">
    {{ page.content }}
    <a href="{{ page.wikipedia-url }}">Read more about {{ page.title }} on Wikipedia</a>
</div>
Line 4 creates a variable called architect and searches all of our people objects for any with an object-id that matches the architect-id attribute from a project. We should assign object-ids so that only one result is ever returned, but to make sure we only get one answer and refer to it instead of our list of one item, we have to set | first at the end of our {% assign %} Liquid tag. This gets around a limitation of Jekyll where objects in collections don’t have unique IDs to begin with. There’s another feature called data that does allow unique IDs, but it doesn’t easily output pages or give us the ability to sort our objects; working around the limitations of collections was an easier and cleaner way to get the functionality we want.
Now that the page has a unique object that represents the architect of that project, we can call its attributes with things like the architect’s first name and the URL to their Wikipedia page. Voila! Easy linking to objects by unique ID.
Wrapping Up
There are some great further features that can established by digging into the Jekyll docs in more detail, but what we have here are the basics of a good content modeling prototype: the ability to define different types of objects, the attributes attached to those objects, and IDs that allow us to call specific objects from anywhere. We also get highly flexible logic for templating and outputting our objects in various places. Best of all, the whole system is simple and human-readable, and outputs plain HTML for use elsewhere if necessary.
For communication purposes, we now have a platform-independent clickable prototype (a real website) that will define the system better than a PDF with a bunch of diagrams ever could. We can alter our content model on the fly as we learn new things and need to adapt. We can get the designer and developer into the system to establish their patterns and front-end architecture because it will accept any markup and CSS they want to use. We can even get content editors into it by setting them up with access through a GitHub GUI or a hosting platform that allows the use of a visual editor such as Prose.io, GitHub Pages, CloudCannon or Netlify.
And none of this ties a person to learning platform-specific ways of working, allowing them to instead work from a conceptual level that’s focused on users and not technology.
 (rb, jb, og, ml)


