Podcasting has experienced a renaissance in the last couple of years. According to RawVoice, which tracks 20,000 shows, the number of unique monthly podcast listeners has tripled to 75 million, up from 25 million five years ago.
Suffice it to say, now is a great time to start a podcast. It’s an authentic and intimate way to demonstrate authority in your niche and to grow your client base.
I recently started my first podcast, Agencies Drinking Beer, with my cofounder, Kevin Springer. When starting out, I was a bit lost with the technical logistics of actually setting up the podcast; figuring out the best approach required a lot of searching and digging.
Further Reading on SmashingMag:
- 59 Exciting Podcasts For Web Designers And Developers
- Screencasting: How To Start, Tools and Guidelines
- The Making Of Melody Jams
I want to make all of that easier for you. Here, in one place, is all of the best advice, information and resources I can offer you. This way, you can spend less time on the technical side of setting up your podcast and more time creating killer content.
Ready to start? Let’s go!
Plan Your Podcast
While this article focuses on the technical aspects of getting a podcast online, we should quickly cover the basics of starting a successful podcast.
Pick a Target
As with any content marketing endeavor, start with identifying your audience and creating personas. Your podcast should target one distinct niche and not try to appeal to everyone.
Listen to other podcasts in your niche to get an idea of what’s out there and what you can offer that’s different. A ton of web design podcasts are out there; so, if your goal is to talk about web design, think about how you can approach it in a way that no one else is doing.
Form a Structure
Decide on the length of the show, whether you’ll have interviews, how often you’ll publish episodes, what day of the week you’ll release them and so on. In most cases, there is no right or wrong way to do it. I’ve listened to podcasts that are 15 minutes each and some that are two hours long. Just pick what works for you and stick to it as consistently as possible.
Plan Your Content
While heavily scripted podcasts can come across as stiff and robotic, planning your topics is still a good idea, especially if you’ll be interviewing guests. I schedule our episodes using a Google Docs spreadsheet, and I use Evernote to store notes, questions and topics for each episode. More recently, I’ve also been sending guests an email outlining the questions I plan to ask, to guide the discussion.
Add the Polish
Create a theme song in Garageband or buy a stock theme from somewhere like AudioJungle. Music will add a lot of energy to your show and make it feel polished and professional.
What Makes A Good Podcast?
An entire article could be written about this — in fact, many articles out there discuss what makes a good podcast — but I will mention some things I’ve learned in the four months I’ve been doing it.
Be Real
You don’t need to have the golden voice of a professional radio announcer, and people won’t care if you stumble or make mistakes — that will just make you sound more authentic and human. Whatever you do, don’t read from a script. Speak from the heart and say what you’re really feeling.
Be Passionate
If your podcast revolves around a subject that you love to talk about, then creating new content each week will not be hard. Your passion will shine through, and people will pick up on that. In my podcast I talk about building great agencies because it’s a topic I enjoy discussing with agency owners. I also like beer.
Be Focused
It’s hard to market an episode where you bounce from topic to topic and go on long, rambling digressions. A few off-topic excursions are fine if they are entertaining, but have a clear direction in mind for each episode. If for nothing else, that will make it easier to package and promote later. Preparing bullet points to have in front of you will help guide the discussion.
Really Listen to the Other Person
This seems obvious, but it’s tricky in practice. If you are thinking about what you’re going to say next while your guest is speaking, later you’ll listen to the recording and kick yourself for missing out on great conversational opportunities because you weren’t really listening to what the other person was saying.
My advice is not to overthink it. Recording something is better than obsessing over getting it perfect and not recording anything. Your first episode isn’t going to be as good as your 10th or 50th, but accept this fact, lay down some tracks and move on.
Ready to record? Let’s make sure you’ve got the right tools in place.
Record Your Podcast
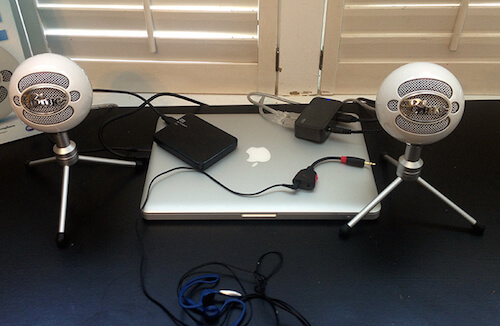
Hardware
The hardware required to record a podcast is actually pretty simple.
- We use a Macbook Pro with an external hard drive (since clips quickly eat up storage space). Mind you, any PC with an audio input can be used.
- A proper microphone was the first thing we purchased, and after some research we found a fantastic product at a great price point, Blue Microphones’ Snowball iCE. It’s a simple plug-and-play USB mic with a sturdy swivel tripod stand. We require two of these because we have two hosts on the show, and we also purchased a USB hub to plug into.
- Headphones are a necessity, and they must be ones that do not have a microphone built in, so that they don’t pick up unwanted sounds. We use Rocketfish’s headphones hub for two.
Software
- Skype is a good choice if interviews are an important part of your podcast. Skype is free and ubiquitous, and the sound quality is decent. Keep in mind that if your Internet connection is slow, you may find occasional distortion or delays, which can sap the flow of your interview. Plugging your laptop directly into your Internet connection will help, especially if you’re using a public Wi-Fi network.
- We found Ecamm’s Call Recorder to be the easiest way to record calls in Skype. The one-time fee of $29.95 is well worth it. It also has video recording capabilities if you need that.
- After we’re done an interview, we import the Ecamm file (which is automatically exported as a MOV file) into GarageBand, and from there we record our introduction and conclusion and add our sound effects and music. GarageBand has a podcast setting, which makes editing a breeze.
Note: When recording with a remote guest, if at all possible, ask them to record their own audio separately and send it to you as an MP3. The quality will generally be much higher than if you record through Skype; and this way, if your recording fails, you’ll have a backup.
From there, we mix it down to a M4A file and upload it to our web server via FTP. (Of course, you may choose MP3, which is perfectly all right.)
Configure Your Website
If you’re new to podcasting, you might be surprised to learn that Apple doesn’t directly host podcasts, and it doesn’t offer any tracking data to tell you how many downloads each episodes get. It’s all on you.
Third-party services, such as Libsyn, will host your podcast for you, generate an RSS feed and give you download metrics. Call me a control freak, but I want total control over my publishing and don’t want to rely on a third-party service for it.
According to the “king of podcasting,” Paul Colligan, you should:
- own the domain name of your podcast,
- bankroll the hosting of your podcast,
- own the RSS feed of your podcast,
- own your podcast copyright.
Set Up a New Blog Channel in Your CMS
For a content management system (CMS), I use Craft, but you could publish your podcast using WordPress, ExpressionEngine, Drupal or any other CMS that lets you define your own fields and output them on the page however you want.
Below is what a blog post in Craft looks like for one of my podcast episodes. I’ve set up basic fields for the headline, teaser, main image and content. For the audio file, I simply insert the name of the file and specify in the template the directory in which to look for the M4A file.
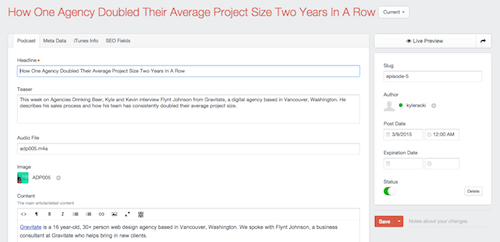
You could do this differently and directly upload the file through your CMS. But at 40 to 50 MB per episode, uploading is easier via FTP than in a web browser.
Set Up Fields to Output the RSS Page
Next, you’ll want to set up fields specifically for your RSS feed that iTunes and FeedBurner will display (more on submitting your feed later). Here are the fields you’ll need:
- Episode title. Make this separate from the headline used on your blog. Most podcasts contain a short code to go in the title. This looks good on iTunes but may not be what you want on your blog.
- Subtitle. This will appear as the description on the iTunes podcast web page.
- Summary. This will appear as the description when someone is subscribed to your podcast in iTunes.
- Length. Find the length of the episode, and insert the time here (for example, 45:15).
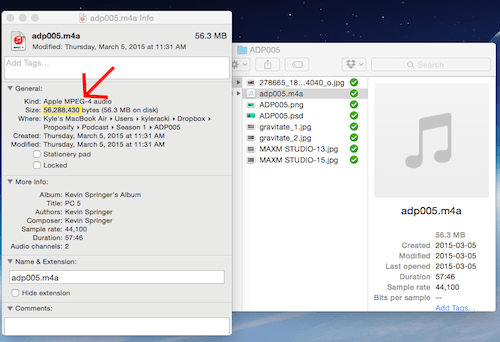
- File size. To get the file size accurate, right-click on your audio file and look at the size in bytes. Remove the commas and paste in the size. It should look something like
56288430.
In Craft, I created a new tab to list all of my iTunes fields, so that they’re organized together and separate from my other content.
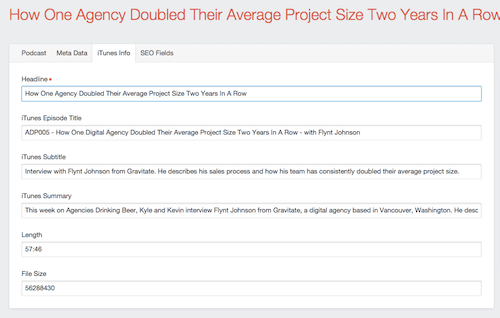
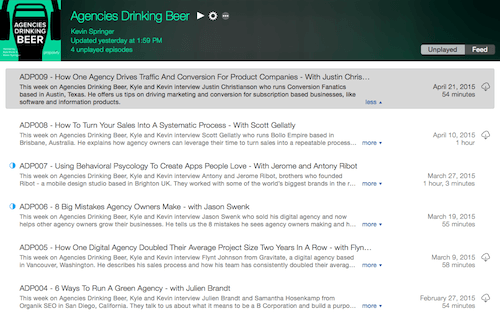
Notice how this content will appear in iTunes:
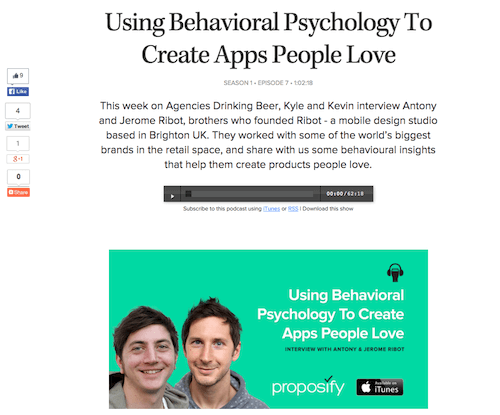
On the front end of the website, I designed a simple blog-style page for each podcast episode that outputs the headline, introductory paragraph and audio player with iTunes and RSS links. Below that is an image for the episode and the written article.
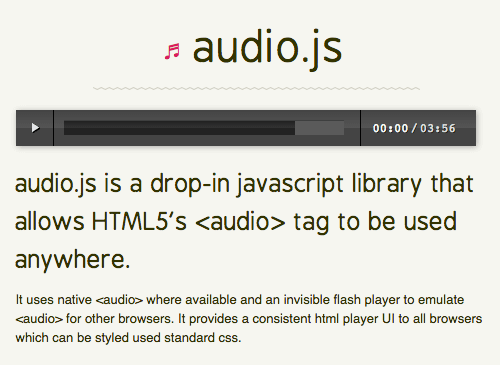
For the audio player, we use audio.js, a simple JavaScript file that uses HTML5’s audio tag, with a Flash fallback for old browsers. The UI is great, and configuration is simple.
Steps for Installing audio.js
Put audio.js, player-graphics.gif and audiojs.swf in the same folder.
Include the audio.js file:
<script src="images-in-article//audiojs/audio.min.js"></script>Initialize audio.js:
<script>
  audiojs.events.ready(function() {
    var as = audiojs.createAll();
  });
</script>
Now, you can use the audio element wherever you’d like in the HTML:
<audio src="images-in-article//mp3/juicy.mp3" preload="auto" />OK, now that your CMS and front end are set up, it’s time to generate the RSS feed.
Generate The RSS Feed
Apple has an extensive article showing all of the different nodes to add to your RSS feed. But after digging, I’ve come up with a basic template that should work for most people’s needs:
<?xml version="1.0" encoding="UTF-8"?>
<rss version="2.0" xmlns:itunes="http://www.itunes.com/dtds/podcast-1.0.dtd">
<channel>
<title></title>
<link></link>
<language>en-us</language>
<itunes:explicit>clean</itunes:explicit>
<itunes:subtitle></itunes:subtitle>
<itunes:author></itunes:author>
<itunes:summary></itunes:summary>
<description></description>
<itunes:owner>
<itunes:name></itunes:name>
<itunes:email></itunes:email>
</itunes:owner>
<itunes:image href="" />
<itunes:category text="Business">
<itunes:category text="Management & Marketing"/>
</itunes:category>
<!- Here's where you’ll want to loop through your CMS entries -->
<item>
<title></title>
<itunes:author></itunes:author>
<itunes:subtitle></itunes:subtitle>
<itunes:summary>
<![CDATA[
]]>
</itunes:summary>
<itunes:image href="" />
<enclosure url="" length="" type="audio/mpeg" />
<guid>http://yoursite.com/download.php?url=</guid>
<pubDate></pubDate>
<itunes:duration></itunes:duration>
</item>
<!- end loop -->
</channel>
</rss>
Note that you won’t be linking directly to the audio file. Rather, you’ll be linking to yoursite.com/download.php?url=path-to-your-file. This is important for tracking downloads. Trust me on this for now — I’ll explain more in a subsequent step.
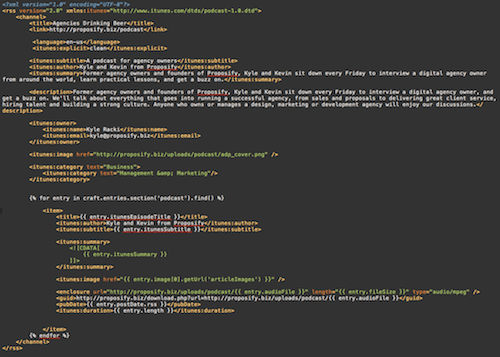
Below is what the RSS feed template looks like filled out with static and dynamic content within my Craft template:
You can download my own RSS template to customize to your own needs.
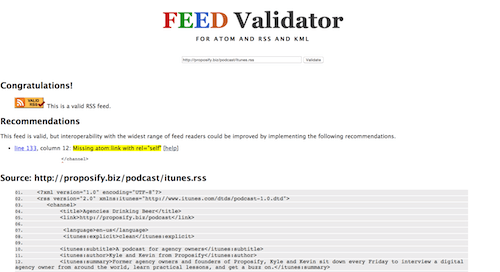
Finally, once you’ve finished coding your RSS feed, submit it to Feed Validator to ensure it has no errors. Do this even if you’re sure it’s valid. At one point, I wondered why my podcast was behaving strangely in iTunes, and it came down to an invalid feed, which Feed Validator helped me fix.
Submit the Feed to FeedBurner
Not everyone will want to subscribe to your podcast through iTunes or email. To let people more easily subscribe to your podcast using their own RSS reader or a third-party podcast subscription app, using FeedBurner is best.
First, submit a new feed and check off the “podcaster” option:

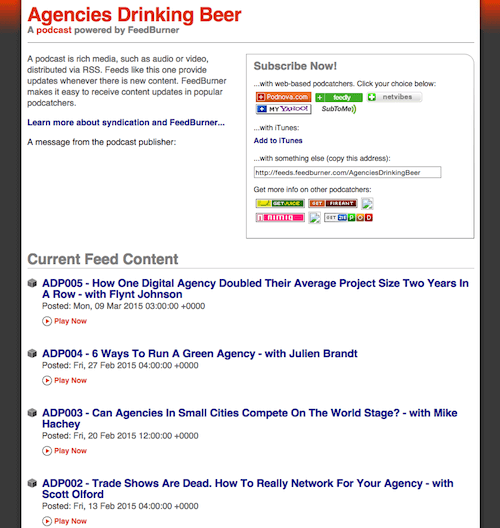
Once you do that, it will read your feed and generate a unique URL. This is the URL you should be linking to when advertising your RSS feed on your website. It will look something like what’s below when users click the link, which is a bit more friendly than sending them to a pure XML page.
Submit To iTunes
Of course, you’ll want to submit your podcast to iTunes to reap the benefits of the free exposure that Apple offers. (That being said, don’t ignore other platforms, such as Pocket Casts and TuneIn.)
Before you submit it, design a beautiful cover to stand out in the iTunes store. This cover is comparable to an app’s icon in the App Store, but you have a slightly larger canvas to work with. Design it at 1400×1400px. It will appear smaller than that in most places your listeners will see it, so keep it simple, bold and free of small text.
I remember thinking I could get away with including my logo and some text in the cover, but this is how it appeared in the iTunes store:
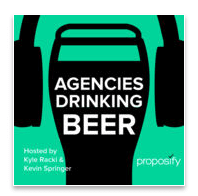
I removed the Proposify logo and text because it couldn’t easily be read.

Ready to submit to Apple? Go to your iTunes app, click on “Podcasts,” and to the right you’ll see a link to submit a podcast.
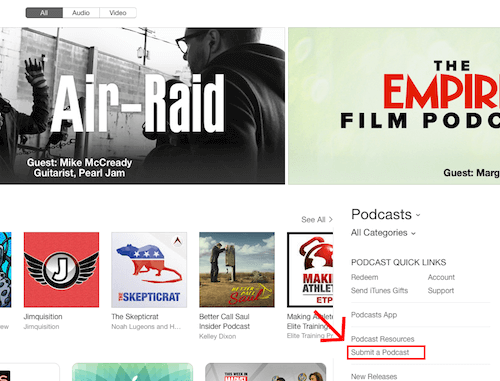
Click on the button, and it will ask you to submit the feed.
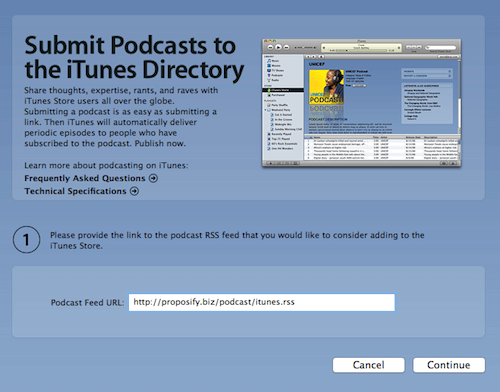
It will return a message if you’ve missed filling in any fields. Once everything is correct, iTunes will notify you within a couple of days that your podcast has been approved and will email you a link to your podcast on the iTunes website. It may take a bit longer to show up in the iTunes app.
Seeing your very own podcast in the iTunes store is a pretty magical experience!
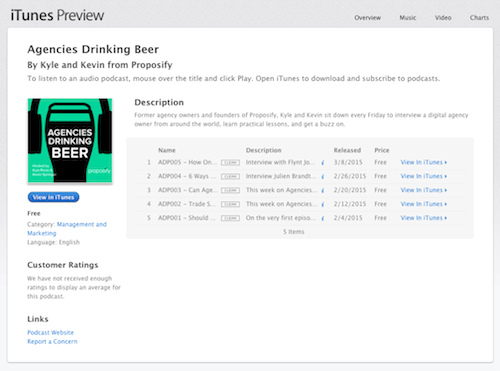
At this point (and probably long before), you should be announcing your podcast to the world.
- Email your list of subscribers.
- Ask all of your friends and colleagues to share it with their contacts.
- Post it on Twitter, Facebook, LinkedIn and Google+.
- Don’t stop.
Nathan Barry’s article “How to Launch Anything” might help.
Launch With At Least Three Episodes
The “New and Noteworthy” section of the iTunes store offers you much needed exposure, especially in those critical six to eight weeks following the launch. iTunes has an algorithm that looks at a number of different factors to determine whether to push you higher up in the “New and Noteworthy” section. One factor you can affect directly is the number of downloads.
What if you haven’t yet built up a huge audience? Simply put, launch with more episodes. The more episodes you launch with, the more likely you’ll get more downloads per subscriber, meaning you’re more likely to get bumped to the top.
Consistently releasing new episodes on schedule is important, so put one or two months’ worth of episodes on reserve in case an interview falls through, you get sick or you can’t release a new episode for some other reason. Of course, this may be impractical if you are newsjacking or discussing some other time-sensitive topic.
Track Downloads With Google Analytics
This is the last piece of the puzzle, and I was shocked at how few resources exist to do something as relatively simple as tracking downloads.
Apple doesn’t offer any tracking whatsoever. There are third-party apps, such as Lisbyn, Podtrac and Blubrry, but, as mentioned, many require you to host your audio files with them and to use their CMS and RSS feed. Not what us control freaks want!
If you aren’t overly concerned with getting paid sponsorship of your podcast, tracking downloads yourself is actually much easier by combining a bit of PHP with Google Analytics events.
I came across a free script from Chris Van Patten, Downloadalytics, which allows you to track downloads as an event in Google Analytics.
Here are the steps for installing it:
- Download the Server Side Google Analytics PHP script from Dan Cameron.
- Download Downloadalytics.
- Upload both PHP files (
ss-ga.class.phpanddownloads.php) to the root directory of your website.
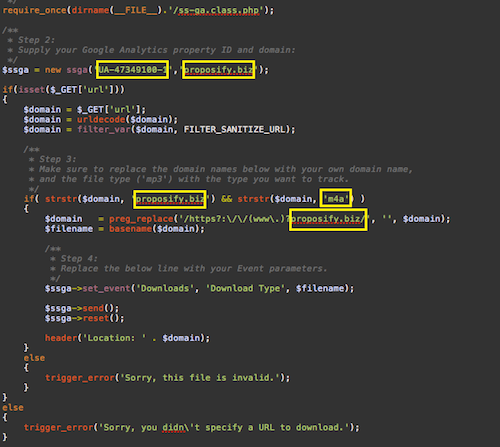
Leave the Server Side Google Analytics file alone, and open downloads.php. You’ll need to change three things:
- the website’s URL (
yoursite.com); - the Google Analytics property ID (for example,
UA-1234567-1), which you can find in Google Analytics; - the type of audio file to track (I use M4A, but you could use MP4, MP3 or something else).
Update Links to Your Audio Files in Your Templates
Remember earlier when we pointed our RSS feed to download.php?url=, instead of just the basic path to the file? We did that so that Downloadalytics can properly track downloads in Google Analytics.
If you’re using an audio player on your blog, be sure to also point to downloads.php, instead of the basic file path. For example, your blog post should link like this:
<audio src="http://yoursite.com/download.php?url=http://yoursite.com/uploads/file01.m4a" preload="auto"></audio>Not like this:
<audio src="http://yoursite.com/uploads/file01.m4a" preload="auto">
</audio>
After a day of tracking, log into Google Analytics. Navigate to “Behavior” → “Events” → “Overview.”
You’ll notice a new event category, named “Downloads,” which Downloadalytics has generated.

Click on the event category, and you can add it to your dashboard to more easily track by episode.

Conclusion
Hopefully, you’ve found this to be a useful and comprehensive guide to launching your very own podcast. I’m only 10 episodes in at the time of writing, but so far I’ve found the experience to be a great way to build a closer relationship with my customers and fans. It’s a lot of work, and discipline is required to record week after week, even when you aren’t in the mood, but the reward is more than worth the effort.
In Craft, I created a new tab to list all of my iTunes fields, so that they’re organized together and separate from my other content.

Notice how this content will appear in iTunes:

On the front end of the website, I designed a simple blog-style page for each podcast episode that outputs the headline, introductory paragraph and audio player with iTunes and RSS links. Below that is an image for the episode and the written article.

For the audio player, we use audio.js, a simple JavaScript file that uses HTML5’s audio tag, with a Flash fallback for old browsers. The UI is great, and configuration is simple.

Steps for Installing audio.js
Put audio.js, player-graphics.gif and audiojs.swf in the same folder.
Include the audio.js file:
<script src="images-in-article//audiojs/audio.min.js"></script>Initialize audio.js:
<script>
  audiojs.events.ready(function() {
    var as = audiojs.createAll();
  });
</script>
Now, you can use the audio element wherever you’d like in the HTML:
<audio src="images-in-article//mp3/juicy.mp3" preload="auto" />OK, now that your CMS and front end are set up, it’s time to generate the RSS feed.
Generate The RSS Feed
Apple has an extensive article showing all of the different nodes to add to your RSS feed. But after digging, I’ve come up with a basic template that should work for most people’s needs:
<?xml version="1.0" encoding="UTF-8"?>
<rss version="2.0" xmlns:itunes="http://www.itunes.com/dtds/podcast-1.0.dtd">
<channel>
<title></title>
<link></link>
<language>en-us</language>
<itunes:explicit>clean</itunes:explicit>
<itunes:subtitle></itunes:subtitle>
<itunes:author></itunes:author>
<itunes:summary></itunes:summary>
<description></description>
<itunes:owner>
<itunes:name></itunes:name>
<itunes:email></itunes:email>
</itunes:owner>
<itunes:image href="" />
<itunes:category text="Business">
<itunes:category text="Management & Marketing"/>
</itunes:category>
<!- Here's where you’ll want to loop through your CMS entries -->
<item>
<title></title>
<itunes:author></itunes:author>
<itunes:subtitle></itunes:subtitle>
<itunes:summary>
<![CDATA[
]]>
</itunes:summary>
<itunes:image href="" />
<enclosure url="" length="" type="audio/mpeg" />
<guid>http://yoursite.com/download.php?url=</guid>
<pubDate></pubDate>
<itunes:duration></itunes:duration>
</item>
<!- end loop -->
</channel>
</rss>
Note that you won’t be linking directly to the audio file. Rather, you’ll be linking to yoursite.com/download.php?url=path-to-your-file. This is important for tracking downloads. Trust me on this for now — I’ll explain more in a subsequent step.
Below is what the RSS feed template looks like filled out with static and dynamic content within my Craft template:

You can download my own RSS template to customize to your own needs.
Finally, once you’ve finished coding your RSS feed, submit it to Feed Validator to ensure it has no errors. Do this even if you’re sure it’s valid. At one point, I wondered why my podcast was behaving strangely in iTunes, and it came down to an invalid feed, which Feed Validator helped me fix.

Submit the Feed to FeedBurner
Not everyone will want to subscribe to your podcast through iTunes or email. To let people more easily subscribe to your podcast using their own RSS reader or a third-party podcast subscription app, using FeedBurner is best.
First, submit a new feed and check off the “podcaster” option:

Once you do that, it will read your feed and generate a unique URL. This is the URL you should be linking to when advertising your RSS feed on your website. It will look something like what’s below when users click the link, which is a bit more friendly than sending them to a pure XML page.

Submit To iTunes
Of course, you’ll want to submit your podcast to iTunes to reap the benefits of the free exposure that Apple offers. (That being said, don’t ignore other platforms, such as Pocket Casts and TuneIn.)
Before you submit it, design a beautiful cover to stand out in the iTunes store. This cover is comparable to an app’s icon in the App Store, but you have a slightly larger canvas to work with. Design it at 1400×1400px. It will appear smaller than that in most places your listeners will see it, so keep it simple, bold and free of small text.
I remember thinking I could get away with including my logo and some text in the cover, but this is how it appeared in the iTunes store:

I removed the Proposify logo and text because it couldn’t easily be read.

Ready to submit to Apple? Go to your iTunes app, click on “Podcasts,” and to the right you’ll see a link to submit a podcast.

Click on the button, and it will ask you to submit the feed.

It will return a message if you’ve missed filling in any fields. Once everything is correct, iTunes will notify you within a couple of days that your podcast has been approved and will email you a link to your podcast on the iTunes website. It may take a bit longer to show up in the iTunes app.
Seeing your very own podcast in the iTunes store is a pretty magical experience!

At this point (and probably long before), you should be announcing your podcast to the world.
- Email your list of subscribers.
- Ask all of your friends and colleagues to share it with their contacts.
- Post it on Twitter, Facebook, LinkedIn and Google+.
- Don’t stop.
Nathan Barry’s article “How to Launch Anything” might help.
Launch With At Least Three Episodes
The “New and Noteworthy” section of the iTunes store offers you much needed exposure, especially in those critical six to eight weeks following the launch. iTunes has an algorithm that looks at a number of different factors to determine whether to push you higher up in the “New and Noteworthy” section. One factor you can affect directly is the number of downloads.
What if you haven’t yet built up a huge audience? Simply put, launch with more episodes. The more episodes you launch with, the more likely you’ll get more downloads per subscriber, meaning you’re more likely to get bumped to the top.
Consistently releasing new episodes on schedule is important, so put one or two months’ worth of episodes on reserve in case an interview falls through, you get sick or you can’t release a new episode for some other reason. Of course, this may be impractical if you are newsjacking or discussing some other time-sensitive topic.
Track Downloads With Google Analytics
This is the last piece of the puzzle, and I was shocked at how few resources exist to do something as relatively simple as tracking downloads.
Apple doesn’t offer any tracking whatsoever. There are third-party apps, such as Lisbyn, Podtrac and Blubrry, but, as mentioned, many require you to host your audio files with them and to use their CMS and RSS feed. Not what us control freaks want!
If you aren’t overly concerned with getting paid sponsorship of your podcast, tracking downloads yourself is actually much easier by combining a bit of PHP with Google Analytics events.
I came across a free script from Chris Van Patten, Downloadalytics, which allows you to track downloads as an event in Google Analytics.
Here are the steps for installing it:
- Download the Server Side Google Analytics PHP script from Dan Cameron.
- Download Downloadalytics.
- Upload both PHP files (
ss-ga.class.phpanddownloads.php) to the root directory of your website.
Leave the Server Side Google Analytics file alone, and open downloads.php. You’ll need to change three things:
- the website’s URL (
yoursite.com); - the Google Analytics property ID (for example,
UA-1234567-1), which you can find in Google Analytics; - the type of audio file to track (I use M4A, but you could use MP4, MP3 or something else).

Update Links to Your Audio Files in Your Templates
Remember earlier when we pointed our RSS feed to download.php?url=, instead of just the basic path to the file? We did that so that Downloadalytics can properly track downloads in Google Analytics.
If you’re using an audio player on your blog, be sure to also point to downloads.php, instead of the basic file path. For example, your blog post should link like this:
<audio src="http://yoursite.com/download.php?url=http://yoursite.com/uploads/file01.m4a" preload="auto"></audio>Not like this:
<audio src="http://yoursite.com/uploads/file01.m4a" preload="auto">
</audio>
After a day of tracking, log into Google Analytics. Navigate to “Behavior” → “Events” → “Overview.”
You’ll notice a new event category, named “Downloads,” which Downloadalytics has generated.

Click on the event category, and you can add it to your dashboard to more easily track by episode.

Conclusion
Hopefully, you’ve found this to be a useful and comprehensive guide to launching your very own podcast. I’m only 10 episodes in at the time of writing, but so far I’ve found the experience to be a great way to build a closer relationship with my customers and fans. It’s a lot of work, and discipline is required to record week after week, even when you aren’t in the mood, but the reward is more than worth the effort.
So, tell me, when do you plan to launch your podcast?
 (ah, ml, al)


