In this article I’ll be taking a look at how to build a simple yet robust workflow for developing sites that require PHP and MySQL. I’ll show you how to use Vagrant to create and run a web server on your own computer, with the version of PHP your live site runs. I also demonstrate a process for using a hosted service to deploy files in a robust way to your live server.
This article is for you if you currently have no way to test your PHP and MySQL sites locally, or use something like MAMP or XAMPP. The second half of the article will help you move away from uploading files using FTP to a process that is far less likely to cause you problems.
Further Reading on SmashingMag:
- Why You Should Stop Installing Your WebDev Environment Locally
- HTTPS Everywhere With Nginx, Varnish And Apache
- Rapid Front-End Prototyping With WordPress
- Controlling The Cache: Using Edge Side Includes In Varnish
The Aim Of A Local Development Environment
When designing and developing your website, you should try to match the live web server as much as possible. This should include ensuring that paths from root don’t change between local and live versions, and that PHP modules and permissions are the same in both places. This approach will reduce the possibility of something going wrong as you push the site live. It should also enable you to come back to a site to make changes and updates and know that you can then deploy those changes without breaking the running site.
A good local development environment saves you time and stress. It gives you a place to test things out. It means that you can pick up a project, make some changes, deploy them and bill your client for another job well done.
Disaster-Free Deployments
If you keep a list of changes made to your site and then transfer the files one by one, you leave yourself open to difficulties caused by human error and connectivity problems. Many issues we see supporting our products are down to failed FTP transfers. A key file has failed to upload, and it is deep in the core product. It’s easy to forget to transfer a file, and it’s also easy to leave old files lying around. If the software you use has removed some files to resolve a security issue, leaving them on the server could leave you at risk even if you have upgraded.
A good deployment method ensures that the files on your live server exactly match those locally. If anything fails to deploy, you should be notified so you can fix the issue before your client or their customers see it first!
Step 1: Grab Some Tools
We’re going to be using some free tools to create our development environment. First, download VirtualBox, a free application which allows you to run a virtual machine on your computer. You may have already come across virtual machines if you work on a Mac and use a Windows virtual machine for testing. A virtual machine is exactly as the name suggests, a complete virtual OS running on your computer.
Install the version of VirtualBox for your operating system.
Now download and install Vagrant. Vagrant is an application that helps you manage virtual machines.

It’s possible to work with virtual machines without using Vagrant. However, each time you want to set up a new VM you have to go through the process of installing web server software and configuring the server. Vagrant helps you automate that process so that within a few minutes you can have a local web server running your site.
If you are on Mac OS X or Linux, at the command line run the following command:
sudo vagrant plugin install vagrant-bindfs
For all operating systems, run the next command to install Vagrant Host Manager to save you editing your hosts file by hand.
sudo vagrant plugin install vagrant-hostmanager
Vagrant requires a project folder with a text file saved with the name Vagrantfile in the root. In the Vagrantfile you specify how the VM should be set up. You can write your own configuration scripts for Vagrant, but for most cases you don’t need to as someone else has already done the hard work for you. Here we’re going to use a tool called PuPHPet.
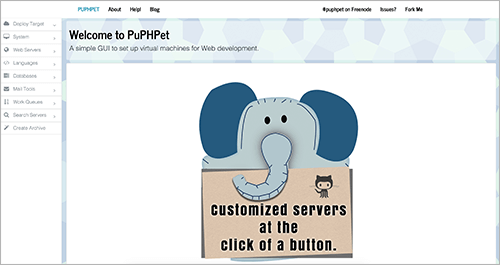
PuPHPet
PuPHPet is an online configuration tool that helps you configure a Vagrant project. You work through a form on the website, selecting options for your site, and then download a package containing a Vagrantfile and other scripts to set up a virtual machine.
Step 2: Discover What Is On Your Live Server
To use PuPHPet to set up a development server that is as close as possible to the hosting you will use for the site, first find out what is on the live server. You want to know:
- Type of Linux
- Web server: Apache or Nginx (probably Apache if shared hosting)
- PHP version: this will be something like PHP 5.4 or 5.5, etc.
- The configured resource limits for file upload, memory and so on
- Installed PHP modules; for example: gd, curl
- MySQL version
If you don’t yet have access to the hosting then you will need to ask the host these questions. If you do have access then you can find out for yourself.
Upload a file to the server named info.php that contains the following PHP function:
<?php phpinfo(); ?>
With your web browser you can visit http://yourdomain.com/info.php and see all kinds of information about PHP on the server.
1. Type Of Linux
You should see an indication of the base operating system in the first line of the report “System”. Knowing that you have a Debian, Ubuntu or CentOS system might be helpful for more advanced configurations.
2. Web Server
This is probably Apache. If you see any mention of Apache in the initial section or in the headings below, it’s Apache. The most likely alternative is Nginx. For simple sites the biggest difference between web servers is the fact that rewrite rules are different, so if you are creating friendly URLs you need to know the correct syntax to use.
3. PHP Version
The version of PHP will be right at the top of the document next to the PHP logo. It might be a long string — you are mostly interested in one number after the dot. So if you see “PHP Version 5.4.4-14+deb7u14,” all you need to note down is PHP 5.4.
4. PHP Modules
PuPHPet will install some default modules for you. If you want to be sure certain things are present, however, you can specify them. The PHP modules are listed, with details about them, after the “Core” section of the report. Common modules to look out for are:
- curl: for making requests to other servers
- gd and/or imagemagick: used for image manipulation
- mysql, mysqli and pdo: methods of connecting to the database. You should probably be using mysqli or pdo at this point
5. Resource Limits And Configuration Options
Under the section “Core” you will find all kinds of information about PHP. Useful settings to note down are:
max_execution_time: how long a script may run formax_file_uploads: how many files may be uploaded at oncemax_input_vars: how many fields a form is limited topost_max_size: the maximum size of a form postupload_max_filesize: file upload limit
Depending on your hosting, some of these might be able to be changed. For example, you can usually increase the size of files that can be uploaded.
6. MySQL Version
Under the PHP module information for mysql, mysqli and pdo_mysql you should see a value for “Client Library Version”: this is your MySQL version. Again, knowing just one value after the dot is fine.
Beware Of Old PHP!
On doing this test, if you discover that the server is running anything older than PHP 5.4 — stop now and find out how to upgrade the hosting to a more recent PHP version. For a new site I’d suggest ensuring you are on at least PHP 5.5. Version 5.6 is even better.
PHP5.3 is not only end-of-life, it’s also really slow in comparison to newer PHP versions. It’s a good plan to make sure you are using a supported version of a core technology on your site. Through helping customers at Perch we’ve found that, in general, hosts are happy to upgrade you to a newer server if you put in a request. If they are not, I’d seriously consider moving hosts.
Step 3: Build A Project With PuPHPet
Now that you have your information to hand, you can use it to build a project with PuPHPet that reasonably closely mirrors your environment. I’ll walk you through the interface. If I don’t mention a setting and you don’t have an opinion about it, then leave the default value.
Deploy Target
On the PuPHPet website, choose Deploy Target → Locally in the sidebar. In the main screen select VirtualBox as the provider.
Under Distro you can select the type of Linux you are using, if it is listed. If it isn’t listed I would suggest using the default Ubuntu.
The IP address needs to be something unique on your network, not a real external IP. I tend to use IP addresses with the format 10.1.0.130 for VMs.
The hostname identifies your server. Again this can be something made up.
Shared Folders is an important setting. When you use a virtual machine you are running an entirely new computer with its own file system on your computer. If you want to continue editing files in the usual place on your computer — and not have to transfer them into the VM to view them — you need to map the drive on your own machine to one on the VM. That’s what we are doing when we create a shared folder.
On my Mac, inside /Users/rachel/Sites I have a folder called vm. This is where I place a folder for each of my projects. When I set up a VM I use the path /Users/rachel/Sites/vm as the folder source, mapped to /var/www as the folder target.
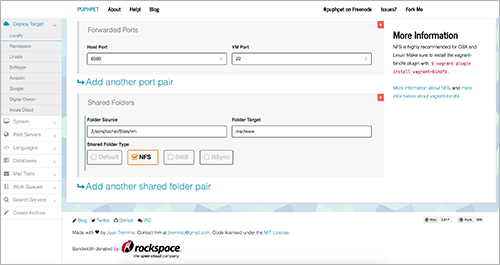
If this is a new site and you don’t already have files created, at this point I’d suggest creating a folder for the project you are setting up the virtual machine for, and pop an index.html into that folder with <h1>It works!</h1> in it. Just so you can see that things are working after running setup.
Finally, if you are on Mac OS X or Linux, select NFS as the shared folder type.
System
You can probably leave everything here as the default. It’s worth knowing that under this option you can configure cron jobs for scheduled tasks and add system packages if you have certain things you want to install.
Web Servers
Unless you have identified that you have Nginx, select Apache and check Install Apache. This will open up a further set of options. Here is where you configure your virtual hosts.
A virtual host means that instead of having one website per server you can have multiple websites on a server. With virtual machines you can create as many as you like, so it’s up to you whether you configure a single virtual host or more. What you should not do is configure one virtual host and then stick multiple websites into subfolders of that host. Each site needs either its own VM or a virtual host on a VM so that the path of your files from root does not change when you go live.
The basic settings for a virtual host are as follows:
Server name: clientname.dev or any made up domain you like.
Document root: from /var/www. If you have shared a folder in the way I suggested, /var/www is that directory on your computer — the directory with all your project folders in it — so you can specify /var/www/clientname here.
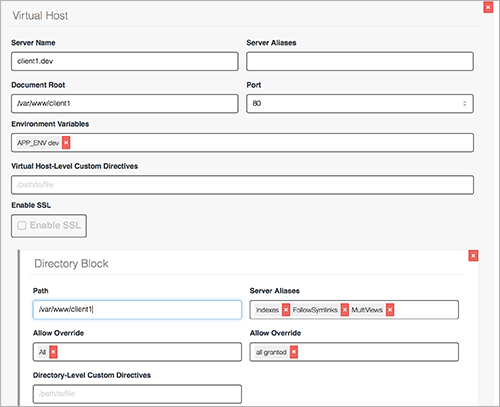
If you want to add another host, scroll down to Add an Apache vhost and create your next one.
Languages
Select PHP and check Install PHP.
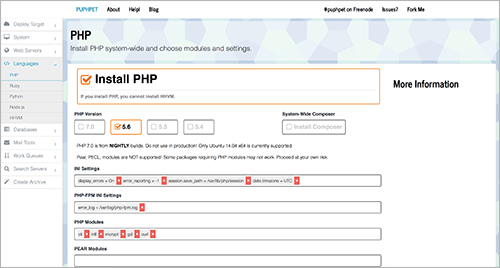
Under PHP Version select the version you identified as being on your host.
Under PHP Modules add any specific modules (for example, “gd” and “curl”) that you identified as present on your hosting.
Databases
Select MySQL and if you know the version of MySQL select it here.
You can now create a database user with a password. I tend to just use the name “vagrant” for both on local development machines.
You can also create a database ready to use for your site. Remember these details as you’ll need them to install your CMS or use in your own custom code that connects to MySQL.
Mail Tools
If you are using a CMS then it’s a good idea to have some way of looking at the emails it sends. PuPHPet suggests you install MailCatcher locally for this task as it saves configuring a mail server.
That should be it for setup. Select Create Archive from the sidebar and download your file. Unzip the file and put it somewhere on your system — mine all live in my home directory in a subdirectory called vagrant.
Your First Virtual Machine
You are almost ready to go. Open up a terminal window and change into the folder where you unzipped your project.
cd /Users/rachel/vagrant/mynewproject
Now run the command:
vagrant up
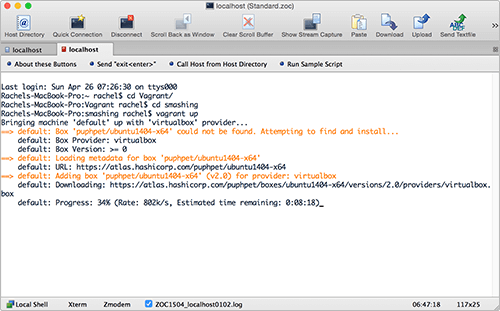
vagrant up command. (View large version)The first time you do this it will take a while. Vagrant will see that you don’t already have the base operating system downloaded so it will download it. When you create a new project in the future and use the same version of Linux, Vagrant will copy the box so this will be quicker.
You will see a lot of stuff scrolling by — don’t worry about it; it will take a few minutes to get everything set up for you. If you are using NFS you will be prompted for your password during the process to allow Vagrant to edit your exports file.
Once Vagrant has finished you should be able to go to the domain you set up for your virtual host using your web browser and see your site! If you make changes to your files and reload the browser, you will see your changes.
Basic Vagrant Commands
Vagrant is controlled with a few simple commands from the command line. We’ve already used vagrant up which will start up a VM. If the VM is brand-new it will also provision it — setting up the packages you configured to be installed, creating your virtual hosts, and so on. If you run vagrant up on a VM that has already been provisioned, Vagrant will not reprovision it.
Understanding the commands and what they will do is important, but if you prefer to stay out of the command line, take a look at Vagrant Manager. Vagrant Manager is an application for Mac OS X and Windows that gives you a nice way to manage your VMs and also see which are running at any one time.
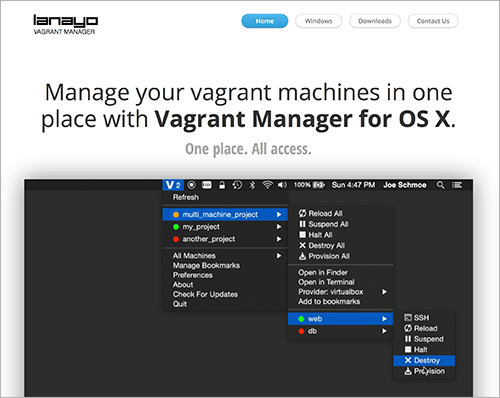
If you want to reprovision a VM, first make sure it is running with vagrant up, then type:
vagrant provision
To stop a VM from running you can use:
vagrant suspend
This will pause the box and give back your host machine the memory it uses, but it won’t delete anything on the VM or shut down the operating system. If you run vagrant up again, it will come back just as it was before you paused it.
To shut down the operating system on a VM use:
vagrant halt
Running vagrant up on a halted box boots up the system again.
If you want to set your virtual machine right back to its initial state, run:
vagrant destroy
This will delete anything you installed on the server. It won’t touch the files in your mapped drive as those are hosted on the host computer, but it will delete MySQL databases, for example. If you want the data from those, export it first.
To access the command line on the VM type:
vagrant ssh
You will then be on your VM and can run any commands. A common thing you might do is import or export a database file.
Importing A Database File
Our process creates an empty database. If you are installing a CMS or some other software, it is likely that it will create the tables for you. If you want to import a file exported from your live server, you can do that at the command line.
Use vagrant ssh to reach the command line of your VM. Make sure your exported database SQL script is in the root of your site, within the shared folder. Then, type the following (I’m assuming a database name of dbMySite, username and password both set to “vagrant”.
mysql -u vagrant -p dbMySite < /var/www/clientname/db.sql
You will then be prompted for the password. Type your password and the database will be imported.
Deploying Live
After following these steps you should have a nice way to work locally on one or more projects at a time. You can set up virtual machines that are similar to live, and you are not developing in subfolders. We can continue to enhance our workflow by moving away from FTP to using a deployment service.
Get Files Into Source Control
If you are already using Git, then you are part of the way to simple deployments. If not, that is the first thing we need to do. Our process will be to commit files into Git on our own computer, then create an account on a hosted Git repository and push our files to the live server from there.
If you don’t already have Git running locally, download and install Git.
At the command line, give Git your name using the following command:
git config --global user.name "YOUR NAME"
Use the next command to give Git your email address. We are going to use a hosted repository, so use the email address here that you will use to sign up.
git config --global user.email "YOUR EMAIL ADDRESS"
Stay on the command line and change to the directory where you keep your site files. If your files are in /Users/rachel/Sites/vm/clientname, you would type:
cd /Users/rachel/Sites/vm/clientname
The next command tells Git that we want to create a new Git repository here:
git init
We then add our files:
git add .
Then commit the files:
git commit -m "Adding initial files"
The comment in quotes after -m is a message describing the commit. Your local files are now in Git! As you work you can add and commit files.
If you would rather not work in the command line, there are plenty of applications to help you work with Git. Tower is a popular choice. The people who develop Tower have also produced a great book on learning version control with Git. You can read online free or purchase an ebook version.
Create A Hosted Repository
To make deployments easy we are going to use a hosted Git repository that will securely store your files and allow you to deploy them live. The hosted service I’m suggesting here is Beanstalk, because it does both hosted Git and deployment. There are other services that will deploy from a GitHub account or other hosted Git service; Beanstalk bundles them together which makes things straightforward.
After setting up your Beanstalk account, create a repository there. You now need to push your files to that repository. At the command line, make sure you are inside the directory that contains your files, and type:
git remote add beanstalk git@accountname.beanstalkapp.com:/gitreponame.git
git push beanstalk
Your files will now be transmitted to Beanstalk. You should be able to see and browse around them there.
We can now edit our files, previewing them on our own web server. We can commit them locally and push the changes to Beanstalk. Our final step is to make them live.
Deployment
Deployments on Beanstalk can be manual or automatic. An automatic deployment would happen when you pushed some code into your branch on GitHub. Typically, you’d do this on a staging environment where it wouldn’t matter if the code you pushed broke things.
For a live site, especially working in our simple way, you’ll want to do a manual deployment. You will log into Beanstalk and trigger the deployment yourself.
When you deploy, Beanstalk will make sure that the files on the server are identical to the files in Git. If a new file is present, it will be added, changed files will be updated, and any files deleted from Git will be removed from the server.
To get started deploying your files, go to the repository that you created on Beanstalk and select Deployments. Here you can create a new environment and server. If you are creating a deployment to the live server, name it “Live” or “Production,” keep Deployment Mode as Manual and specify the master branch.
You can then add a server type. If you are deploying to shared hosting, that type would ideally be SFTP, but could also be FTP. On the next screen you then add your server details. These are exactly what you would use to connect with an FTP client.
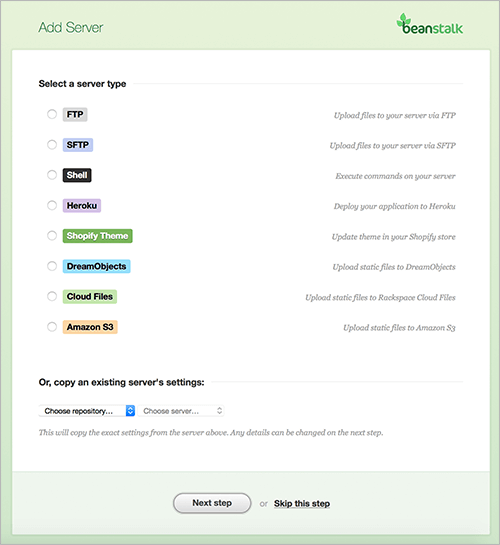
Beanstalk allows you to run a test to check that your server can be connected to. Once you have your server set up, and have verified the connection, you are all set to deploy your files to your live site. It’s as simple as clicking a button and waiting. Once you deploy, Beanstalk will do the following:
- Connect to your server.
- Ensure that the files on the server match the files in the branch you are deploying.
- On initial deploy, all existing files on the server have to be checked. Your first deploy will be slow!
- Subsequent deploys only change things that have changed in Git.
Deployment Tips
Here are a few suggestions to make deploying your sites in this way easier.
Create A Multiple-Server Config File
Working across a few environments means you are going to need to manage things that are specific to each environment, such as database settings or file paths. I like to create a config file that switches on host name, so the same file can be everywhere and you can’t accidentally replace your live details with the development server ones. You can see an example for Perch, but you could do the same for any other system that has a config file as part of the code.
Use .gitignore To Keep Things Out Of Beanstalk
There are likely to be files and assets that you don’t want to push to Beanstalk. You can use a .gitignore file to make Git ignore them. There are some good starting point files for various systems on GitHub.
Exclude Files And Folders On GitHub
If you want files and folders to end up on Beanstalk as part of the repository but not be deployed onto your server, you can also exclude them from the deployment. Perhaps you have some source assets you want to manage in Git along with the site, but don’t want to deploy. You can configure patterns, specific files or directories when setting up or editing your deployment.
Edit Files On Beanstalk In Emergencies
When you are away from your desk and need to fix a problem, Beanstalk can save the day. You can edit a file directly on Beanstalk using the web interface and push it live.
This is not as good as testing locally before deploying but handy in an emergency. Unlike editing directly on the server, you have the safety net of being able to roll back to a previous version if it all goes wrong. You also have the changed file in Git so you don’t overwrite the change next time you deploy.
Use Navicat To Sync Database Changes
One of the biggest problems of deploying changes can arise if you need to make changes to the live database to keep it in sync with your local one. Navicat can help with that job. You can select a source and target, compare differences and run queries to make changes.
Your New Workflow
If you’ve followed this article you should now be in a position to develop one or many sites locally, using a setup similar to how the site will run on the live server.
Your files are now version-controlled and are pushed to a remote Git repository.
You can deploy in the confidence that what ends up on the live server is exactly what should be on that server — no more, no less.
When you need to make changes to a project in the future, you can make sure you have the latest files from Beanstalk, make your changes, test, commit and deploy, and not worry that you might break something. The time you have spent getting your workflow straight should pay off the first time you need to make updates to a running site that you haven’t touched for a few weeks.
This isn’t the only way to achieve a solid development environment and deployment process, but it’s a reasonably straightforward one. Once you understand this type of workflow, you can explore how to streamline it further, making time to do more interesting things than fight with servers and hosting!
 (vf, ml, og)


