Making an application work offline can be a daunting task. In this article, Matthew Andrews, a lead developer behind FT Labs, shares a few insights he had learned along the way while building the FT application. – Ed.
We’re going to make a simple offline-first to-do application with HTML5 technology. Here is what the app will do:
- store data offline and load without an Internet connection;
- allow the user to add and delete items in the to-do list;
- store all data locally, with no back end;
- run on the first- and second-most recent versions of all major desktop and mobile browsers.
The complete project is ready for forking on GitHub.
Which Technologies To Use
In an ideal world, we’d use just one client database technology. Unfortunately, we’ll have to use two:
- IndexedDB. This is the standard for client-side storage and the only option available on Firefox and Internet Explorer.
- WebSQL. This is the deprecated predecessor to IndexedDB and the only option available on current versions of iOS (although iOS 8 will finally give us IndexedDB).
Veterans of the offline-first world might now be thinking, “But we could just use localStorage, which has the benefits of a much simpler API, and we wouldn’t need to worry about the complexity of using both IndexedDB and WebSQL.” While that is technically true, localStorage has number of problems, the most important of which is that the amount of storage space available with it is significantly less than IndexedDB and WebSQL.
Further Reading on SmashingMag:
- Building The New Financial Times Web App (A Case Study)
- Making A Service Worker: A Case Study
- Local Storage And How To Use It On Websites
Luckily, while we’ll need to use both, we’ll only need to think about IndexedDB. To support WebSQL, we’ll use an IndexedDB polyfill. This will keep our code clean and easy to maintain, and once all browsers that we care about support IndexedDB natively, we can simply delete the polyfill.
Note: If you’re starting a new project and are deciding whether to use IndexedDB or WebSQL, I strongly advocate using IndexedDB and the polyfill. In my opinion, there is no reason to write any new code that integrates with WebSQL directly.
I’ll go through all of the steps using Google Chrome (and its developer tools), but there’s no reason why you couldn’t develop this application using any other modern browser.
1. Scaffolding The Application And Opening A Database
We will create the following files in a single directory:
/index.html/application.js/indexeddb.shim.min.js/styles.css/offline.appcache
/index.html
<!DOCTYPE html>
<html>
  <head>
    <link rel='stylesheet' href='./styles.css' type='text/css' media='all' />
  </head>
  <body>
    <h1>Example: Todo</h1>
    <form>
      <input placeholder="Type something" />
    </form>
    <ul>
    </ul>
    <script src="./indexeddb.shim.min.js"></script>
    <script src="./application.js"></script>
  </body>
</html>
Nothing surprising here: just a standard HTML web page, with an input field to add to-do items, and an empty unordered list that will be filled with those items.
/indexeddb.shim.min.js
Download the contents of the minified IndexedDB polyfill, and put it in this file.
/styles.css
body {
  margin: 0;
  padding: 0;
  font-family: helvetica, sans-serif;
}

* {
  box-sizing: border-box;
}

h1 {
  padding: 18px 20px;
  margin: 0;
  font-size: 44px;
  border-bottom: solid 1px #DDD;
  line-height: 1em;
}

form {
  padding: 20px;
  border-bottom: solid 1px #DDD;
}

input {
  width: 100%;
  padding: 6px;
  font-size: 1.4em;
}

ul {
  margin: 0;
  padding: 0;
  list-style: none;
}

li {
  padding: 20px;
  border-bottom: solid 1px #DDD;
  cursor: pointer;
}
Again, this should be quite familiar: just some simple styles to make the to-do list look tidy. You may choose not to have any styles at all or create your own.
/application.js
(function() {

  // 'global' variable to store reference to the database
  var db;

  databaseOpen(function() {
    alert("The database has been opened");
  });

  function databaseOpen(callback) {
    // Open a database, specify the name and version
    var version = 1;
    var request = indexedDB.open('todos', version);

    request.onsuccess = function(e) {
      db = e.target.result;
      callback();
    };
    request.onerror = databaseError;
  }

  function databaseError(e) {
    console.error('An IndexedDB error has occurred', e);
  }

}());
All this code does is create a database with indexedDB.open and then show the user an old-fashioned alert if it is successful. Every IndexedDB database needs a name (in this case, todos) and a version number (which I’ve set to 1).
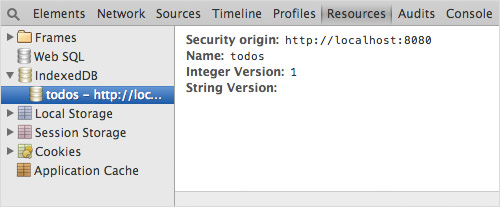
To check that it’s working, open the application in the browser, open up “Developer Tools” and click on the “Resources” tab.

By clicking on the triangle next to “IndexedDB,” you should see that a database named todos has been created.
2. Creating The Object Store
Like many database formats that you might be familiar with, you can create many tables in a single IndexedDB database. These tables are called “objectStores.” In this step, we’ll create an object store named todo. To do this, we simply add an event listener on the database’s upgradeneeded event.
The data format that we will store to-do items in will be JavaScript objects, with two properties:
timeStampThis timestamp will also act as our key.textThis is the text that the user has entered.
For example:
{ timeStamp: 1407594483201, text: 'Wash the dishes' }
Now, /application.js looks like this (the new code starts at request.onupgradeneeded):
(function() {

  // 'global' variable to store reference to the database
  var db;

  databaseOpen(function() {
    alert("The database has been opened");
  });

  function databaseOpen(callback) {
    // Open a database, specify the name and version
    var version = 1;
    var request = indexedDB.open('todos', version);

    // Run migrations if necessary
    request.onupgradeneeded = function(e) {
      db = e.target.result;
      e.target.transaction.onerror = databaseError;
      db.createObjectStore('todo', { keyPath: 'timeStamp' });
    };

    request.onsuccess = function(e) {
      db = e.target.result;
      callback();
    };
    request.onerror = databaseError;
  }

  function databaseError(e) {
    console.error('An IndexedDB error has occurred', e);
  }

}());
This will create an object store keyed by timeStamp and named todo.
Or will it?
Having updated application.js, if you open the web app again, not a lot happens. The code in onupgradeneeded never runs; try adding a console.log in the onupgradeneeded callback to be sure. The problem is that we haven’t incremented the version number, so the browser doesn’t know that it needs to run the upgrade callback.
How to Solve This?
Whenever you add or remove object stores, you will need to increment the version number. Otherwise, the structure of the data will be different from what your code expects, and you risk breaking the application.
Because this application doesn’t have any real users yet, we can fix this another way: by deleting the database. Copy this line of code into the “Console,” and then refresh the page:
indexedDB.deleteDatabase('todos');
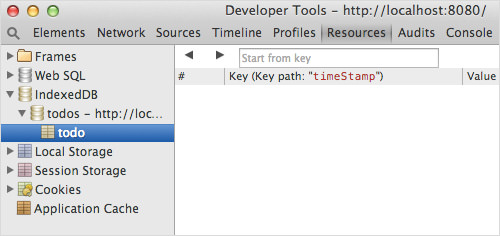
After refreshing, the “Resources” pane of “Developer Tools” should have changed and should now show the object store that we added:

3. Adding Items
The next step is to enable the user to add items.
/application.js
Note that I’ve omitted the database’s opening code, indicated by ellipses (…) below:
(function() {

  // Some global variables (database, references to key UI elements)
  var db, input;

  databaseOpen(function() {
    input = document.querySelector('input');
    document.body.addEventListener('submit', onSubmit);
  });

  function onSubmit(e) {
    e.preventDefault();
    databaseTodosAdd(input.value, function() {
      input.value = '';
    });
  }

[…]

  function databaseTodosAdd(text, callback) {
    var transaction = db.transaction(['todo'], 'readwrite');
    var store = transaction.objectStore('todo');
    var request = store.put({
      text: text,
      timeStamp: Date.now()
    });

    transaction.oncomplete = function(e) {
      callback();
    };
    request.onerror = databaseError;
  }

}());
We’ve added two bits of code here:
- The event listener responds to every
submitevent, prevents that event’s default action (which would otherwise refresh the page), callsdatabaseTodosAddwith the value of theinputelement, and (if the item is successfully added) sets the value of theinputelement to be empty. - A function named
databaseTodosAddstores the to-do item in the local database, along with a timestamp, and then runs acallback.
To test that this works, open up the web app again. Type some words into the input element and press “Enter.” Repeat this a few times, and then open up “Developer Tools” to the “Resources” tab again. You should see the items that you typed now appear in the todo object store.

todo object store. (View large version)4. Retrieving Items
Now that we’ve stored some data, the next step is to work out how to retrieve it.
/application.js
Again, the ellipses indicate code that we have already implemented in steps 1, 2 and 3.
(function() {

  // Some global variables (database, references to key UI elements)
  var db, input;

  databaseOpen(function() {
    input = document.querySelector('input');
    document.body.addEventListener('submit', onSubmit);
    databaseTodosGet(function(todos) {
      console.log(todos);
    });
  });

[…]

  function databaseTodosGet(callback) {
    var transaction = db.transaction(['todo'], 'readonly');
    var store = transaction.objectStore('todo');

    // Get everything in the store
    var keyRange = IDBKeyRange.lowerBound(0);
    var cursorRequest = store.openCursor(keyRange);

    // This fires once per row in the store. So, for simplicity,
    // collect the data in an array (data), and pass it in the
    // callback in one go.
    var data = [];
    cursorRequest.onsuccess = function(e) {
      var result = e.target.result;

      // If there's data, add it to array
      if (result) {
        data.push(result.value);
        result.continue();

      // Reach the end of the data
      } else {
        callback(data);
      }
    };
  }

}());
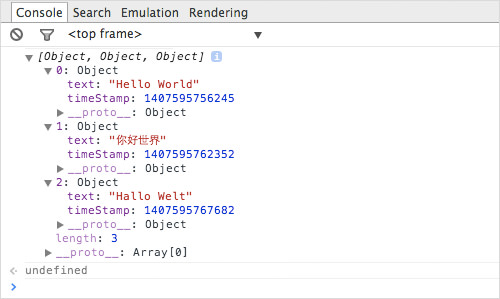
After the database has been initialized, this will retrieve all of the to-do items and output them to the “Developer Tools” console.
Notice how the onsuccess callback is called after each item is retrieved from the object store. To keep things simple, we put each result into an array named data, and when we run out of results (which happens when we’ve retrieved all of the items), we call the callback with that array. This approach is simple, but other approaches might be more efficient.
If you reopen the application again, the “Developer Tools” console should look a bit like this:

5. Displaying Items
The next step after retrieving the items is to display them.
/application.js
(function() {

  // Some global variables (database, references to key UI elements)
  var db, input, ul;

  databaseOpen(function() {
    input = document.querySelector('input');
    ul = document.querySelector('ul');
    document.body.addEventListener('submit', onSubmit);
    databaseTodosGet(renderAllTodos);
  });

  function renderAllTodos(todos) {
    var html = '';
    todos.forEach(function(todo) {
      html += todoToHtml(todo);
    });
    ul.innerHTML = html;
  }

  function todoToHtml(todo) {
    return '<li>'+todo.text+'</li>';
  }

[…]
All we’ve added are a couple of very simple functions that render the to-do items:
todoToHtmlThis takes atodosobject (i.e. the simple JavaScript object that we defined earlier).renderAllTodosThis takes an array oftodosobjects, converts them to an HTML string and sets the unordered list’sinnerHTMLto it.
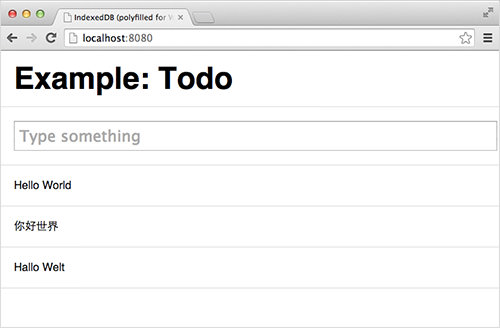
Finally, we’re at a point where we can actually see what our application is doing without having to look in “Developer Tools”! Open up the app again, and you should see something like this:

But we’re not done yet. Because the application only displays items when it launches, if we add any new ones, they won’t appear unless we refresh the page.
6. Displaying New Items
We can fix this with a single line of code.
/application.js
The new code is just the line databaseTodosGet(renderAllTodos);.
[…]

function onSubmit(e) {
  e.preventDefault();
  databaseTodosAdd(input.value, function() {
    // After new items have been added, re-render all items
    databaseTodosGet(renderAllTodos);
    input.value = '';
  });
}

[…]
Although this is very simple, it’s not very efficient. Every time we add an item, the code will retrieve all items from the database again and render them on screen.
7. Deleting Items
To keep things as simple as possible, we will let users delete items by clicking on them. (For a real application, we would probably want a dedicated “Delete” button or show a dialog so that an item doesn’t get deleted accidentally, but this will be fine for our little prototype.)
To achieve this, we will be a little hacky and give each item an ID set to its timeStamp. This will enable the click event listener, which we will add to the document’s body, to detect when the user clicks on an item (as opposed to anywhere else on the page).
/application.js
(function() {

  // Some global variables (database, references to key UI elements)
  var db, input, ul;

  databaseOpen(function() {
    input = document.querySelector('input');
    ul = document.querySelector('ul');
    document.body.addEventListener('submit', onSubmit);
    document.body.addEventListener('click', onClick);
    databaseTodosGet(renderAllTodos);
  });

  function onClick(e) {

    // We'll assume that any element with an ID
    // attribute is a to-do item. Don't try this at home!
    if (e.target.hasAttribute('id')) {

      // Because the ID is stored in the DOM, it becomes
      // a string. So, we need to make it an integer again.
      databaseTodosDelete(parseInt(e.target.getAttribute('id'), 10), function() {

        // Refresh the to-do list
        databaseTodosGet(renderAllTodos);
      });
    }
  }

[…]

  function todoToHtml(todo) {
    return '<li id="'+todo.timeStamp+'">'+todo.text+'</li>';
  }

[…]

  function databaseTodosDelete(id, callback) {
    var transaction = db.transaction(['todo'], 'readwrite');
    var store = transaction.objectStore('todo');
    var request = store.delete(id);
    transaction.oncomplete = function(e) {
      callback();
    };
    request.onerror = databaseError;
  }

}());
We’ve made the following enhancements:
- We’ve added a new event handler (
onClick) that listens to click events and checks whether the target element has an ID attribute. If it has one, then it converts that back into an integer withparseInt, callsdatabaseTodosDeletewith that value and, if the item is successfully deleted, re-renders the to-do list following the same approach that we took in step 6. - We’ve enhanced the
todoToHtmlfunction so that every to-do item is outputted with an ID attribute, set to itstimeStamp. - We’ve added a new function,
databaseTodosDelete, which takes thattimeStampand acallback, deletes the item and then runs thecallback.
Our to-do app is basically feature-complete. We can add and delete items, and it works in any browser that supports WebSQL or IndexedDB (although it could be a lot more efficient).
Almost There
Have we actually built an offline-first to-do app? Almost, but not quite. While we can now store all data offline, if you switch off your device’s Internet connection and try loading the application, it won’t open. To fix this, we need to use the HTML5 Application Cache.
Warning
- While HTML5 Application Cache works reasonably well for a simple single-page application like this, it doesn’t always. Thoroughly research how it works before considering whether to apply it to your website.
- Service Worker might soon replace HTML5 Application Cache, although it is not currently usable in any browser, and neither Apple nor Microsoft have publicly committed to supporting it.
8. Truly Offline
To enable the application cache, we’ll add a manifest attribute to the html element of the web page.
/index.html
<!DOCTYPE html>
<html manifest="./offline.appcache">
[…]
Then, we’ll create a manifest file, which is a simple text file in which we crudely specify the files to make available offline and how we want the cache to behave.
/offline.appcache
CACHE MANIFEST
./styles.css
./indexeddb.shim.min.js
./application.js

NETWORK:
*
The section that begins CACHE MANIFEST tells the browser the following:
- When the application is first accessed, download each of those files and store them in the application cache.
- Any time any of those files are needed from then on, load the cached versions of the files, rather than redownload them from the Internet.
The section that begins NETWORK tells the browser that all other files must be downloaded fresh from the Internet every time they are needed.
Success!
We’ve created a quick and simple to-do app that works offline and that runs in all major modern browsers, thanks to both IndexedDB and WebSQL (via a polyfill).
databaseOpen(function() { input = document.querySelector(‘input’); document.body.addEventListener(‘submit’, onSubmit); databaseTodosGet(function(todos) { console.log(todos); }); });
[…]
function databaseTodosGet(callback) { var transaction = db.transaction([‘todo’], ‘readonly’); var store = transaction.objectStore(‘todo’);
// Get everything in the store
var keyRange = IDBKeyRange.lowerBound(0);
var cursorRequest = store.openCursor(keyRange);

// This fires once per row in the store. So, for simplicity,
// collect the data in an array (data), and pass it in the
// callback in one go.
var data = [];
cursorRequest.onsuccess = function(e) {
  var result = e.target.result;

  // If there's data, add it to array
  if (result) {
    data.push(result.value);
    result.continue();

  // Reach the end of the data
  } else {
    callback(data);
  }
};
}
}());
After the database has been initialized, this will retrieve all of the to-do items and output them to the “Developer Tools” console.
Notice how the onsuccess callback is called after each item is retrieved from the object store. To keep things simple, we put each result into an array named data, and when we run out of results (which happens when we’ve retrieved all of the items), we call the callback with that array. This approach is simple, but other approaches might be more efficient.
If you reopen the application again, the “Developer Tools” console should look a bit like this:

5. Displaying Items
The next step after retrieving the items is to display them.
/application.js
(function() {

  // Some global variables (database, references to key UI elements)
  var db, input, ul;

  databaseOpen(function() {
    input = document.querySelector('input');
    ul = document.querySelector('ul');
    document.body.addEventListener('submit', onSubmit);
    databaseTodosGet(renderAllTodos);
  });

  function renderAllTodos(todos) {
    var html = '';
    todos.forEach(function(todo) {
      html += todoToHtml(todo);
    });
    ul.innerHTML = html;
  }

  function todoToHtml(todo) {
    return '<li>'+todo.text+'</li>';
  }

[…]
All we’ve added are a couple of very simple functions that render the to-do items:
todoToHtmlThis takes atodosobject (i.e. the simple JavaScript object that we defined earlier).renderAllTodosThis takes an array oftodosobjects, converts them to an HTML string and sets the unordered list’sinnerHTMLto it.
Finally, we’re at a point where we can actually see what our application is doing without having to look in “Developer Tools”! Open up the app again, and you should see something like this:

But we’re not done yet. Because the application only displays items when it launches, if we add any new ones, they won’t appear unless we refresh the page.
6. Displaying New Items
We can fix this with a single line of code.
/application.js
The new code is just the line databaseTodosGet(renderAllTodos);.
[…]

function onSubmit(e) {
  e.preventDefault();
  databaseTodosAdd(input.value, function() {
    // After new items have been added, re-render all items
    databaseTodosGet(renderAllTodos);
    input.value = '';
  });
}

[…]
Although this is very simple, it’s not very efficient. Every time we add an item, the code will retrieve all items from the database again and render them on screen.
7. Deleting Items
To keep things as simple as possible, we will let users delete items by clicking on them. (For a real application, we would probably want a dedicated “Delete” button or show a dialog so that an item doesn’t get deleted accidentally, but this will be fine for our little prototype.)
To achieve this, we will be a little hacky and give each item an ID set to its timeStamp. This will enable the click event listener, which we will add to the document’s body, to detect when the user clicks on an item (as opposed to anywhere else on the page).
/application.js
(function() {

  // Some global variables (database, references to key UI elements)
  var db, input, ul;

  databaseOpen(function() {
    input = document.querySelector('input');
    ul = document.querySelector('ul');
    document.body.addEventListener('submit', onSubmit);
    document.body.addEventListener('click', onClick);
    databaseTodosGet(renderAllTodos);
  });

  function onClick(e) {

    // We'll assume that any element with an ID
    // attribute is a to-do item. Don't try this at home!
    if (e.target.hasAttribute('id')) {

      // Because the ID is stored in the DOM, it becomes
      // a string. So, we need to make it an integer again.
      databaseTodosDelete(parseInt(e.target.getAttribute('id'), 10), function() {

        // Refresh the to-do list
        databaseTodosGet(renderAllTodos);
      });
    }
  }

[…]

  function todoToHtml(todo) {
    return '<li id="'+todo.timeStamp+'">'+todo.text+'</li>';
  }

[…]

  function databaseTodosDelete(id, callback) {
    var transaction = db.transaction(['todo'], 'readwrite');
    var store = transaction.objectStore('todo');
    var request = store.delete(id);
    transaction.oncomplete = function(e) {
      callback();
    };
    request.onerror = databaseError;
  }

}());
We’ve made the following enhancements:
- We’ve added a new event handler (
onClick) that listens to click events and checks whether the target element has an ID attribute. If it has one, then it converts that back into an integer withparseInt, callsdatabaseTodosDeletewith that value and, if the item is successfully deleted, re-renders the to-do list following the same approach that we took in step 6. - We’ve enhanced the
todoToHtmlfunction so that every to-do item is outputted with an ID attribute, set to itstimeStamp. - We’ve added a new function,
databaseTodosDelete, which takes thattimeStampand acallback, deletes the item and then runs thecallback.
Our to-do app is basically feature-complete. We can add and delete items, and it works in any browser that supports WebSQL or IndexedDB (although it could be a lot more efficient).
Almost There
Have we actually built an offline-first to-do app? Almost, but not quite. While we can now store all data offline, if you switch off your device’s Internet connection and try loading the application, it won’t open. To fix this, we need to use the HTML5 Application Cache.
Warning
- While HTML5 Application Cache works reasonably well for a simple single-page application like this, it doesn’t always. Thoroughly research how it works before considering whether to apply it to your website.
- Service Worker might soon replace HTML5 Application Cache, although it is not currently usable in any browser, and neither Apple nor Microsoft have publicly committed to supporting it.
8. Truly Offline
To enable the application cache, we’ll add a manifest attribute to the html element of the web page.
/index.html
<!DOCTYPE html>
<html manifest="./offline.appcache">
[…]
Then, we’ll create a manifest file, which is a simple text file in which we crudely specify the files to make available offline and how we want the cache to behave.
/offline.appcache
CACHE MANIFEST
./styles.css
./indexeddb.shim.min.js
./application.js

NETWORK:
*
The section that begins CACHE MANIFEST tells the browser the following:
- When the application is first accessed, download each of those files and store them in the application cache.
- Any time any of those files are needed from then on, load the cached versions of the files, rather than redownload them from the Internet.
The section that begins NETWORK tells the browser that all other files must be downloaded fresh from the Internet every time they are needed.
Success!
We’ve created a quick and simple to-do app that works offline and that runs in all major modern browsers, thanks to both IndexedDB and WebSQL (via a polyfill).
Resources
- “A Simple TODO list Using HTML5 IndexedDB,” Paul Kinlan, HTML5 Rocks The app we just developed builds on Kinlan’s article.
- “IndexedDB Polyfill Over WebSQL,” Parashuram Narasimhan
- “Application Cache Is a Douchebag,” Jake Archibald, A List Apart A comprehensive guide to what’s wrong with the HTML5 Application Cache.
- Is Service Worker Ready? Track the implementation of Service Worker across major web browsers.
 (al, ml, il)


