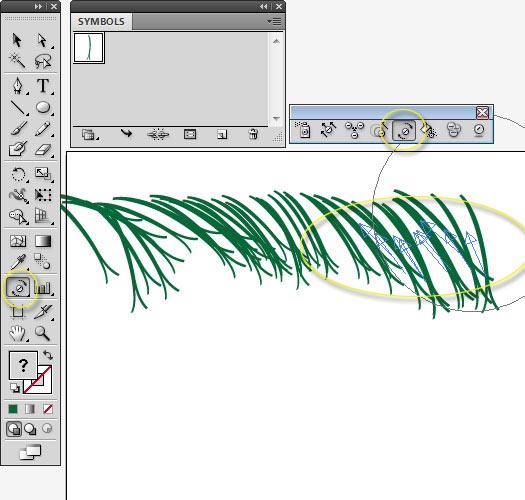
For drawing and painting digital illustrations, Adobe Illustrator is a favorite among designers for many reasons. One of the reasons is some of the amazing time-saving features that come with it. The Symbols feature in Illustrator does just this: it saves valuable time by creating a “symbol,” or copy, of an object. This means that all of the time you have spent creating a minutely detailed flower does not have to be repeated. Instead, simply save the flower as a symbol for future use. Plus, symbols greatly reduce the size of image files.
Illustrator makes it easy to use symbols multiple times within a document as well. With the Symbols tools, you can add and alter several symbols at once. And in CS5, you can now change the settings for a symbol while editing. Another benefit of symbols in Illustrator CS5 is that you can change a symbol to a movie clip, making it easy to export to Adobe Flash. You can also make sure that the symbol scales correctly for your interface design by choosing 9-Slice Scaling while still in Illustrator.
Further Reading on SmashingMag: Link
- How To Create A Dramatic Vector Illustration
- How To Create A Water Lily In Illustrator
- The Process Behind Good Illustration (Part 1)
- 40 Excellent Adobe Illustrator Tutorials
CS5 makes working with symbols even easier by adding a few new features, explained below. If you are working in an earlier version of Illustrator, you will still be able to follow along and become as much a master of symbols in Illustrator as the next guy.
The topics covered in this article are:
- Basic Symbol Use
- Symbols panel 101
- Creating symbols
- Symbol libraries
- Placing symbols
- Breaking links
- Changing symbol options
- Adding or duplicating symbols
- Deleting symbols
- Redefine a symbol
- Swap/replace a symbol
- Advanced Symbol Use
- Control window
- Editing as a graphic
- Registration point edits
- 9-Slice Scaling edits
- Sub-layer for symbols
- Symbolism Tools
- Symbol sets
- Symbol Sprayer tool
- Symbol Shifter tool
- Symbol Scruncher tool
- Symbol Sizer tool
- Symbol Spinner tool
- Symbol Stainer tool
- Symbol Screener tool
- Symbol Styler tool
- Symbolism Tools Advanced Options
- Options available to all symbol tools
- Symbol Sprayer options
- Symbol Sizer options
- Make Symbols Your Best Friend
- More resources
Basic Symbol Use
Some of the actions for Symbols are quite easy to figure out just by playing around with them, while others take some explanation. Below is an overview of how to use symbols, but remember that you can move, scale, rotate, reflect and skew (shear) symbols just like other objects.
Symbols Panel 101
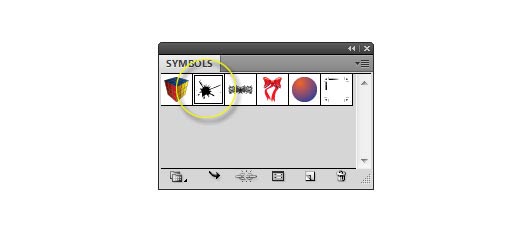
To open the Symbols panel, click on the button that looks like a clover, located in the menu on the right side of the Illustrator screen. Or go to Window → Symbols. As always the case with Adobe software, there are several ways to complete a task with Symbols.

The drop-down menu in the upper-right corner of the Symbols panel offers access to nearly every action for the panel, including creating a symbol, editing a symbol, breaking links, changing the view in the panel and more. To save you time, along the bottom of the Symbols panel are a few shortcuts to the most commons actions. You can also use the options in the Control window at the top of the screen.
To select a symbol in the panel, click on the icon. With a symbol selected, you can now edit it, place it on your artboard, delete it and more.
You can also organize the symbols in the panel by clicking and dragging them around. Or choose “Sort by Name” to change the view of the icons from within the drop-down menu.
Creating Symbols
Nearly any object can be made into a symbol. A couple of exceptions are art that is not linked and groups of graphics. Make sure the Symbols panel is open.
Click on the “New Symbols” icon (it looks like two white squares, one smaller than the other) at the bottom of the Symbols window, or drag an object directly into the Symbols panel. Illustrator will automatically turn the object you have selected into a symbol and also add the object to the Symbols window.
If you do not want your original object to become a symbol, then hold down Shift while creating the new symbol. This allows you to quickly create a symbol while retaining editable work on your artboard.
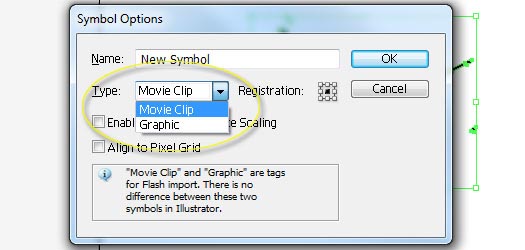
In the Symbols dialog box that appears, first specify a name, one that you will easily remember later.

Next, select the “Type” of symbol you want to create: a graphic or movie clip. If you will be using the symbol only in Illustrator, it does not matter which you select. The only reason why the two options are available is if you want to use the symbol in Adobe Flash: a movie-clip symbol in Flash can be manipulated for animation purposes, while a graphic symbol in Flash will remain static.
Symbol Libraries
The Symbol Libraries provide a clean way to organize the symbols that you acquire. To open them, click on the Symbols Library menu in the far left of your Symbols tools, or go to Window → Symbol Libraries → [symbol]. The library that you select will open in a new window. When you choose a symbol from an open library, it is automatically added to the Symbols panel.
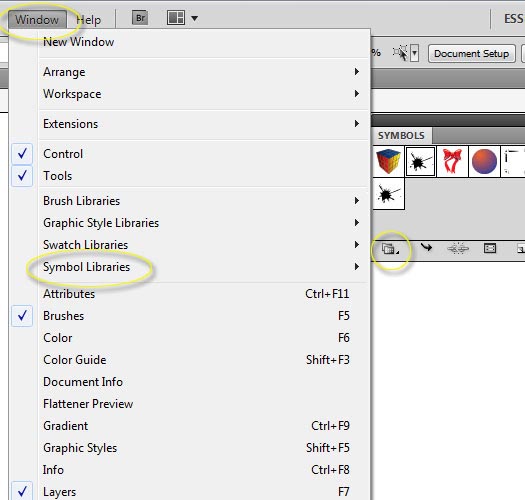
Remember that you can change the symbol once it is in your panel, but the original symbol in the library will never change.
Adding symbols from the panel to your library is easy but can be confusing at first. Begin by deleting any symbols that you do not want to add. (To quickly remove unused symbols, choose “Select All Unused” from the Symbols panel menu.) Then choose “Save Symbols” from the Symbols Library menu button, or go to the Symbols panel menu and select “Save Symbol Library.” Name your symbol library, and save it to the default Symbols folder. You can now find your new library folder in Symbols Library Menu → User Defined → [symbol].
Note: You can create a new library from any symbols, whether default Illustrator symbols or your own. Just drag the desired symbols into the Symbols panel, and follow the steps above to create a new library.
Saving symbol libraries in locations other than the default library folder enables you to more easily share your created symbols with other designers. First, create your library as explained in the section above. When you get to the step where Illustrator asks you to choose a name and location for your library, choose a location other than the default folder (such as the desktop or “My Documents”). Remember that you can always access the symbols in this alternate location when working in Illustrator by choosing “Other Library” from the Symbols Library menu.
Placing Symbols
To place a symbol on your artboard, simply click on the icon in the panel and drag the symbol onto your board, or select the Symbol icon in the panel and then click the “Place Symbol Instance” button. Dragging the symbol is helpful if you have a specific place for it, whereas the “Place Symbol Instance” button works well when you want to place several on the board but are not yet sure where.

Breaking Links
The “Break Link to Symbol” button simply turns the symbol that you’ve placed on your artboard back into a regular graphic. While changes such as move, scale, rotate, reflect and skew (shear) can be made to a symbol’s instance on the artboard without changing the original symbol in the panel, more advanced edits will affect both the instance and the symbol if they are linked. By clicking on the “Break Link to Symbol” button, you can now modify the symbol in the panel without affecting the graphic on your artboard. The opposite is also true: edits made to an instance with a broken link will no longer affect the symbol.

Changing Symbol Options
The “Symbol Options” button opens the Options dialog box, where you can change the symbol to “Graphic” or “Movie Clip,” change it to 9-Slice Scaling, and make the symbol automatically align to a grid. See the section above on “Creating Symbols” for more explanation. You can also change the name, which is helpful if you duplicate a symbol.
Adding or Duplicating Symbols
The “New Symbol” button allows you to change a selected object into a symbol. Or, to quickly duplicate a symbol, just select it in the panel and drag it onto the “New Symbol” button. Illustrator will automatically name it the original symbol’s name plus a number, such as “Cube 1,” but you can change the name with the Options button.

Drag the symbol to the “New Symbol” button.

A new symbol will appear with a numbered name.
Deleting Symbols
Drag a symbol onto the Delete button to delete it from the panel. This will not delete it from your library, so if you need to use it again, just open the library and drag it back onto the panel. You can also click on the “Delete” button when a symbol is selected to delete it; a dialog box will appear asking “Delete the selected symbol?”

If you delete a symbol that has instances on the artboard, an alert dialog box will appear saying that the symbol cannot be deleted until its instance in use is either deleted or expanded. Choose “Expand Instances” to break the link to the symbol; this option will turn the instance on the artboard into a regular graphic and will delete the symbol from the panel. Choose “Delete Instances” to remove the instance from the artboard and delete the symbol from the panel.
Redefine Symbol
“Redefine Symbols” (located in the drop-down menu of the Symbols panel) allows you to change a symbol to the selected graphic on your artboard. Keep in mind that this action will change only the appearance of the symbol, while the name and other options (such as the type) will remain the same.

With the symbol selected on the artboard, select one of the previously defined symbols in the Symbols panel. In this example, we have selected the bow-tie symbol.

The bow-tie symbol now looks like the grime symbol, but the name and other options remain unchanged.
Swap/Replace a Symbol
To swap a symbol with another, select the symbol on your artboard, then select the symbol icon in the panel that you want to use in its place. From the drop-down menu, select “Replace Symbol.”

2. Advanced Symbol Use
Symbols can be edited several ways. In fact, CS5 now offers more editing options than previous versions of Illustrator, including 9-Slice Scaling (see below) and much more.
Control Window
One way to edit symbols is with the options in the Control window, located along the top (or bottom, depending on how you have arranged your Illustrator window) of your artboard. Simply click on the symbol that you want to edit, and you will notice that many of the Control window options for symbols are similar to the options for other objects, such as “Opacity,” “Recolor Artwork,” “Transform” and “Align to Selection.” You might also notice that you can break links and replace symbols from this menu.

The Control window’s options change depending on what type of graphic is selected, so some of these options are available to normal graphics, while others are exclusive to symbols.
To undo transformations, just select the symbol on the artboard and click “Reset” on the Control window; or choose “Reset Transformation” from the drop-down menu in the Symbols panel; or simply right-click on the symbol’s instance on the artboard and choose “Reset Transformation” from the context menu.

Editing as a Graphic
To edit a symbol with your primary editing tools just as you would any other graphic, click on a symbol in the panel (or, to be safe, duplicate the symbol and then edit the duplication), and select “Edit Symbol” in the drop-down menu. (Alternatively, double-click on the symbol in the panel.) You will now be able to modify the symbol in your panel as well as any instances on your artboard.
To modify only the instance(s) on your artboard and not the symbol in your panel, select the instance(s) on the artboard and break the link first. The instance will now be regular artwork that you can edit using any tool in the Tool menu.
You can always turn your edited graphic back into a new symbol by selecting the graphic and clicking “New Symbol” in the symbol’s palette.
To break links to all symbol instances at once, select the symbol’s icon in the Symbols panel, then choose “Select All Instances” from the drop-down menu.
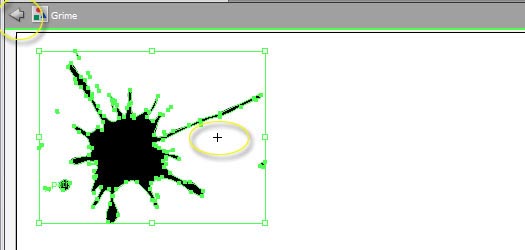
You can also edit all symbol instances along with the symbol in the panel. Simply double-click the symbol on the artboard; or select the instance and click the “Edit Symbol” button in the Control window; or select “Edit Symbol” from the fly-out menu. An alert dialog box will appear, warning you that you are about to edit the symbol and that any changes will be made to all instances of that symbol.
You can choose “OK” or “Cancel.” This means what it says: all instances and the symbol in the panel will be changed according to the edits you make while in this “Isolation Mode.” Check the “Don’t Show Again” checkbox to prevent this warning from appearing again.
To exit the Edit Symbol mode, click on the “Back” arrow in the edit bar at the top of the artboard, or hit the “Escape” key. You can also right-click on the instance that you are editing and choose “Exit Isolation Mode.”
Registration Point Edits
In CS5, editing the registration point of symbols is possible. For those of you familiar with Flash, no more explanation is needed. For those who know nothing of Flash, the registration point basically allows you to select where to place the anchor point, which determines how a symbol will be placed within a screen coordinate.
One time when the registration grid makes a difference in Illustrator is when rotating symbols. If your registration is set to the upper-right corner of your symbol, then the symbol will rotate around that corner. You can see the location of the registration point simply by selecting the symbol on the artboard using the Selection tool. It looks like a small crosshair.

You can set the registration point by selecting a point on the registration grid when you create a new symbol. In the example below, the registration is set to the bottom-left corner. The default is centered. Just click the “New Symbol” button, and the Symbol options dialog box will pop up.
To edit the registration point or to fine tune the location, simply double-click the symbol on the artboard, and you will enter Isolation Mode. Move the graphic around; the registration point will remain stationary. When finished, click the “Back” button in the Control window. In this example, the symbol has been moved to the left, which has the effect of shifting the registration point to the right on the symbol.
Illustrator automatically uses the registration grid’s settings on a symbol, but you can turn this off. Say that you want to set the registration point to the left side of a symbol for Flash purposes, but while in Illustrator you do not want to use the grid. With the symbol selected, click on “Transform” in the Control window. Then click on the drop-down menu in the upper-right corner of the Transform panel. From this menu, select “Use Registration Point for Symbol.” With it deselected, this setting is now off.

9-Slice Scaling Edits
You can select 9-Slice Scaling for a symbol, either when you first create it or later through the Symbol options.

You can also edit the 9-Slice Scaling grid on a symbol when in “Edit (Isolation) Mode.” Double-click the symbol on the artboard to enter “Edit (Isolation) Mode.” Then hover the Selection tool over any of the gridlines until it changes to the move cursor.

Sub-Layers for Symbols
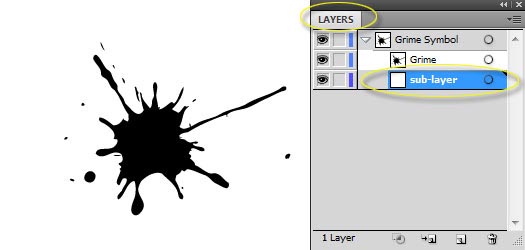
In CS5, you can now create sub-layers for symbols. The reason this is possible is that CS5 has given symbols an independent layer hierarchy, even when you expand symbols. Also, the “Paste Remember Layers” setting works when pasting objects in the symbol’s Edit Mode.
3. Symbolism Tools
One of the best aspects of symbols in Illustrator is the Symbol tools (referred to as “Symbolism Tools” by Adobe). Using symbol sets and the tools available, designing even the most detailed graphics is quick and easy.
Symbol Sets
Although you can use the Symbolism tools in a single symbol’s instance, they really shine when you use them with symbol sets. A symbol set is a group of symbol instances, often sprayed onto the artboard using the Symbol Sprayer tool. To select an entire set, just click on that symbol’s icon in your panel, or click on more than one symbol icon to select more than one symbol set.
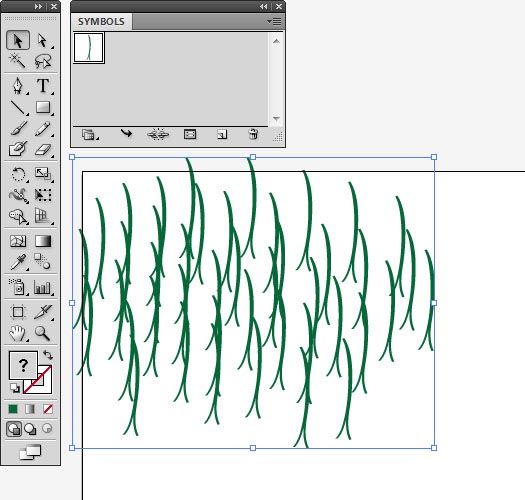
In this example, a symbol has been sprayed onto the artboard. To select the set, simply use the Selection tool, and click on any of the symbols.
Symbol Sprayer Tool
With the Symbol Sprayer tool, you can add single instances, add single or multiple sets of instances, and delete individual or sets of symbol instances. To spray symbol instances onto the artboard, select the symbol from the panel, select the Symbol Sprayer tool from the toolbar, and click to add one instance at a time, or drag to spray several at a time.
To delete symbols from the artboard, hold down Alt or Option while clicking or dragging on the instances that you want to remove.

Symbol Shifter Tool
To move entire sets of symbols, use the Symbol Shifter tool. Just select the set or individual symbol instances that you want to shift, and with the Symbol Shifter tool selected, drag the instances in any direction on the board. You can also change the stacking order of symbols with this tool. Simply hold down Shift while clicking on an instance or a set to move it forward. Hold down Alt/Option + Shift while clicking on an instance or set to move it backward.

Symbol Scruncher Tool
The Scruncher tool is helpful for when you want to adjust the space between symbols in a set. To move symbol instances closer together, select the Symbol Scruncher tool, and click or drag in the areas between symbols. To push symbols apart, hold down Alt/Option while clicking or dragging between symbols.
Symbol Sizer Tool
Quickly resize entire sets of symbols by selecting the Symbol Sizer tool and then clicking or dragging on the symbols in the set that you want to resize. Keep in mind that only those symbols within the brush’s dimensions will change size. To decrease in size, hold down Alt/Option while clicking or dragging on symbol instances.
Hold down Shift while clicking or dragging the tool over several symbols in the set to preserve their density. You have to be careful with this shortcut, though. If you are enlarging symbols and hold down Shift, they will often be deleted to keep the density the same. But if you are downsizing symbols and use the Shift key, more symbols of the same size will be added to the set.
Symbol Spinner Tool
Another way to create variety in a symbol set made up of the same symbols is to select the Symbol Spinner tool and rotate the symbols in different directions. Click on a group of symbols and drag and rotate the cursor to turn the symbols in different directions.
Keep in mind that, just as when using the Rotate tool on symbol instances, with the Symbol Spinner tool, instances in a set will rotate based on the registration grid settings. So, if you’ve selected the upper-right corner of the registration grid when creating symbols, then your symbols will “lock” on the upper-right corner and rotate around that locked position.
Symbol Stainer Tool
This is an incredible tool for creating a naturally random color variety within a symbol set. It uses both the color’s hue and luminosity to “stain” symbol instances. Therefore, both black symbols (low luminosity) and white symbols (high luminosity) do not change at all; the higher or lower the luminosity, the less drastic the change in color.
First, you will need to select a staining color from the Color panel. With the Symbol Stainer tool selected, click or drag across the symbol instances that you want to colorize. If you want to reverse the stain effect, hold down Alt/Option and click or drag across symbols.

With the Stainer tool, the longer you hold it over a symbol set, the greater the amount of tint change. But if you want the same amount of tint no matter how much you drag the tool across a symbol set, hold down Shift. This works well when you want to change an entire set to a new shade without much variation.
Symbol Screener Tool
To change the transparency of symbol instances, select the Symbol Screener tool and click or drag across symbols. Hold down Alt/Option to reverse the transparency effect.

In this example, we have duplicated the Symbol layer several times and used the Symbol Stainer tool to add color depth. The Symbol Screen tool allows us to tone down the effect.
2. Advanced Symbol Use
Symbols can be edited several ways. In fact, CS5 now offers more editing options than previous versions of Illustrator, including 9-Slice Scaling (see below) and much more.
Control Window
One way to edit symbols is with the options in the Control window, located along the top (or bottom, depending on how you have arranged your Illustrator window) of your artboard. Simply click on the symbol that you want to edit, and you will notice that many of the Control window options for symbols are similar to the options for other objects, such as “Opacity,” “Recolor Artwork,” “Transform” and “Align to Selection.” You might also notice that you can break links and replace symbols from this menu.

The Control window’s options change depending on what type of graphic is selected, so some of these options are available to normal graphics, while others are exclusive to symbols.
To undo transformations, just select the symbol on the artboard and click “Reset” on the Control window; or choose “Reset Transformation” from the drop-down menu in the Symbols panel; or simply right-click on the symbol’s instance on the artboard and choose “Reset Transformation” from the context menu.

Editing as a Graphic
To edit a symbol with your primary editing tools just as you would any other graphic, click on a symbol in the panel (or, to be safe, duplicate the symbol and then edit the duplication), and select “Edit Symbol” in the drop-down menu. (Alternatively, double-click on the symbol in the panel.) You will now be able to modify the symbol in your panel as well as any instances on your artboard.
To modify only the instance(s) on your artboard and not the symbol in your panel, select the instance(s) on the artboard and break the link first. The instance will now be regular artwork that you can edit using any tool in the Tool menu.
You can always turn your edited graphic back into a new symbol by selecting the graphic and clicking “New Symbol” in the symbol’s palette.
To break links to all symbol instances at once, select the symbol’s icon in the Symbols panel, then choose “Select All Instances” from the drop-down menu.
You can also edit all symbol instances along with the symbol in the panel. Simply double-click the symbol on the artboard; or select the instance and click the “Edit Symbol” button in the Control window; or select “Edit Symbol” from the fly-out menu. An alert dialog box will appear, warning you that you are about to edit the symbol and that any changes will be made to all instances of that symbol.
You can choose “OK” or “Cancel.” This means what it says: all instances and the symbol in the panel will be changed according to the edits you make while in this “Isolation Mode.” Check the “Don’t Show Again” checkbox to prevent this warning from appearing again.
To exit the Edit Symbol mode, click on the “Back” arrow in the edit bar at the top of the artboard, or hit the “Escape” key. You can also right-click on the instance that you are editing and choose “Exit Isolation Mode.”
Registration Point Edits
In CS5, editing the registration point of symbols is possible. For those of you familiar with Flash, no more explanation is needed. For those who know nothing of Flash, the registration point basically allows you to select where to place the anchor point, which determines how a symbol will be placed within a screen coordinate.
One time when the registration grid makes a difference in Illustrator is when rotating symbols. If your registration is set to the upper-right corner of your symbol, then the symbol will rotate around that corner. You can see the location of the registration point simply by selecting the symbol on the artboard using the Selection tool. It looks like a small crosshair.

You can set the registration point by selecting a point on the registration grid when you create a new symbol. In the example below, the registration is set to the bottom-left corner. The default is centered. Just click the “New Symbol” button, and the Symbol options dialog box will pop up.
To edit the registration point or to fine tune the location, simply double-click the symbol on the artboard, and you will enter Isolation Mode. Move the graphic around; the registration point will remain stationary. When finished, click the “Back” button in the Control window. In this example, the symbol has been moved to the left, which has the effect of shifting the registration point to the right on the symbol.
Illustrator automatically uses the registration grid’s settings on a symbol, but you can turn this off. Say that you want to set the registration point to the left side of a symbol for Flash purposes, but while in Illustrator you do not want to use the grid. With the symbol selected, click on “Transform” in the Control window. Then click on the drop-down menu in the upper-right corner of the Transform panel. From this menu, select “Use Registration Point for Symbol.” With it deselected, this setting is now off.

9-Slice Scaling Edits
You can select 9-Slice Scaling for a symbol, either when you first create it or later through the Symbol options.

You can also edit the 9-Slice Scaling grid on a symbol when in “Edit (Isolation) Mode.” Double-click the symbol on the artboard to enter “Edit (Isolation) Mode.” Then hover the Selection tool over any of the gridlines until it changes to the move cursor.

Sub-Layers for Symbols
In CS5, you can now create sub-layers for symbols. The reason this is possible is that CS5 has given symbols an independent layer hierarchy, even when you expand symbols. Also, the “Paste Remember Layers” setting works when pasting objects in the symbol’s Edit Mode.
3. Symbolism Tools
One of the best aspects of symbols in Illustrator is the Symbol tools (referred to as “Symbolism Tools” by Adobe). Using symbol sets and the tools available, designing even the most detailed graphics is quick and easy.
Symbol Sets
Although you can use the Symbolism tools in a single symbol’s instance, they really shine when you use them with symbol sets. A symbol set is a group of symbol instances, often sprayed onto the artboard using the Symbol Sprayer tool. To select an entire set, just click on that symbol’s icon in your panel, or click on more than one symbol icon to select more than one symbol set.

In this example, a symbol has been sprayed onto the artboard. To select the set, simply use the Selection tool, and click on any of the symbols.
Symbol Sprayer Tool
With the Symbol Sprayer tool, you can add single instances, add single or multiple sets of instances, and delete individual or sets of symbol instances. To spray symbol instances onto the artboard, select the symbol from the panel, select the Symbol Sprayer tool from the toolbar, and click to add one instance at a time, or drag to spray several at a time.
To delete symbols from the artboard, hold down Alt or Option while clicking or dragging on the instances that you want to remove.

Symbol Shifter Tool
To move entire sets of symbols, use the Symbol Shifter tool. Just select the set or individual symbol instances that you want to shift, and with the Symbol Shifter tool selected, drag the instances in any direction on the board. You can also change the stacking order of symbols with this tool. Simply hold down Shift while clicking on an instance or a set to move it forward. Hold down Alt/Option + Shift while clicking on an instance or set to move it backward.

Symbol Scruncher Tool
The Scruncher tool is helpful for when you want to adjust the space between symbols in a set. To move symbol instances closer together, select the Symbol Scruncher tool, and click or drag in the areas between symbols. To push symbols apart, hold down Alt/Option while clicking or dragging between symbols.
Symbol Sizer Tool
Quickly resize entire sets of symbols by selecting the Symbol Sizer tool and then clicking or dragging on the symbols in the set that you want to resize. Keep in mind that only those symbols within the brush’s dimensions will change size. To decrease in size, hold down Alt/Option while clicking or dragging on symbol instances.
Hold down Shift while clicking or dragging the tool over several symbols in the set to preserve their density. You have to be careful with this shortcut, though. If you are enlarging symbols and hold down Shift, they will often be deleted to keep the density the same. But if you are downsizing symbols and use the Shift key, more symbols of the same size will be added to the set.
Symbol Spinner Tool
Another way to create variety in a symbol set made up of the same symbols is to select the Symbol Spinner tool and rotate the symbols in different directions. Click on a group of symbols and drag and rotate the cursor to turn the symbols in different directions.
Keep in mind that, just as when using the Rotate tool on symbol instances, with the Symbol Spinner tool, instances in a set will rotate based on the registration grid settings. So, if you’ve selected the upper-right corner of the registration grid when creating symbols, then your symbols will “lock” on the upper-right corner and rotate around that locked position.
Symbol Stainer Tool
This is an incredible tool for creating a naturally random color variety within a symbol set. It uses both the color’s hue and luminosity to “stain” symbol instances. Therefore, both black symbols (low luminosity) and white symbols (high luminosity) do not change at all; the higher or lower the luminosity, the less drastic the change in color.
First, you will need to select a staining color from the Color panel. With the Symbol Stainer tool selected, click or drag across the symbol instances that you want to colorize. If you want to reverse the stain effect, hold down Alt/Option and click or drag across symbols.

With the Stainer tool, the longer you hold it over a symbol set, the greater the amount of tint change. But if you want the same amount of tint no matter how much you drag the tool across a symbol set, hold down Shift. This works well when you want to change an entire set to a new shade without much variation.
Symbol Screener Tool
To change the transparency of symbol instances, select the Symbol Screener tool and click or drag across symbols. Hold down Alt/Option to reverse the transparency effect.

In this example, we have duplicated the Symbol layer several times and used the Symbol Stainer tool to add color depth. The Symbol Screen tool allows us to tone down the effect.
Symbol Styler Tool
The Symbol Styler tool allows you to add or remove graphic styles from symbol instances. First, select the Symbol Styler tool (if you select a graphic style first, then Illustrator will apply the graphic style to the entire selected symbol set). Then choose a graphic style from the Graphic Styles panel by going to Window → Graphic Styles, and click or drag across symbol instances for a gradual increase in a graphic style.
Hold down Alt/Option while clicking or dragging to reverse the style effect. Keep in mind that if you want to keep the graphic style changes the same throughout the symbol set, hold down Shift while using the Symbol Styler tool.

Here, we’ve opened a standard Graphics Style library called Illuminate Styles, by going to Windows → Graphic Styles Library → Illuminate Styles.
4. Symbolism Tools Advanced Options
To access the Symbolism tool’s options, double-click on any of the tools. It doesn’t matter which tool you double-click, because all of them can be accessed from the Options dialog box.
Options Available to All Symbolism Tools
At the top of the dialog box are options that stay the same, no matter which tool is selected. Some are fairly self-explanatory. “Diameter” determines the brush size. “Intensity” sets the change rate. “Symbol Set Density” sets the amount of symbols placed within a given area based on a formula; the higher the number, the denser the symbols will be.
“Method” (not available for all tools) adjusts the symbol’s instances: “User Defined” allows a gradual adjustment, determined by the location of the cursor; “Random” adjusts the symbols at a random rate; and “Average” smoothens the symbols gradually. Select “Show Brush Size and Intensity” to see these options while using the tools.
Click on each of the tool icons within the options dialog box to see individual adjustments and shortcuts. Not all of the tools have adjustments, and not all have shortcuts.
Symbol Sprayer Options
The Symbol Sprayer tool contains the most options. All six options contain two choices: “User Defined” and “Average.” If you already have symbol instances in place, the “Average” setting allows the sprayer to spray according to the settings of instances within the brush’s area. For example, with “Average” as the setting, spraying next to instances with variegated sizes will cause your symbol’s instances to spray in variegated sizes, depending on which ones fall within the brush’s radius.
“User Defined” means that the sprayer will place symbols using preset settings:
- “Scrunch”: The density based on the size of the original symbol.
- “Size”: Once again, based on the original symbol size.
- “Spin”: Symbols will orient themselves based on the movement of the mouse.
- “Screen”: 100% opacity automatically.
- “Stain”: A full amount of tint and the current color of the symbol.
- “Style”: This is determined by the current style of the symbol.
Symbol Sizer Options
The Symbol Sizer options include only two choices. When the “Proportional Resizing” checkbox is selected, the symbol instance’s size will remain uniform when resizing. When “Resizing Affects Density” is selected, the symbol’s instances will move further away when enlarged and closer together when shrunk.

5. Make Symbols Your Best Friend
If you plan to create illustrations that repeat a lot of graphics, such as trees, grass, flowers, floating shapes and swirls, to name a few, then symbols should become your best friend in Illustrator. Rather than just copying and pasting a graphic that you have created, you can use a symbol to quickly spray hundreds to millions of copies on your artboard and make changes to them in a matter of minutes. Even if you have used symbols before, taking the time to really play around with them and maybe even following some tutorials will help you grasp this gem of an Illustrator tool.
More Resources
- “Learn Illustrator CS5: Working with Symbols More Easily” This video shows a few examples of how useful the registration grid and 9-Slice Scaling can be in Illustrator CS5.
- “Using Adobe Illustrator CS5: Symbols” This PDF help document is an excellent resource to bookmark for basic how-to questions on anything in Illustrator CS5, including Symbols.
- “Illustrator Symbol Sprayer: Use and Hints and Tips Tutorial” Learn how to use the Symbol Sprayer in this basic video on Illustrator CS5. The video includes an overview of the other Symbolism tools as well.
- “How to Use the Symbol Tool in Illustrator” See how to use symbols to add leaves to a tree in Illustrator. This video is full of hints and tips on working with the Symbolism tools.
(al) (il)


